
How To Add a Buy Now Button on WordPress? (Easy Steps)


Table of Content
Download Paymattic – it’s Free!

Subscribe To Get
WordPress Guides, Tips, and Tutorials
We will never spam you. We will only send you product updates and tips.
Takeaways:
You don’t need a full eCommerce setup or hours of work to add a Buy Now button on WordPress. With Paymattic, you can create and publish a working Buy Now button in just a few minutes. Simply set up your form, customize the button, and start accepting payments right away.
Steps to add a Buy Now button with Paymattic:
1. Install and activate Paymattic
2. Set up a buy now button
3. Integrate payment gateway
4. Style your buy now button
5. Embed button on your website
Online sales mostly depend on how your e-commerce store looks to the audience. Most importantly, the appearance and responsiveness of the ‘Buy Now’ buttons matter more. If the buy now buttons don’t attract your customers and are not responsive to all devices, then there is a risk of losing your customers.
If you’re selling products, services, or even digital downloads, having a quick way for customers to pay without extra clicks is a game-changer to increase sales rates. Instead of sending them through a lengthy checkout process, a Buy Now button eliminates the extra step and takes them directly to the payment page.
In this blog, we’ll walk you through how to create a Buy Now button on WordPress. Additionally, we will demonstrate how to achieve this without a heavy eCommerce plugin, using just a few easy steps, and you’ll have your button ready to go.
Buy now buttons – at a glance
The “Buy Now” buttons are typically used in e-commerce stores to enable customers to proceed to the checkout process and complete a payment for the selected product they have chosen. The primary purpose of this button is to directly bring customers to the payment pages and avoid extra buying hassle.
For example: Imagine you’re browsing an online shop and find something you like. Instead of adding it to a cart and going through multiple pages, you click a single button that instantly takes you to the payment page, that’s exactly what a “Buy Now” button does.
Can you add a payment button to WordPress website?
Yes, you definitely can!
WordPress makes it super easy to add a payment button with the help of plugins. WordPress payment plugins let you integrate payment gateways like Stripe, PayPal, and Square with the payment button to complete the purchase successfully.
WordPress is loaded with many payment plugins. But today, we will introduce you to the no-code solution Paymattic, which lets you enjoy the unlimited pro features and functionalities without breaking your bank account.
Why use Paymattic for creating a buy now button?
Here’s why Paymattic is a solid choice when it comes to creating Buy Now buttons on WordPress:
Lightweight and simple: Paymattic isn’t like a heavy eCommerce plugin, so it won’t clutter your website or slow it down. You can add a Buy Now button quickly without going through complex setups.
Beginner-friendly: Even if you’re completely new to WordPress or online payments, Paymattic keeps things simple. The dashboard is clean, and creating a Buy Now button takes just a few clicks.
Multiple payment gateways: It allows you to collect payments worldwide and supports all the popular gateways like Stripe, PayPal, Mollie, Paystack, Razorpay, and more. This means your customers can pay using the method they trust most, and that is available in their country.
No extra add-ons required: Unlike other plugins that make you purchase separate extensions for every little feature, Paymattic gives you everything in one pack. That saves you money and also keeps things much easier to manage.
Works for one-time & recurring payments: Whether you’re selling a single product, collecting donations, or running subscription-based services, Paymattic has you covered. You can set up both one-time and recurring payments with the same button.
Easy customization: Your Buy Now button doesn’t have to look boring. With Paymattic, you can customize the button text, size, and color to match your website’s style, and you don’t need to touch a single line of code.
For advanced customization, you can use custom CSS to style your payment button.
Subscribe Newsletter
Subscribe to our newsletter for updates, exclusive offers, and news you won’t miss!

Paymattic the best WordPress payment plugin
Paymattic is a powerful WordPress payment and donation plugin built for small businesses, nonprofits, and individuals. It supports 14+ payment gateways including Stripe, PayPal, and Square, and makes one-time, recurring, and subscription payments simple, all without any coding.
With easy customization and built-in templates, you can create payment or donation forms in minutes. Whether you’re selling products, offering services, or raising funds, Paymattic helps you collect payments securely and manage everything from one place.
Key features of Paymattic include:
- 14 global payment gateways covering the whole world.
- Supports 157+ currencies.
- Supports both one-time and recurring payments.
- Offers a detailed customer dashboard to manage subscriptions.
- Offers a detailed report dashboard.
- Integrates with major tools.
- Offers a built-in drag-and-drop form builder with 35+ custom input fields.
- PCI-DSS compliance and built with security best practices.
- Advanced fraud protection with Honeypot, ReCAPTCHA V2 and V3, and Cloudflare Turnstile.
- Offers hooks, filters, and extensive documentation for custom development.
Ready to get started?
Experience WordPress payment and donation like never before. Try Paymattic now!
Tutorial: Steps to add a buy now button on WordPress with Paymattic
In this section, we will show you how to add a ‘Buy Now’ button on WordPress with Paymattic. Here are the steps to follow:
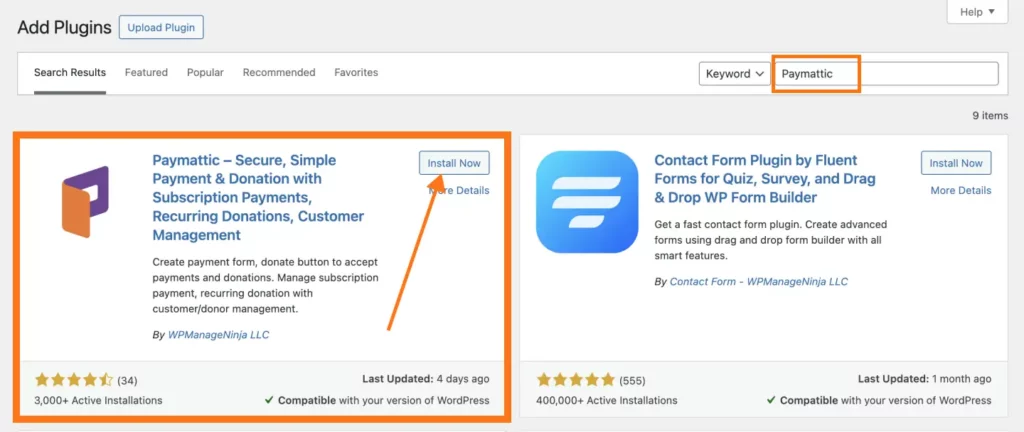
Step 1: Install and activate Paymattic
First, to get started, you have to install and activate Paymattic on your WordPress dashboard. Once you activate the free version, you can upgrade it to the pro version to enjoy advanced functionality.
Step 2: Set up a buy now button
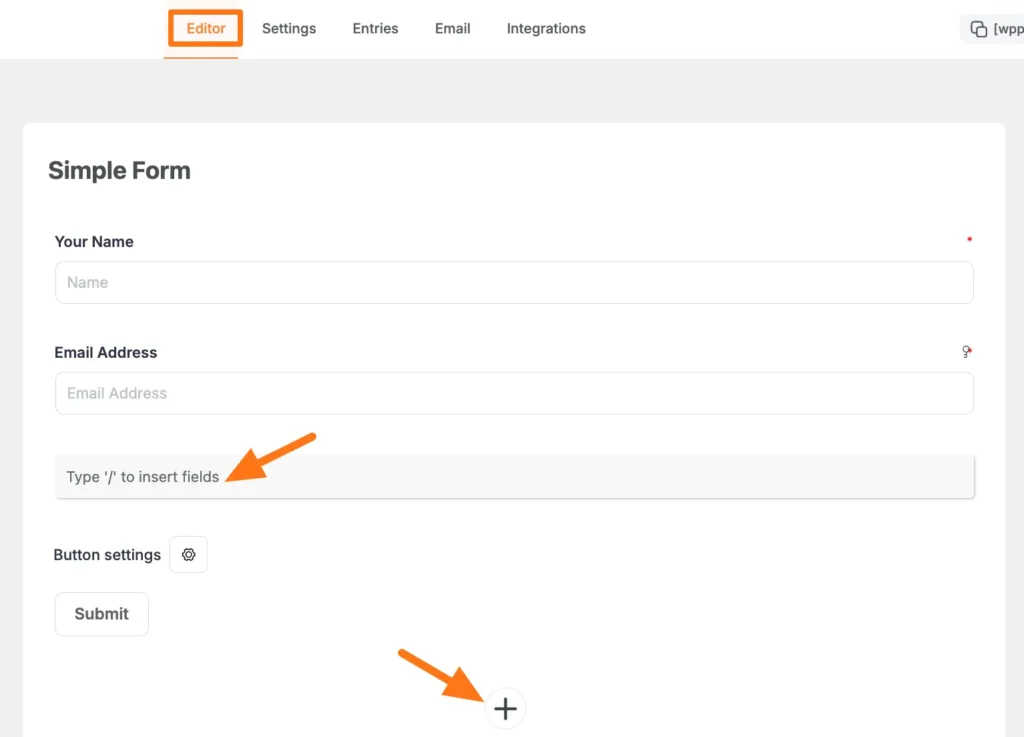
Paymattic allows you to add a ‘Buy Now’ button while displaying your products. Let me show you the processes. First, you have to create a form, To do this:
- Go to Paymattic > Add new Forms.
- Then, click on Blank Form.
- Then choose the information fields to collect data from the customers ( Suppose name, email, phone number, or address fields). Click on the (+) icon to explore all available fields.
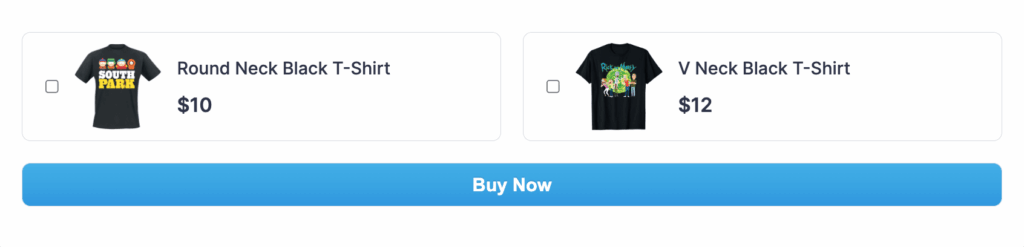
- In the next step, select the Payment Item fields.
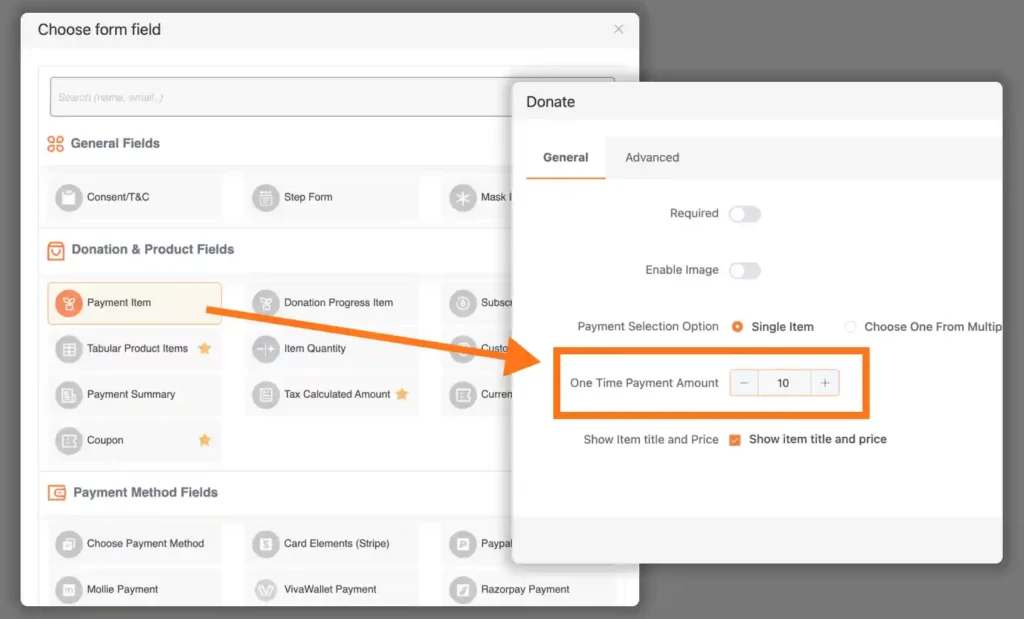
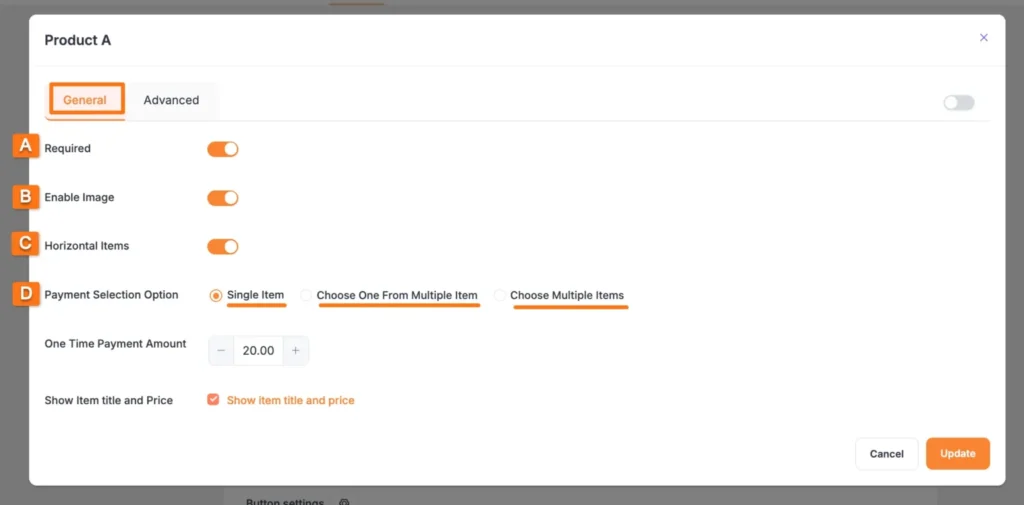
- Now you can customize the payment item field, you can select whether you want to provide an option to show Single Item, Choose One From Multiple Item, or Choose Multiple Items.
- If you want to show image/s in your form. You can simply add image/s by clicking the Plus Icon tab option under Upload Image
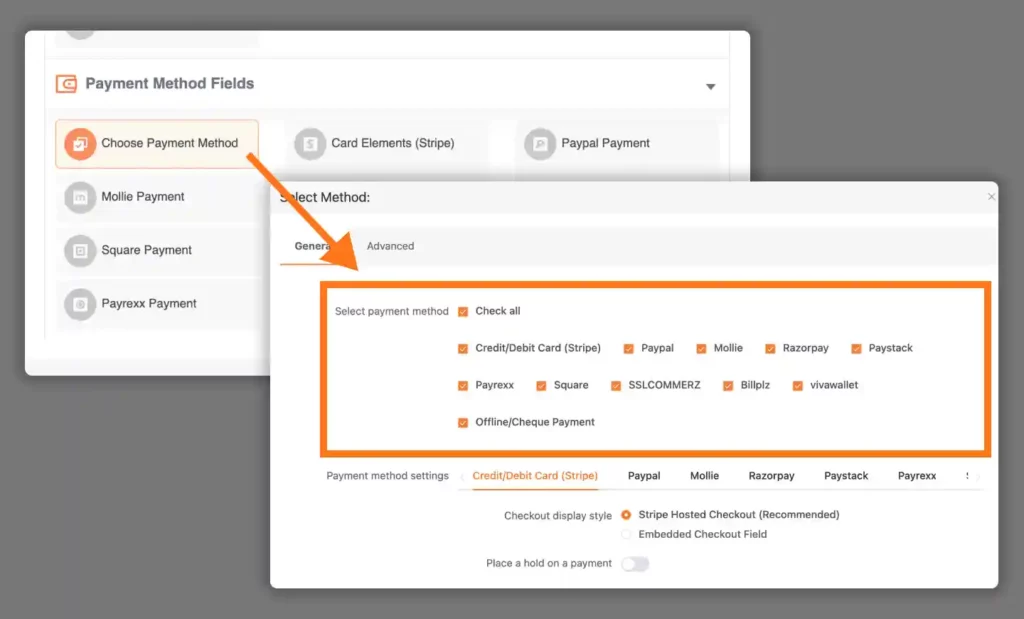
Step 3: Integrate payment gateways
Now, it’s time to offer your customers options for paying for your products or services. With Paymattic, you can select any available payment option or add all of them. For this blog, we are showing the way to add all available payment method fields. To do this,
- Go to the “Choose Payment Method” field and click on “Check all” box, all payment gateways will be selected for this form.” Then, click the Save button.
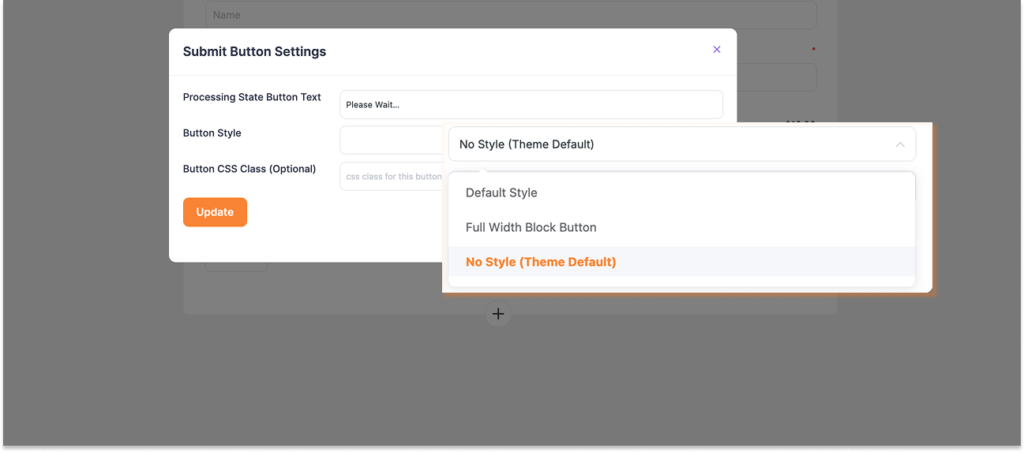
Step 4: Style your buy now button
Paymattic allows you to rename the submit button as you wish. I have changed it to a ‘Buy Now’.
Here you will find three options available to style your buttons.
Default Style: If you want to keep it as it is.
Full-width Block Button: Stretches across the section for maximum visibility, perfect for landing pages or mobile screens.
No Style (Theme Default): If you want your Buy Now button to automatically match the design of your WordPress theme, go with this option.
Paymattic comes with a Custom CSS/JS feature that lets you add your own styles or scripts to any specific form. This means, you can apply custom CSS to change the appearance of your Buy Now button, from adjusting its size to giving it a color that blends perfectly with your website design.
Step 5: Embed buy now button on your website
Now, you might be wondering, how do you embed a Buy Now button on WordPress? Let me walk you through the steps.
Here’s what to do:
- Go to your WordPress dashboard and create a new page or post.
- Open the Paymattic plugin and copy the Shortcode of the Buy Now form you just created.
- Paste that Shortcode into your page or post where you want the button to appear.
- Hit Publish, and you’re all set!
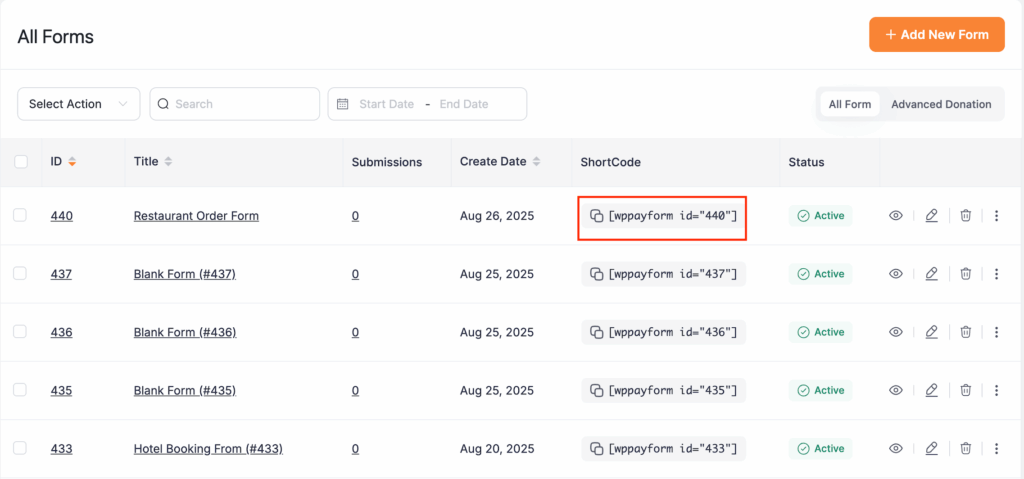
That’s it, your Buy Now button is now live and ready to accept payments.
How to add PayPal buy now buttons to your website?
While researching the topic of adding buy buttons to websites, I found common queries on how to integrate PayPal’ Buy Now’ buttons on websites.
The process of adding the PayPal’ Buy Now’ button with Paymattic is the same as we explained before. The difference is that here you have to choose only PayPal as a payment method to collect payments for your products.
If you want to add a buy now button for any other payment gateway, the process is the same.
Ready to add buy now buttons and boost sales?
At the end of the day, you want to grow your sales, and your customers want a quick, hassle-free way to purchase. That’s exactly where a Buy Now button does the magic, it shortens the process and makes checkout super easy.
We’ve already walked you through how to create a simple yet effective Buy Now button using Paymattic. Hopefully, this guide helps you set it up on your site and start converting more visitors into customers.
Got any questions? Feel free to reach out. We’ll be more than happy to help!
Frequently asked questions
Here are some frequently asked questions on “how to add buy now button on your website”.
1. Do I need WooCommerce to add a Buy Now button on WordPress?
No, you don’t!
If you only want a simple Buy Now button without the complexity of WooCommerce, you can use Paymattic to create and embed one in just a few clicks.
2. Can I create multiple Buy Now buttons for different products?
Yes. With Paymattic, you can create separate payment forms for each product or service and generate unique Buy Now buttons for them.
3. Is Paymattic free, or do I need the Pro version?
Paymattic offers both free and Pro versions. You can create a basic Buy Now button with the free plan, but the Pro version unlocks advanced features like multiple gateways, recurring payments, and extra styling options.
4. How do I add the Buy Now button to my website pages?
It’s super simple. Just copy the shortcode of your Buy Now form from Paymattic and paste it into any page, or post.
5. Can I customize the look of my Buy Now button?
Definitely. Paymattic gives you button styling options like default, full-width, or theme-based buttons. Plus, you can add custom CSS to match your brand colors and design.
Join the thousands already enjoying Paymattic Pro!

Madhobi
This is Madhobi, a content writer at WPManageNinja with expertise in technical writing and email marketing. Outside of work, she likes traveling and exploring new places.


Leave a Reply