How to Add Custom CSS and JS to WordPress Donation Form
Table of Content
Download Paymattic – it’s Free!

Subscribe To Get
WordPress Guides, Tips, and Tutorials
We will never spam you. We will only send you product updates and tips.
You have built a donation website in WordPress, and now you may want to tweak the design of your WordPress donation form. Probably, you want the form background a little bit darker or in a different color that matches your website theme.
The default design of your WordPress website may limit you from customizing your donation form. So, you can go beyond the default design of your WordPress donation website and style your WordPress donation form as you want by adding custom CSS and JS. Today, this blog will show you how to add custom CSS and JS to the WordPress donation form.
What is custom CSS?
Basically, CSS is a popular web language for styling webpage elements. It stands for Cascading Style Sheets. It works with the HTML elements in a webpage. CSS and HTML go hand-in-hand, where HTML lays the structure of a webpage and CSS helps to modify its appearance.
To give you a clear idea, I am going to step back a little and start with what HTML is. HTML is known as Hypertext Markup Language that primarily creates your WordPress website. It indicates your web browser about several contents of your webpage. For example, It tells the browser which text is the webpage header and which text is the body paragraph of your WordPress website.
Your WordPress donation form is an HTML element and you can do the basic styling of your donation form using HTML, but it has certain limitations. So, here you can use custom CSS to describe how your WordPress fundraising form will appear, including the size, color, font, position etc.
To style your WordPress donation form using the custom CSS in WordPress, we suggest you know the basics of HTML and CSS. You can try these online web tutorials to learn more about HTML and CSS.
What is JavaScript?
JavaScript is mainly a programming language that makes a webpage more interactive and creates dynamic websites. It is a lightweight scripting language that developers love to use besides HTML and CSS.
You can write custom JavaScript or jQuery for your WordPress fundraising form. It enables you to style your form as you want and you can also change the interaction of your online donation form.
If you want to set custom logic on your form based on front-end interaction, you can do it using custom JS in your form. I will show you step-by-step how to add custom JS in your WordPress form.
Paymattic WordPress donation plugin
Paymattic is the ultimate donation plugin for your fundraising website. You can create and design custom donation forms using Paymattic. This WordPress fundraising plugin lets you add custom CSS and JS to the individual donation form. It means you can do different styling for each of your forms with a single plugin.
Isn’t it so cool?
This amazing plugin comes with 13 types of payment gateway integration, including Stripe, PayPal, Mollie, Razorpay, Billplz, Paystack, Payrexx and many more! Other notable features of Paymattic are –
- Subscription payments
- 13 payment gateways integration
- Donation progress item with progress bar
- 70+ pre-built form templates
- Custom donation amount
- Customizable image upload
- Integrations with LMS platforms
- Individual customer profile
- 135+ currencies support
- Form import-export
- Detailed reporting and analytics
Paymattic is a freemium WordPress plugin. You can avail all the basic features such as custom payment and donation form, Stripe payment gateway integration, FluentCRM, MailChimp, Slack and Zapier integration with the free version. Upgrade to the pro version to access all the premium features such as pre-built donation templates, LMS integration, Twilio and Telegram integration, advanced form fields, multiple payment gateways integration as well as custom CSS and JS.
Add custom CSS and JS to WordPress donation form
It’s so simple to use additional CSS and JS to WordPress with a plugin. Install and activate the Paymattic Pro WordPress plugin to create your online donation form. Once you build your online donation form, you will find the Form Settings tab with the individual forms.
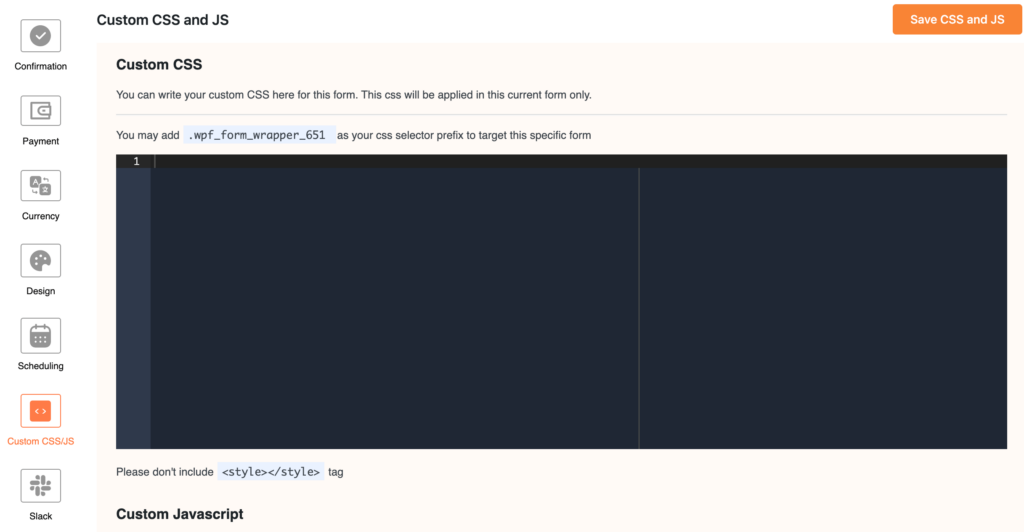
Go to Paymattic > All Forms and click on the Settings link below the form name to access the Form Settings tab. Here, you can see the custom CSS/JS panel at the left sidebar.

Custom CSS
You can write or edit custom CSS in this panel to target the specific form. You may add .wpf_form_wrapper_[form ID] as your CSS selector prefix to target a specific form. Replace the [form ID] part of the CSS selector with the ID number of your form. You can get your form ID in the shortcode of a specific form. For example, if your form ID is 342 then the CSS selector for this form will be .wpf_form_wrapper_342. You do not need to add any <style> tag in the CSS editor panel. But sometimes you may need to type !important to override the default style.
You can define Field Wrapper CSS Class and Input Element CSS Class for individual fields in Paymattic. To do so, click on the advanced tab while you configure the form fields in the Form Editor.
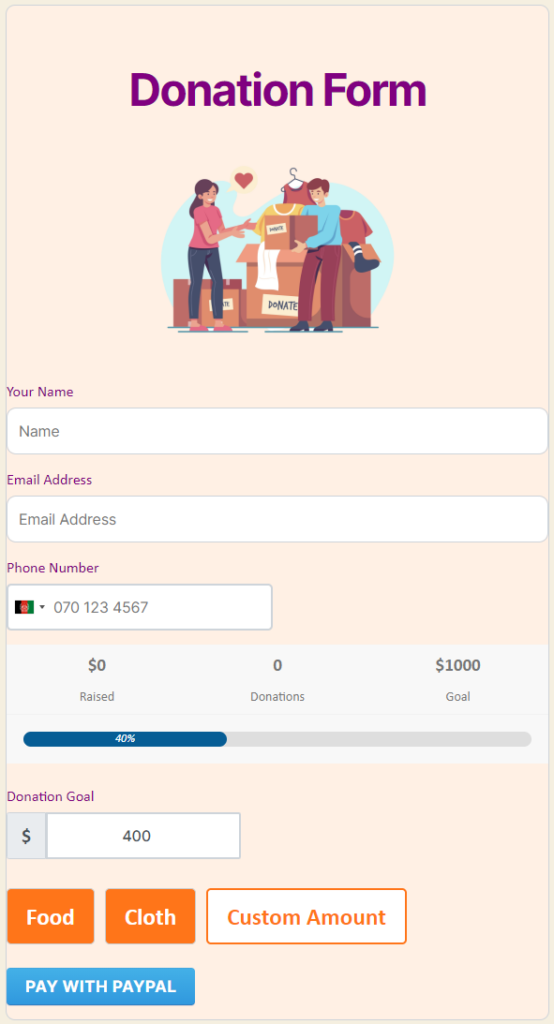
For demonstration purposes, I am adding the following custom CSS to an online donation form and you can view how it changed the styling of the form.
.wpf_form_wrapper_342 {

    background-color: #fff0e4;
    border: 1px solid #ced4da;
    border-radius: 10px;
    font-family: calibri;
    color: purple;
   }

.wpf_form_wrapper_342 #wpf_input_342_customer_name {

 padding: 6px 12px;  /*change padding*/
    background-color: #fff; /*change background color*/
    border: 1px solid #ced4da; /*change border width and color*/
    border-radius: 10px; /*change corner round/ border radius*/
    }

.wpf_form_wrapper_342 #wpf_input_342_customer_email {

    padding: 6px 12px;  /*change padding*/
    background-color: #fff; /*change background color*/
    border: 1px solid #ced4da; /*change border width and color*/
    border-radius: 10px;
}

.wpf_form_wrapper_342 .wpf_html_content_wrapper {
    padding : 0;
}

 .wpf_form_wrapper_342 .wpf_preview_body{
     width: 600px;
 }
These custom CSS designed the existing form like below.

Custom JS
You can notice the custom JS editor panel right below the CSS editor panel. You will write your custom JavaScript in this custom JS editor panel. You have to provide valid JavaScript code to make these changes happen. Your additional JS code will run after the user initiates the form.
For example, I am writing the below custom JavaScript code to set a logic for a donation form. These code will effect the form interaction and set up the logic that, when a donor pay more than $50, he will get a notification message “Congratulation! Now you are our platinum donor member”.
const notification = "Congratulation! Now you are our platinum donor member.";

const quantityHandler = $form.find('.wpf_item_qty');

quantityHandler.parent().append( "<p id='memberNotify'></p>" )
let hasElem = $form.find('#memberNotify');

quantityHandler.on('change', (e) => {
    if ($form.data('payment_total') > 5000) {
        hasElem[0].innerHTML = "<p id='memberNotify' style='color: green;'>" + notification + "</p>";
    } else {
        hasElem[0].innerHTML = "<p id='memberNotify'></p>";
    }

});
The above custom JavaScript has added the following visual interaction in the donation form.
You do not need to add any <script> tag in the JS editor panel. Just write your custom code and save the code clicking on the Save CSS and JS button.
To conclude
As a beginner, it might be a little confusing for you using CSS and JS in WordPress website. But, once you know the basics and learn how to add custom CSS and JS in WordPress you will not have any more trouble.
Luckily, the Paymattic WordPress donation plugin comes with all the basic functionalities to design a classic fundraising form. However, it gives you the opportunity to add custom CSS and JS so that you can use this fantastic plugin without any pause.
Get Paymattic Pro today and start playing with your donation forms using custom CSS and JS.
Wish you all the best!
Join the thousands already enjoying Paymattic Pro!


Leave a Reply