How to Add Coupon Codes on a WordPress Website?
Table of Content
Download Paymattic – it’s Free!

Subscribe To Get
WordPress Guides, Tips, and Tutorials
We will never spam you. We will only send you product updates and tips.
No one wants to miss the chance to save some extra bucks. Though the digital coupon code system coins from the very traditional paper coupon, it’s still so popular among consumers to use a coupon code while shopping.
A coupon discount makes a consumer feel psychologically he is winning. Over 90% of American consumers prefer to use coupons. So, adding a coupon code to your payment form ultimately increases the chance of conversions.
Maybe you are wondering how to add coupon codes on your WordPress website. It’s so simple like a breeze with Paymattic. Today, we will show you step-by-step how to add coupon discount codes for the WordPress website.
What is a coupon code & how it works
A coupon code is a simple code that usually consists of letters and numbers. Shoppers put the code in the checkout form to avail of a discount while they make a purchase. We may call it by many names – promo code, discount code or voucher code.
For example, Paymattic currently uses the PAYMAGIC50 coupon code to provide a 50% discount on its annual individual & agency licenses.
If you are a website owner, first you need to set a coupon code on your payment form. Promote the code through various marketing channels of your website to entice buyers. Visitors will put the code on the checkout form and a predefined discount will be applied to the final price. You can also share the coupon code with some special buyers through email in case you want to offer discounts for a limited audience.
Subscribe Newsletter
Subscribe to our newsletter for updates, exclusive offers, and news you won’t miss!

Paymattic for coupon code payment in WordPress
Meet Paymattic. An unparalleled plugin in the WordPress donation and payment sphere. It lets you play with some fantastic donation and payment features on your WordPress website. You can collect donations, online payments, sell products or courses, build beautiful donation & payment forms, add coupon codes on payment forms and many more with this plugin.
It supports 13 payment gateways and integrates with 14 third-party platforms to take your website to another level. Let’s have an eye on some of the powerful features of Paymattic –
- Easy User Interface
- Gutenberg-style advanced editor
- 35+ custom form fields
- Detailed reporting
- Coupon
- Donation progress bar
- Donor profile
- Donation & payment templates
- 135+ currency support
- Import-Export
How to add coupon codes with Paymattic
The coupon code field is one of the smartest features of Paymattic. Paymattic has a full-fledged coupon module. You can add as many coupon codes as you want.
So, let’s jump into the process and learn how to create coupon codes with Paymattic for the WordPress website.
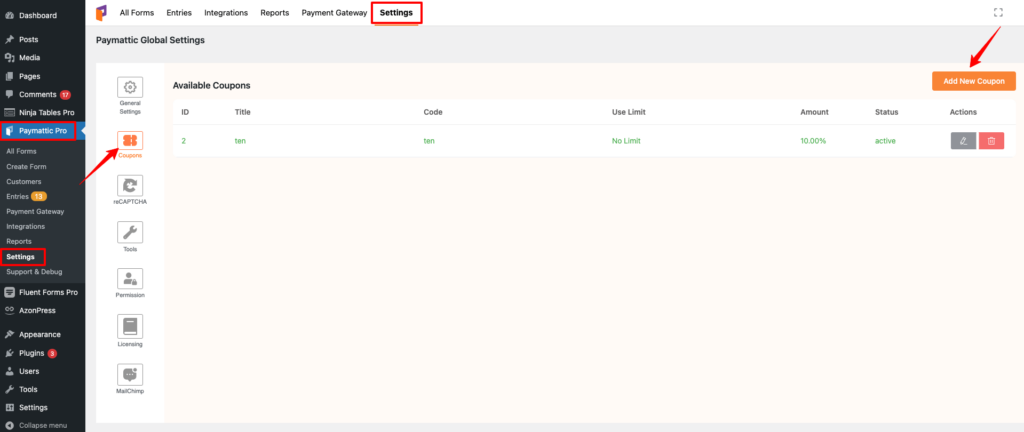
- First of all, go to Paymattic (Pro) → Settings from your WordPress dashboard.
- Next, click on the Coupons tab from the left sidebar.
- Then, press the Add New Coupon button.

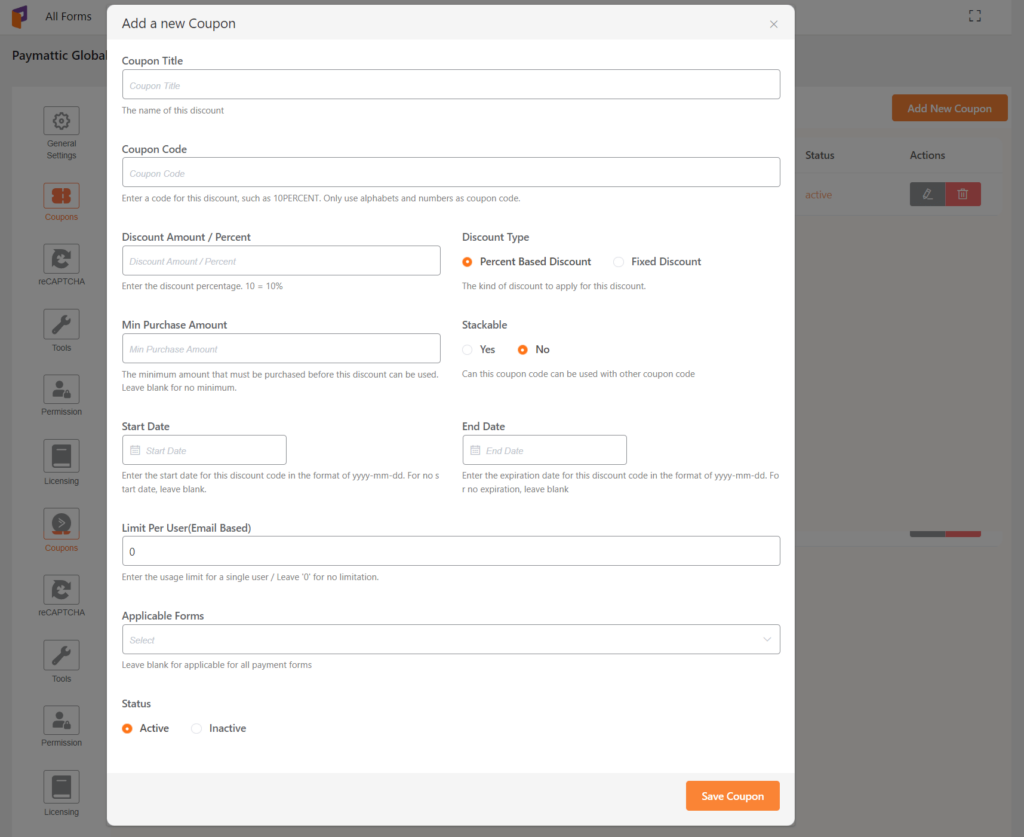
Now, a pop-up window will appear to configure the coupon. Follow the steps to configure the coupon properly.
- Add a title of this coupon in the Coupon Title field so that you can identify when you create multiple coupons.
- Put your coupon code in the Coupon Code box, such as PAYMAGIC50. You can add only letters or numbers as coupon codes.
- You can provide two types of discount – Percent-based discount or Fixed discount.
- Put your discount amount in the Discount Amount / Percent field.
- In the Min, Purchase Amount field specifies the minimum amount that must be purchased to avail of any discount. Leave blank if there is no minimum amount requirement.
- Switch the Stackable option, yes or no, if you want to define if the coupon code can be used with other coupon codes.
- You can schedule the discount offer. Enter the Start date for this coupon code in the format of yyyy-mm-dd. Leave blank if there is no start date.
- Enter the End date for this coupon code in the format of yyyy-mm-dd. Leave blank if there is no end date.
- Limit Per User (Email Based): Set the number of times a specific user can use this coupon. It identifies a unique user based on email address. If you do not want to set any limit simply leave the field empty.
- Select a form in the Applicable Forms option to specify for which form this coupon code is applicable. Leave blank to apply this coupon code for all forms.
You can change the status of the coupon by switching Active or Inactive from the Status field. At last, all you need to click the Save settings button.

So, you have already created your coupon code with Paymattic. Now, it’s time to integrate this coupon code with your payment form. To do so –
- Go to Paymattic (Pro) → All Forms from your WordPress dashboard.
- You can start with a fresh new form or select a form that you already built.
- Click on the Edit button below the form name.
- Add your desired fields to the form.
- After adding all the fields, add the Coupon field under the Donation & Product Fields section.

At last, click on the Save button to save the form.
It’s that simple & easy! So adding a coupon code to your payment form is not rocket science anymore. Even you don’t need to write a single line of code.
To wrap up
Coupon code helps your business grow by attracting new customers. As a bonus, you gain customer loyalty by sharing some special coupon codes.
Try the Paymattic WordPress plugin today and add coupon codes for your WordPress website. If you find this blog interesting subscribe us below for more helpful tips, tricks and product updates.
Good luck!
Join the thousands already enjoying Paymattic Pro!


Leave a Reply