
How to Integrate Razorpay Payment Gateway with Paymattic?
Table of Content
Download Paymattic – it’s Free!

Subscribe To Get
WordPress Guides, Tips, and Tutorials
We will never spam you. We will only send you product updates and tips.
Razorpay is a payment gateway based in India that enables users to accept and disburse payments online while also maintaining a fully functional current account. It works with a wide range of payment methods, including credit card, debit card, netbanking, UPI, and popular wallets such as JioMoney, Mobikwik, Airtel Money, FreeCharge, Ola Money, and PayZapp.
Razorpay – at a glance
The Razorpay payment gateway comes with multiple advantages for its users. Let’s learn about some of the core benefits of Razorpay.
- It accepts all types of payment modes – credit cards, debit cards, EMI, UPI, mobile wallets and net banking
- Flash checkout and global card savings
- Robust and developer-friendly API
- Payment links feature
- Razorpay smart collects feature automate NEFT, RTGS, IMPS payments
- 24/7 customer support
Paymattic WordPress payment and donation plugin
Paymattic is a WordPress payment and donation plugin that can be used to create customizable payment and donation forms online. You can easily integrate Razorpay with Paymattic Pro. It comes both in free and paid version with plenty of amazing features. Some of the key features of Paymattic include-
- Subscription payments
- Donation progress item with progress bar
- 10 payment gateways – Stripe (free), PayPal, Square, Mollie, Razorpay, Billplz, Xendit, Paystack, Payrexx and SSLCOMMERZ.
- Multiple integrations including LMS plugins.
- 135+ currencies support
- 24/7 customer support
Integrate Razorpay payment gateway with Paymattic
Today this simple guide will navigate you on how to integrate Razorpay payment gateway in WordPress with Paymattic.
Let’s start!
- At first, go to Paymattic (Pro) > Payment Gateway from your WordPress dashboard.
- Then, click on Razorpay from the left navigation bar.
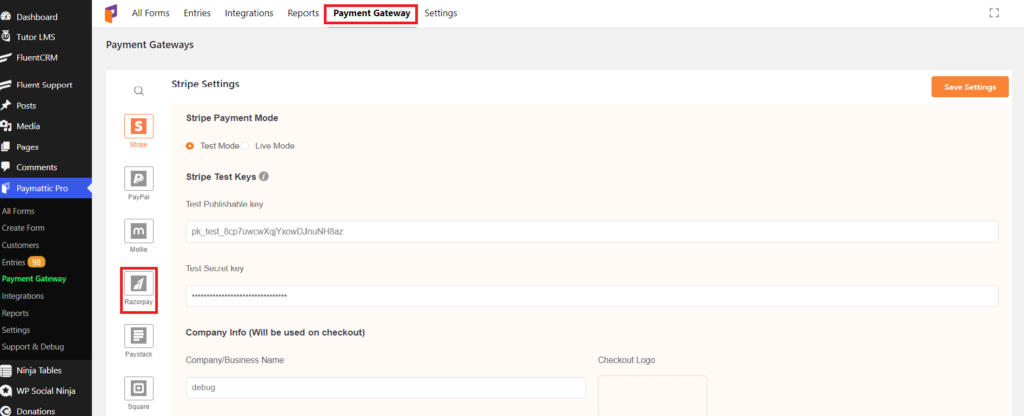
The Razorpay payment settings page will open up.
Now, you have to select a payment mode. There are two payment modes – Test Mode and Live Mode. Activate the Test Mode if you want to test the transactions and select the Live Mode when you are ready to accept actual live payments from your customers. However, the Live Mode and Test Mode both can be set up in the same process.
Check out this simple guide to Stripe payment gateway integration with Paymattic
Then, it will ask you to select a checkout style. There are two checkout style options – Modal Checkout Style and Hosted to razorpay.com. The Modal Checkout Style lets your customer make payment staying on the same page and the Hosted to razorpay.com option redirects users to the Razorpay site during checkout.
Next, you will require an API key and an API secret key.
To get your API key and API secret key-
- Sign in to your Razorpay account.
- Go to Settings from the left navigation menu.
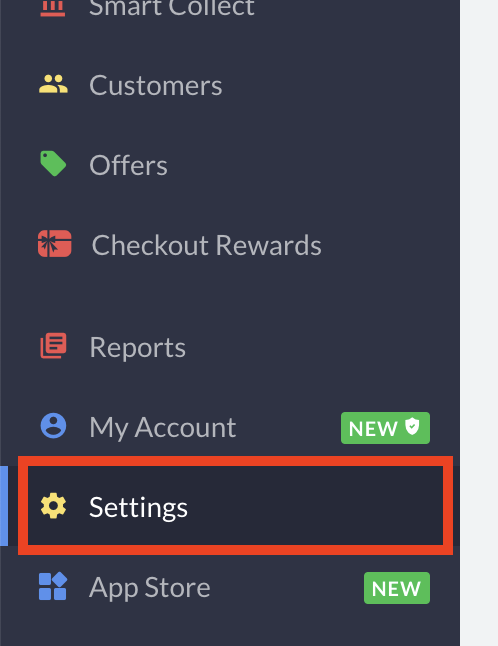
- Then, navigate to the API Keys > Generate Test Key.
- You will get your Key ID and Key Secret.
- Simply copy the keys and go back to your WordPress dashboard.

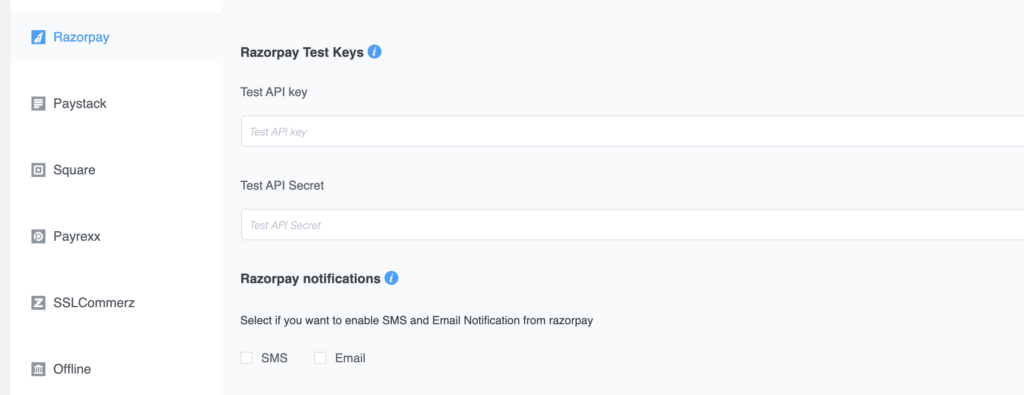
- Next, go to Paymattic (Pro) > Payment Gateway > Razorpay and paste your API Keys in the required field.
- Then, select the SMS or Email notification method if you want to notify users after a successful transaction.
- At last, click on the Save Settings button to settle the changes.
Great! You have successfully integrated Razorpay payment gateway with Paymattic. Other than Razorpay, you can also integrate Stripe, PayPal, Square, Mollie, Payrexx, Paystack and many more with this payment and fundraising plugin.
Paymattic payment plugin is also introducing integration with various learning management systems such as LifterLMS, LearnDash and Tutor LMS.
If you find this blog helpful let us know your feedback in the comment section below. Follow our Facebook page for more interesting new and updates.
Join the thousands already enjoying Paymattic Pro!






Leave a Reply