10 Min Read
Build A Registration Payment System On WordPress In 7 Minutes
Table of Content
Download Paymattic – it’s Free!

Subscribe To Get
WordPress Guides, Tips, and Tutorials
We will never spam you. We will only send you product updates and tips.
Takeaway:
To implement a registration payment system on your WordPress website, you’ll need to use a WordPress payment plugin that allows you to create registration forms with payment options. There’s a popular WordPress payment plugin called Paymattic, which offers integration with popular global payment gateways like PayPal, Stripe, Square, and more.
Ideal steps should be:
- Choosing a WordPress payment plugin
- Installing and activating the plugin
- Configuring payment gateways
- Creating a registration form
- Integrating the form
- Testing and publishing
After setting up a registration payment system on my membership portal, my revenue skyrocketed. But it was not easy for me. Had to go through unnecessary tools. Surprisingly, the solution was right under my nose. And it was the easiest till now.
To set up a registration payment system on WordPress, you typically use a WordPress plugin that combines user registration with integrated payment gateways.
This is essential for scenarios like event sign-ups, membership sites, online courses, or any situation where your users need to register and pay at the same time.
In this article, I’ll show you how to build a registration payment system on your WordPress website in 7 minutes.
Let’s get started.
What you’ll need to build a registration payment system on WordPress
You’ll need two things to create a WordPress registration form with payment.
1. A WordPress payment plugin: Paymattic
I’ll use the Paymattic Pro WordPress payment plugin for this tutorial. So, make sure you have Paymattic installed on your WordPress website. You can get the Paymattic plugin from here. 👇

Paymattic has a free version available with the Stripe payment gateway. But the features we are going to use in this tutorial need the Paymattic Pro plugin.
You can still accept one-time payments on Stripe with the Paymattic free plugin. But you can’t set up WordPress user registration with the free version.
2. A payment gateway
Paymattic makes it very easy to integrate global payment gateways like Stripe, PayPal, Authorize.net, Square, and more.
All of these payment gateways have their pros and cons, but they all accept several payment methods, including debit or credit cards and digital wallets.
Today, I’ll use Stripe checkout to keep things easy and quick. I’ll show you how to integrate Stripe payment gateway with Paymattic using the API key and secret key.
You’ll find how to integrate other payment gateways from Paymattic’s payment gateway documentation.

Online Payment Security Handbook
A SAFETY CHECKLIST TO PROTECT YOUR ONLINE PAYMENT
A single security breach can be devastating. This e-book outlines the essential practices that businesses should apply to safeguard online transactions and build a trusted payment environment.
- Security Checklist
- Security Concerns
- Security Types
- Best Practices
How to build a registration payment system on WordPress
Steps to create a registration payment system on your WordPress website:
- Install and activate Paymattic
- Configure payment gateways
- Create a registration form
- Integrate the form
- Test and publish
Step 1: Install and activate the Paymattic plugin
First, install your Paymattic Pro plugin in your WordPress website.
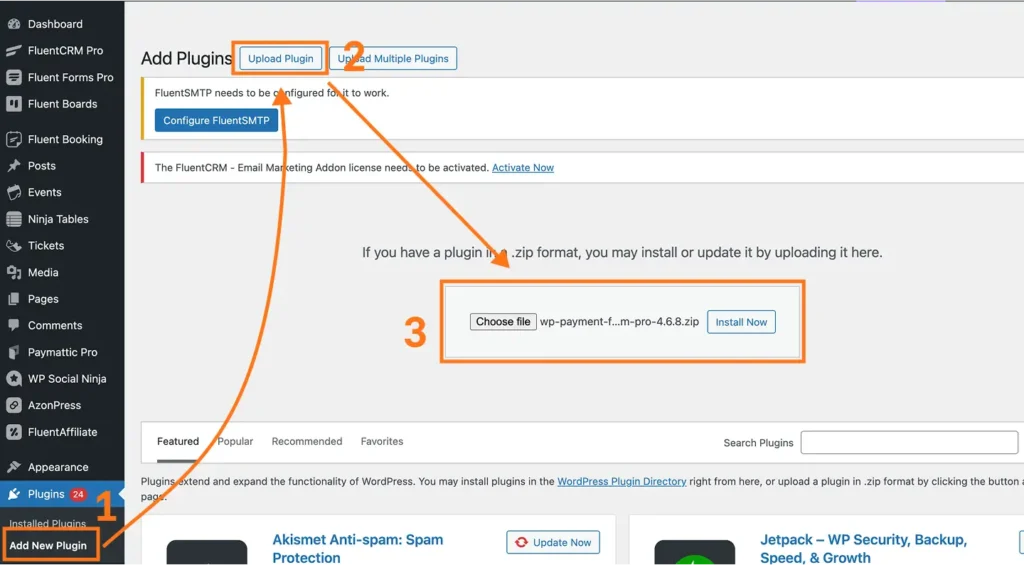
If you haven’t already installed Paymattic, go to Plugins > Add New Plugin from your WordPress dashboard.
Select Upload Plugin and upload your Paymattic Pro zip file from the upload window.
Install the plugin and activate.
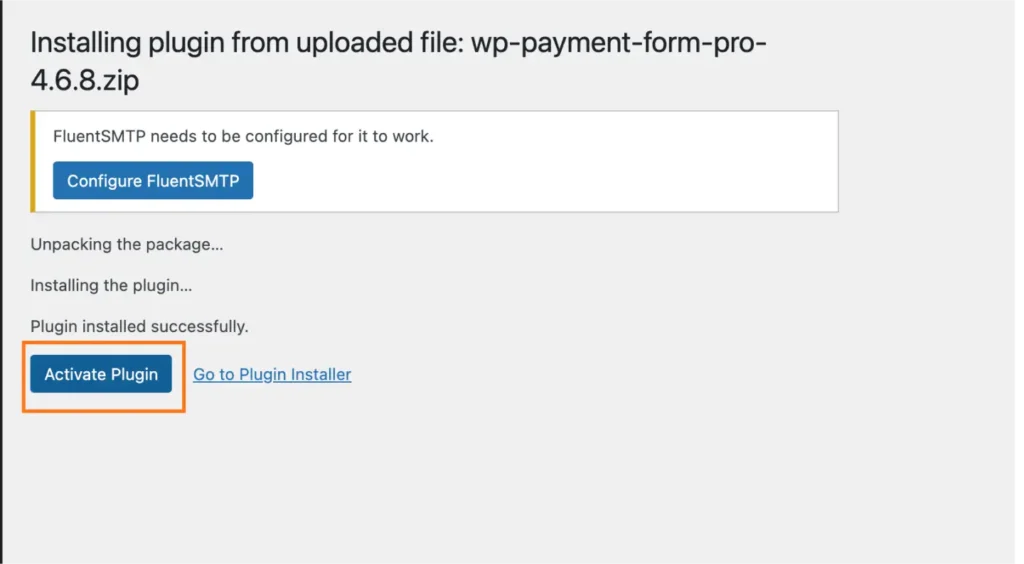
You are good to go with Paymattic Pro.
P.S. Paymattic Pro requires the Paymattic free plugin. You can download Paymattic Free directly from here 👇
Step 2: Configure payment gateways
I’ll show you how to set up the Stripe payment gateway with Paymattic for demonstration. Adding other payment gateways is almost similar.
To configure payment gateways with Paymattic, open your WordPress dashboard and go to Paymattic Pro > Payment Gateways.
From the Payment Gateways page, you’ll find Stripe. Adding Stripe requires Stripe’s Public Key and Secret Key.
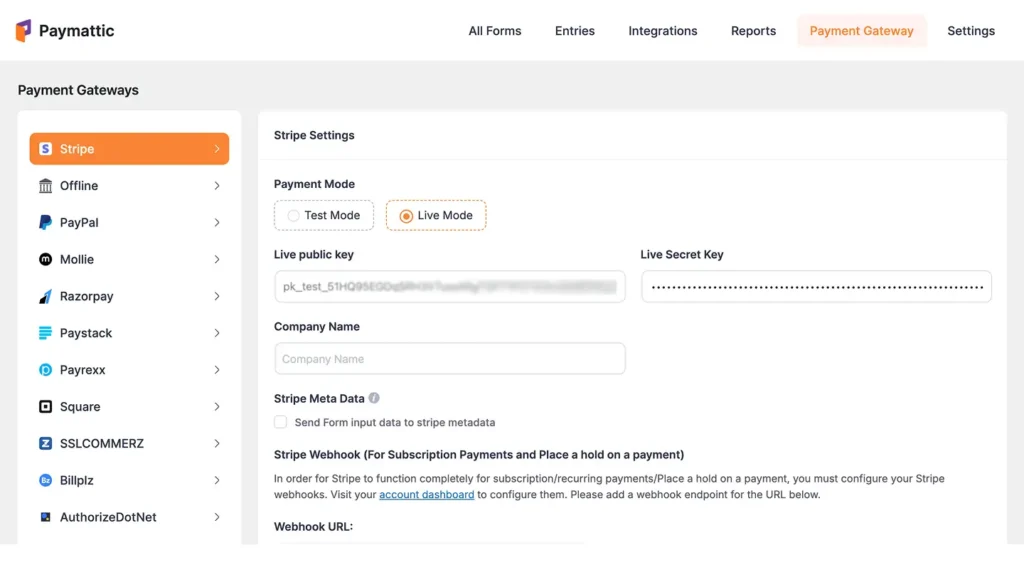
You’ll get these keys from your Stripe dashboard. After inserting those keys, press Save Settings. And Stripe is now connected with your Paymattic plugin.
If you struggle finding your Stripe keys, here is the detailed Paymattic-Stripe integration documentation.
Step 3: Create a registration form
Stripe is now connected with your WordPress website. Now let’s create your WordPress registration form with payment.
Go to Paymattic Pro > All Forms and click the orange + Add New Form button in the top right corner.
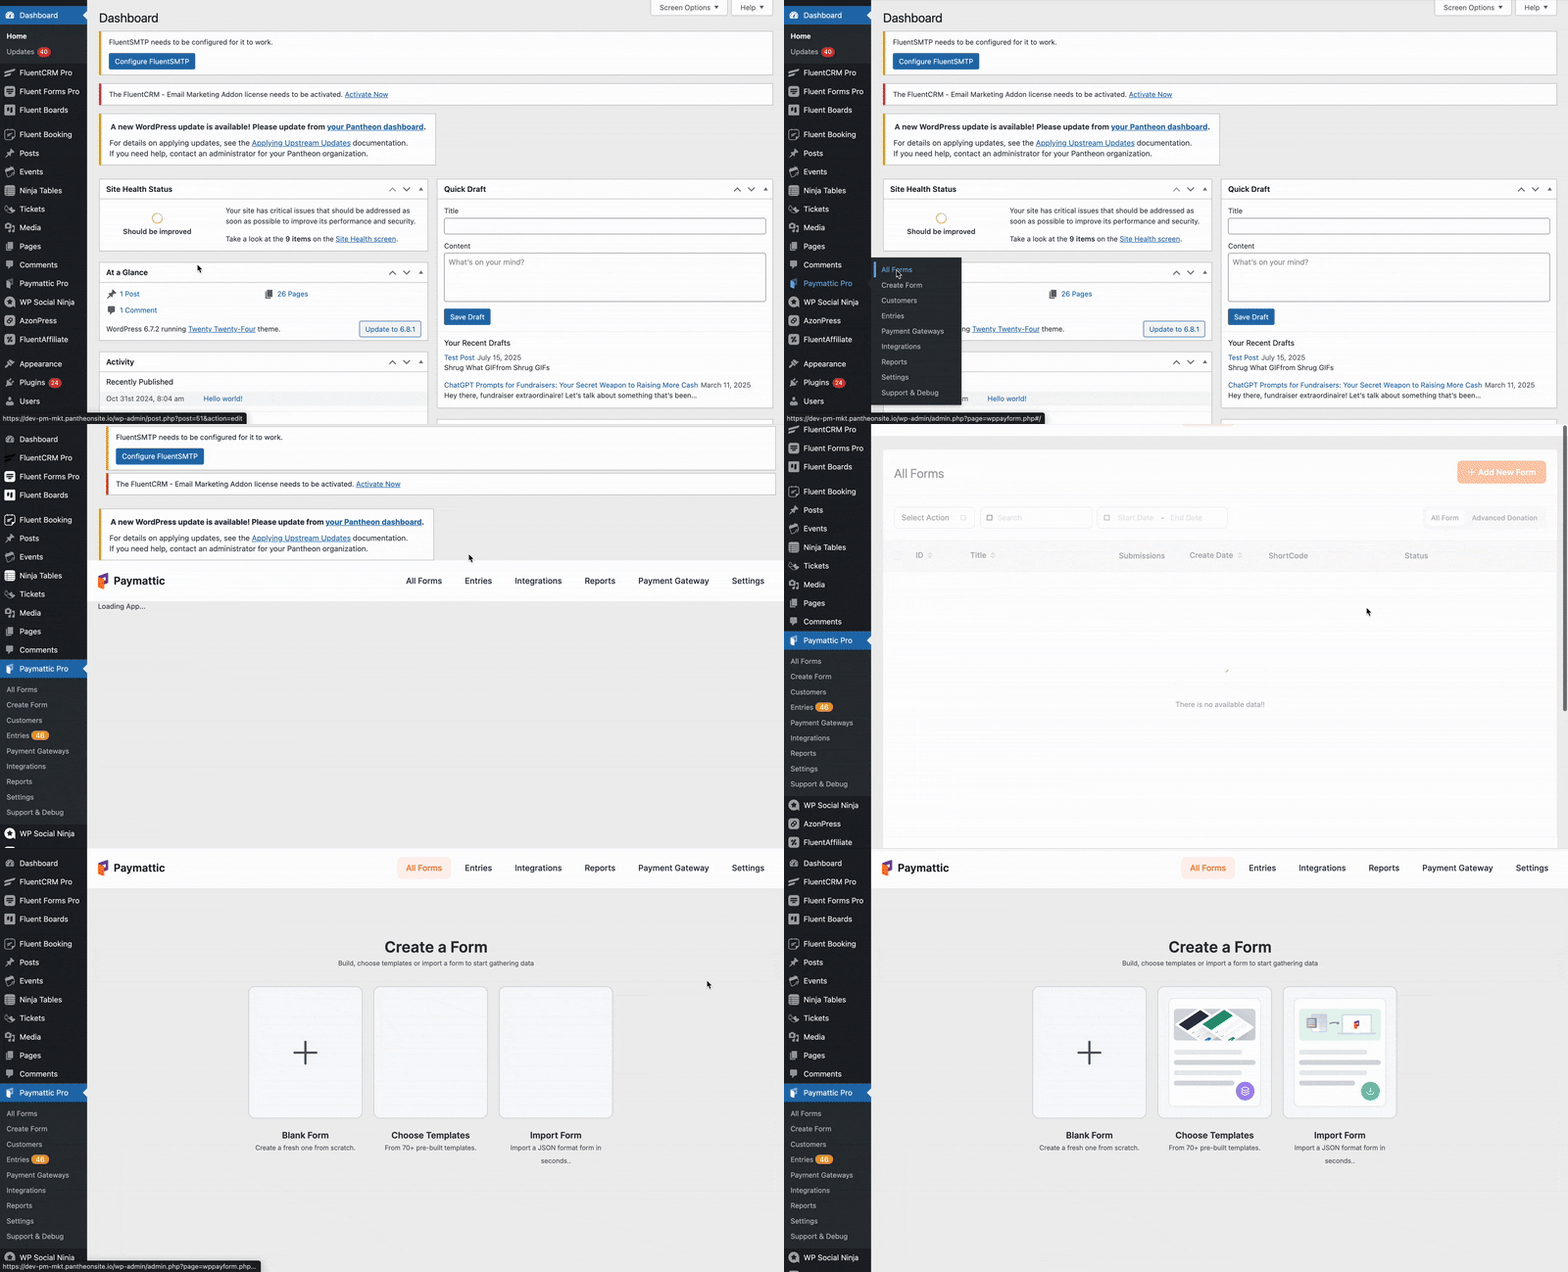
Next, you can start with a pre-built registration form and customize it. Or you can start from scratch. I’m going to start from ground zero to show you more of it.
I’m choosing the Blank Form from this menu.
Let’s add the necessary input fields. I’ll add a name field, an email field, a password field, and a payment item field, and customize them from settings.
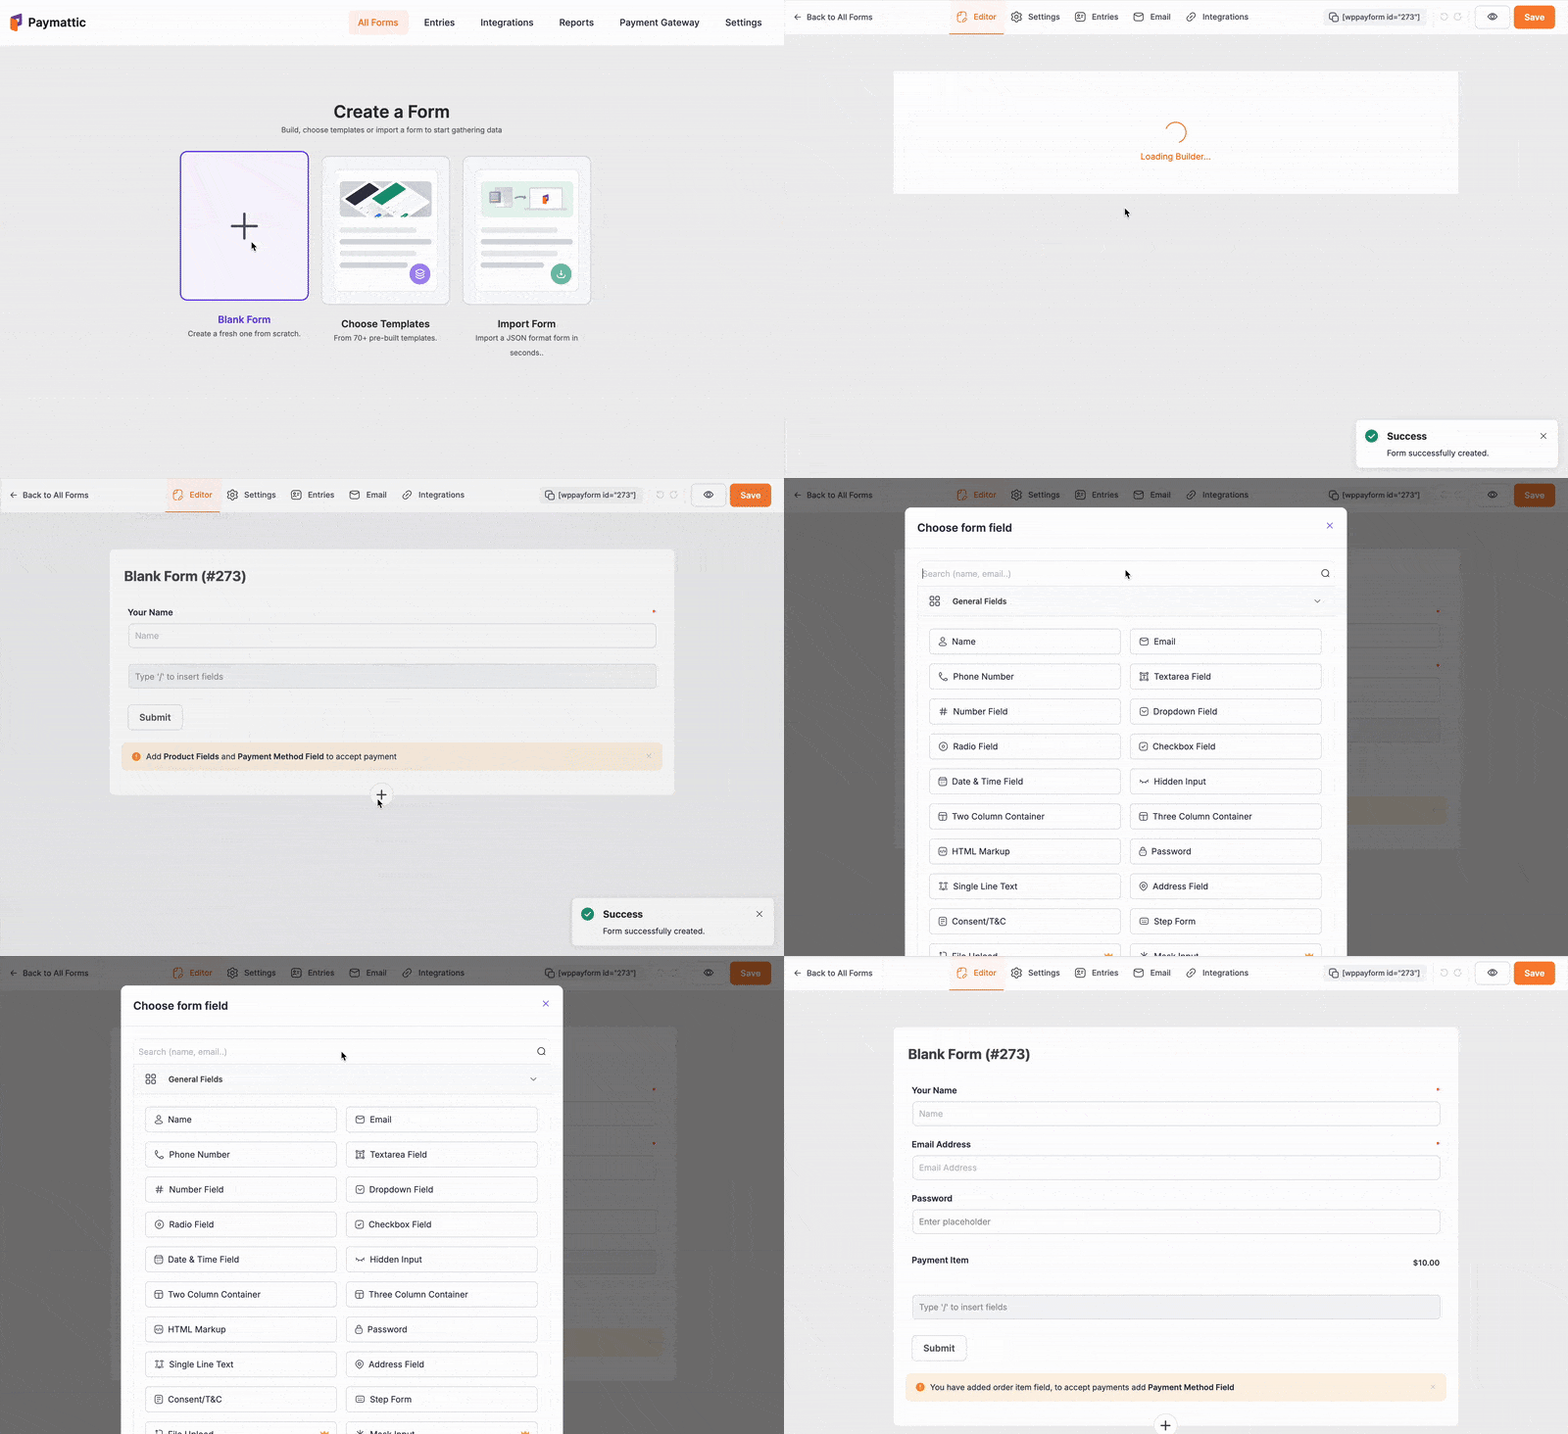
Also, I’ll add the Stripe payment method from the payment fields. This is crucial. If you don’t add a payment method to your field, your payments won’t proceed.
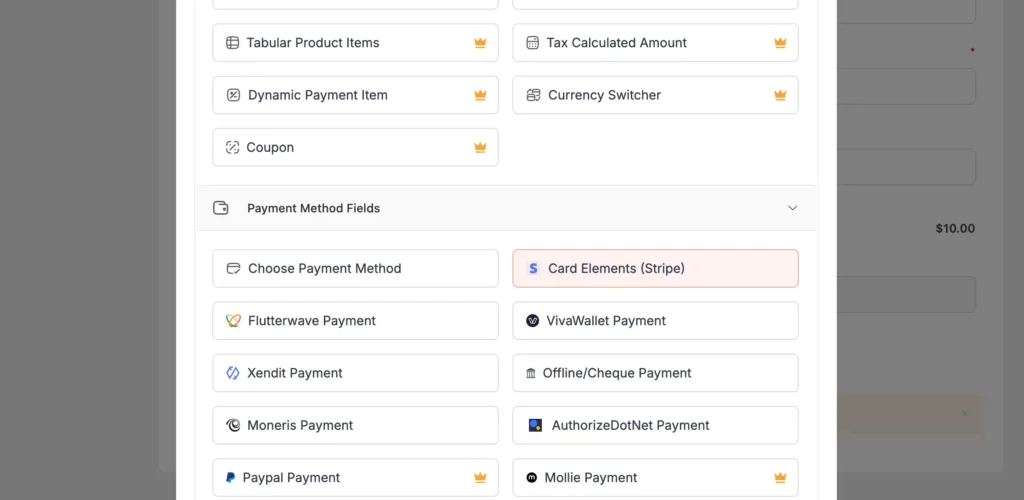
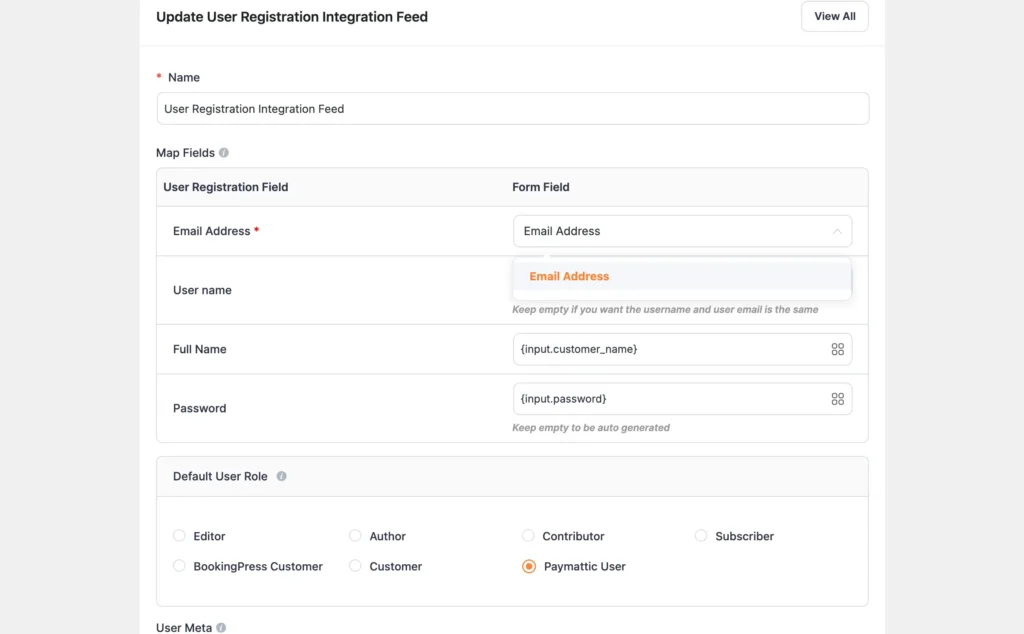
Now that our form is ready, we’ll add the user registration integration with this form. From your form editor, go to Integrations > Add New Integration and choose User Registration Integration.
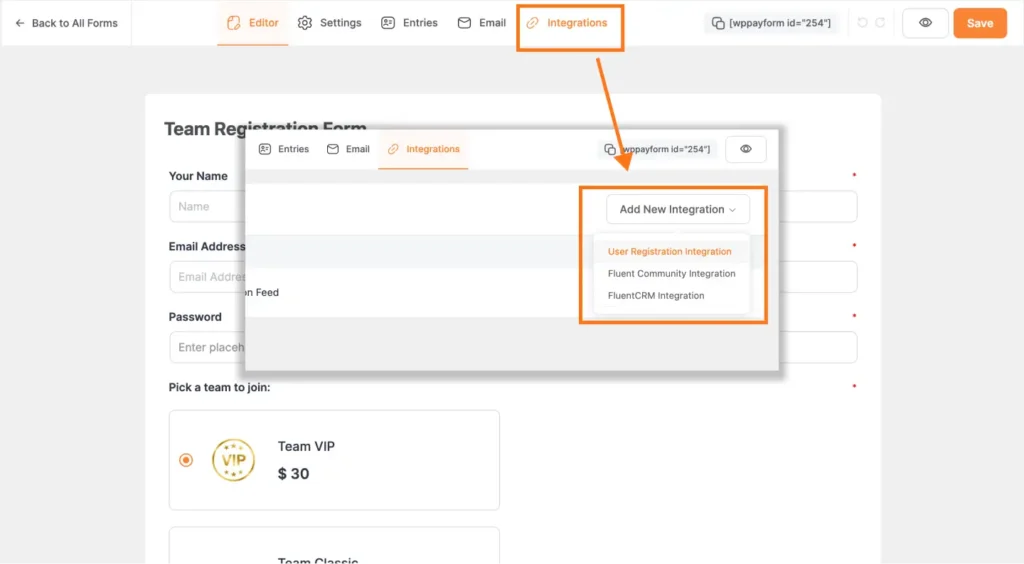
If it’s not enabled, go to Paymattic Pro > Settings > Integrations and enable it.
I’ve selected the input fields for field mapping and ticked the necessary checkboxes. I’ve also selected custom roles for the registered user as a Paymattic user.
You can pick any role you want. And then click Update User Registration Feed.
Your user registration form is ready.
This is the preview of the form I’ve created 👇

Step 4: Integrate the form
Now let’s integrate the form into your website.
Create a new page or open the page you want to use as a user registration page. Copy the shortcode of the form we’ve just created. Paste the shortcode and hit Publish.
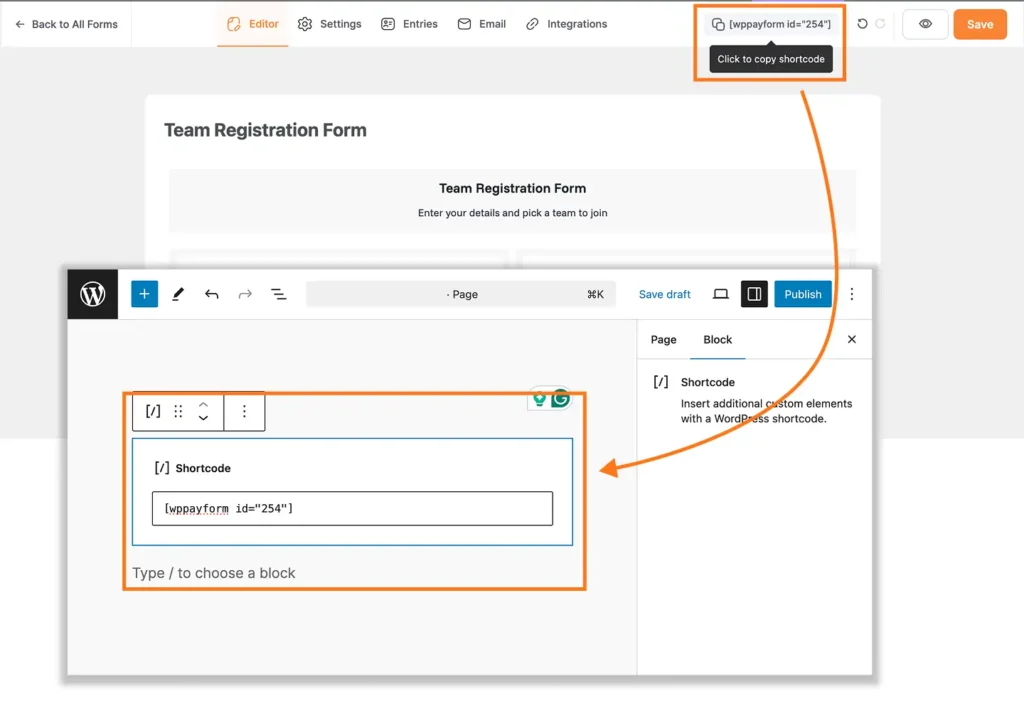
Boom! Your user registration form is integrated into your page.
Step 5: Test and publish
If you’ve selected a Test Mode from the payment gateway section for Stripe, you’ll need to select Live to accept real-time payments. Just toggle the button from your form settings and add credentials.
But first, test your form. If it’s working for the test mode, it’ll work for the live key too.
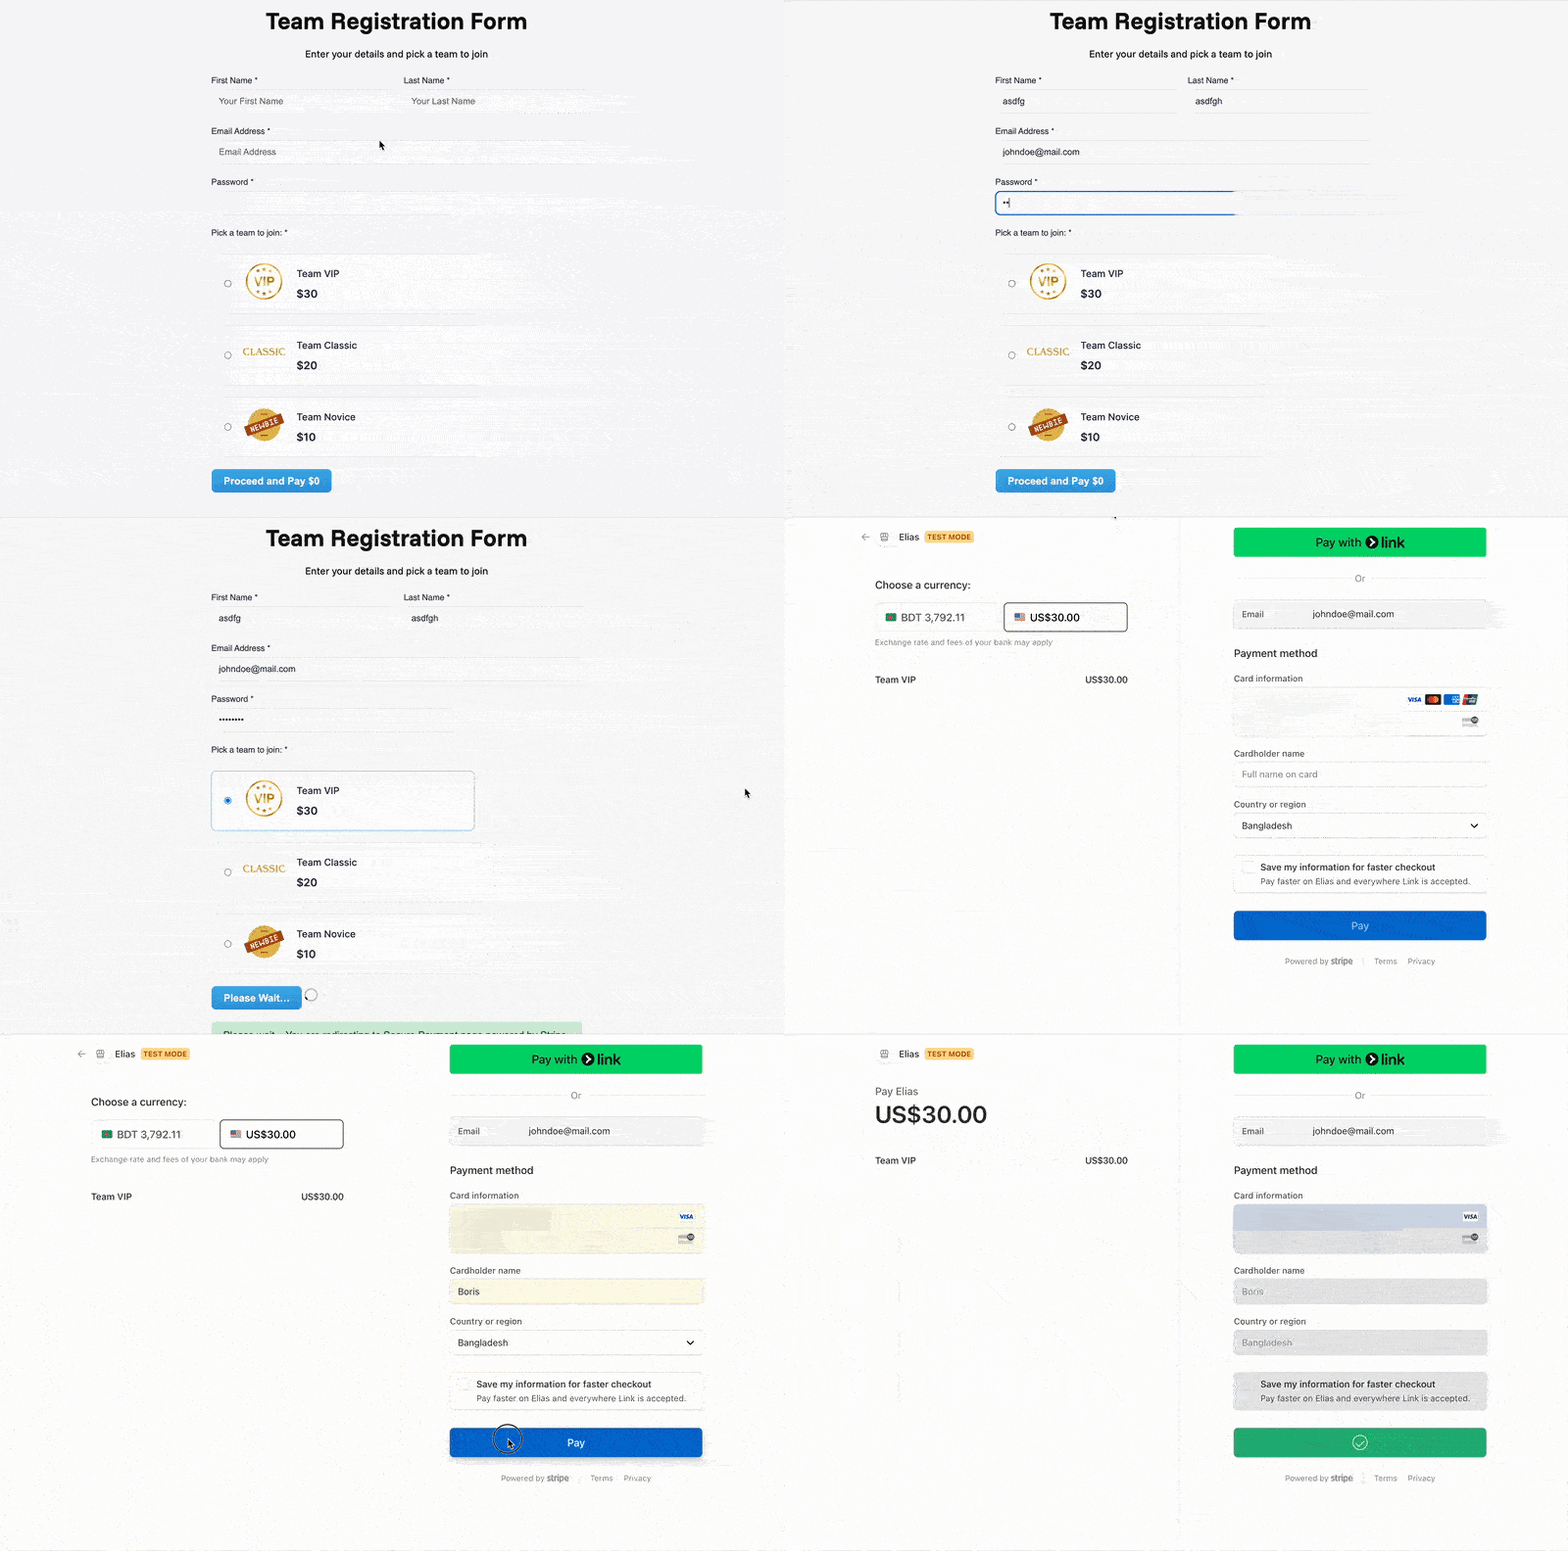
This user registration form will assign specific roles to your paid users.
If you are satisfied with the result, publish the page. Or share it with your network.
Features to consider when choosing a WordPress payment plugin
Choosing a user registration payment plugin is both easy and tough. While choosing, you should consider these essential features:
- Proper payment gateway integrations: Make sure the plugin supports all the necessary global payment gateways you need, like Stripe, PayPal, Authorize.net, and others.
- Essential security features: Security is the most important parameter for online transactions. Choose a plugin that follows WordPress security best practices and complies with payment industry standards. For example, security measures like Payment Card Industry Data Security Standard (PCI DSS) and Strong Customer Authentication (SCA) are a must-have.
- Adequate user management: Look for useful user management features that allow you to track registrations, manage user accounts and roles, access, and handle customer engagements.
- Basic customization options: The plugin should offer basic customization options for payment and registration forms, email notifications, and user dashboards. If you want to send proper emails, make sure the plugin integrates with good CRM software like FluentCRM. Moreover, it should support custom user registration fields for specialized requirements.
- Multi-device responsive forms: Your registration form should work seamlessly across all devices. Furthermore, mobile optimization is crucial since many users register using smartphones and tablets.
- Analytics and reporting features: Comprehensive reporting features help you track registration rates, payment success rates, and user behavior patterns. An ideal plugin should offer you essential reporting features so that you can get a glimpse of your performance from the dashboard.
Ready to create a registration payment system on WordPress with Paymattic?
Well… creating a registration payment system doesn’t have to be complicated. With the right WordPress payment plugin, you can have a fully functional system running in minutes.
Paymattic simplifies the entire process, from payment gateway integration to user registration management. The plugin handles all the technical complexities of paid registrations while you can focus on growing your business.
Paymattic is a powerful WordPress payment & donation plugin that simplifies online payments, donations, and subscriptions in one place.
With support for Stripe, PayPal, Authorize.net, offline payments, subscriptions, multi-currency, and detailed reporting, it’s your all-in-one solution for collecting payments, managing donations, and growing your business with ease.
Key features of Paymattic:
- 13+ global payment gateways covering the whole world.
- Supports 197+ currencies.
- Supports both one-time and recurring payments.
- Offers a detailed customer dashboard to manage subscriptions.
- Offers a detailed report dashboard.
- Integrates with major tools.
- Offers a built-in drag-and-drop form builder with 35+ custom input fields.
- PCI-DSS compliance and built with security best practices.
- Advanced fraud protection with Honeypot, ReCAPTCHA V2 and V3, and Cloudflare Turnstile.
- Offers hooks, filters, and extensive documentation for custom development.
Whether you’re running a membership site, organizing events, or selling online courses, a streamlined registration and payment process can significantly boost your conversion rates. Additionally, automated user registration reduces manual work and improves customer satisfaction.
Best thing? Paymattic covers it all.
Conclusion
Building a registration payment system on WordPress has never been easier. With Paymattic’s powerful features and intuitive interface, you can create a professional payment and registration system in just a few minutes.
The combination of user registration and payment processing in a single workflow eliminates friction and increases conversion rates. Furthermore, the automated registration payment system saves time and reduces administrative overhead.
I’ve shown you how you can create one in just 7 minutes. It takes less than 5 minutes if you are already familiar with Paymattic. Your WordPress registration system with integrated payments is now ready to register your paid users.
Remember to test thoroughly before going live and continuously optimize based on user feedback and analytics data.
Thank you for your time.
Read More: WordPress Payment Gateway Integration – An Actionable Guide
Frequently Asked Questions
Here are answers to some frequently asked questions about the registration payment system on WordPress.
Q. How can I integrate multiple payment gateways into my WordPress registration system?
Answer: You can do that with Paymattic. Currently, Paymattic supports more than 13 payment methods. And you set up your registration form with all of them.
Q. Can I offer multiple subscription plans or payment tiers?
Answer: Yes. Paymattic Pro lets you create multiple plans or tiers (e.g., basic vs premium), which your users choose during the registration process.
Q. Can I customize the registration/payment form fields?
Answer: Definitely. Paymattic offers you simple drag‑and‑drop tools for custom fields, conditional logic, file uploads, and even multi-step forms. You can also use custom CSS and JavaScript to get your desired registration form look.
Q. Will users automatically receive appropriate roles after payment?
Answer: Yes. Paymattic assigns user roles based on payment success. You can tweak the option in the settings. For example, a user becomes a “subscriber”, “editor”, or “Paymattic user” upon successful payment using built-in payment methods.
Join the thousands already enjoying Paymattic Pro!
Mahfuzur Rahman Nafi
Mahfuzur Rahman Nafi is a Marketing Strategist at WPManageNinja. With 4 years of experience in Product Marketing, he has developed marketing strategies, launched products, written content, and published websites for WordPress products. In his free time, he loves to read geeky stuffs.







Leave a Reply