
8 Min Read
How to Use Conditional Logic with Payment Forms in WordPress?
Table of Content
Download Paymattic – it’s Free!

Subscribe To Get
WordPress Guides, Tips, and Tutorials
We will never spam you. We will only send you product updates and tips.
TL;DR: How to Use Conditional Logic with Payment Forms in WordPress?
Conditional logic helps you create smarter WordPress forms by showing or hiding fields based on user responses. It improves user experience and keeps your forms clean and relevant. In this blog, you’ll learn how conditional logic works and get a step-by-step guide to building dynamic WordPress forms with Paymattic.
I didn’t realize how much I needed conditional logic until my forms started getting messy. At first, I was just adding all possible fields into one long form, hoping users would just scroll and fill out what mattered to them.
But actually, they didn’t.
That’s when I realized I needed a better way to guide people through the form, showing only the fields that mattered based on what they selected.
Conditional logic completely changed the game for me. It made my forms cleaner, more user-friendly, and honestly, a lot smarter.
In this blog, I’ll show you how you can create WordPress forms with conditional logic step by step, using a plugin I personally rely on Paymattic. If you’re tired of cluttered forms and want a better experience for your users, this one’s for you.
First, let’s recap a few basics.
Conditional logic – at a glance
Conditional logic is a unique feature that will help you make a short, personalized, and intuitive form. It automatically changes the form depending on users’ actions. Conditional logic in web form will definitely take your forms’ conversion rate to the next level.
You may create intelligent forms that gather audience data with conditional logic. This smart feature allows you to create a robust form that delights your user and drives the result you are looking for.
So to reduce the hassle for your users, you can try using conditional logic in your payment and donation forms.
How conditional logic works on an online form?
It may look technical, but I promise you it’s not. Let me explain conditional logic simply for you with an easy example:
An easy example would be an option for a contact method. Say you need to collect your users’ phone numbers or email addresses. You can simply add a radio button to let the users choose their preferred mode of contact. You show the phone number input field only when the users choose the phone number option. And if someone prefers to be contacted via email, they will pick the email address option, and only then will the email address input field appear.
Ultimately conditional logic shortens your form by hiding fields that don’t necessarily need to be shown for all types of users. It also reduces your form’s abandonment rate.
Find out some easy way to get reporting overview for your campaign
Best plugin to use conditional logic in forms
In WordPress, tons of plugins are available to make your WordPress form. Not just basic online forms, but web forms with advanced functionalities as well! You may wonder which one will serve your purpose the best among all these options. If you ask us, we’ll suggest Paymattic. Why? Because it makes things the easiest for you.
Paymattic is a great WordPress payment and fundraising plugin for collecting simple payments and donations online. Its flexible and user-friendly design makes it simple to create forms with a few clicks. This multi-purpose plugin can accept payment for products or services and collect donations. In Paymattic, 35+ fully customizable input fields are available to create the perfect WordPress payment and donation form. Every feature is designed to make your form more effective.
Conditional logic is one of the magical features of Paymattic, which responds to each user differently based on their actions on the form. Paymattic breaks this feature into three parts.
- Parameter: The action will be initiated by this input area.
- Condition: There are five general conditions you can set. Such as equal, not equal, equal to data length, less than to data length, and greater than to data length.
- Value: This can be any text or numeric data you choose to target or exclude.
Multiple conditions can be set up. Additionally, you can decide whether your action must satisfy all of the established conditions or just one of them by selecting the “Any” or “All” option.
Create WordPress forms with conditional logic
Let’s see how Paymattic can improve your form-creating experience with conditional logic.
- Conditional logic on input field
- Conditional logic on integration
- Conditional logic on email notification
Conditional logic on input field
Conditional logic on the input field is used to hide or show a particular field of your form if all or any criteria are met. Let’s elaborate the use of conditional logic on input fields.
First, go to Paymattic dashboard > All forms > Add new forms. You can take a form template or a blank form to create a new one.
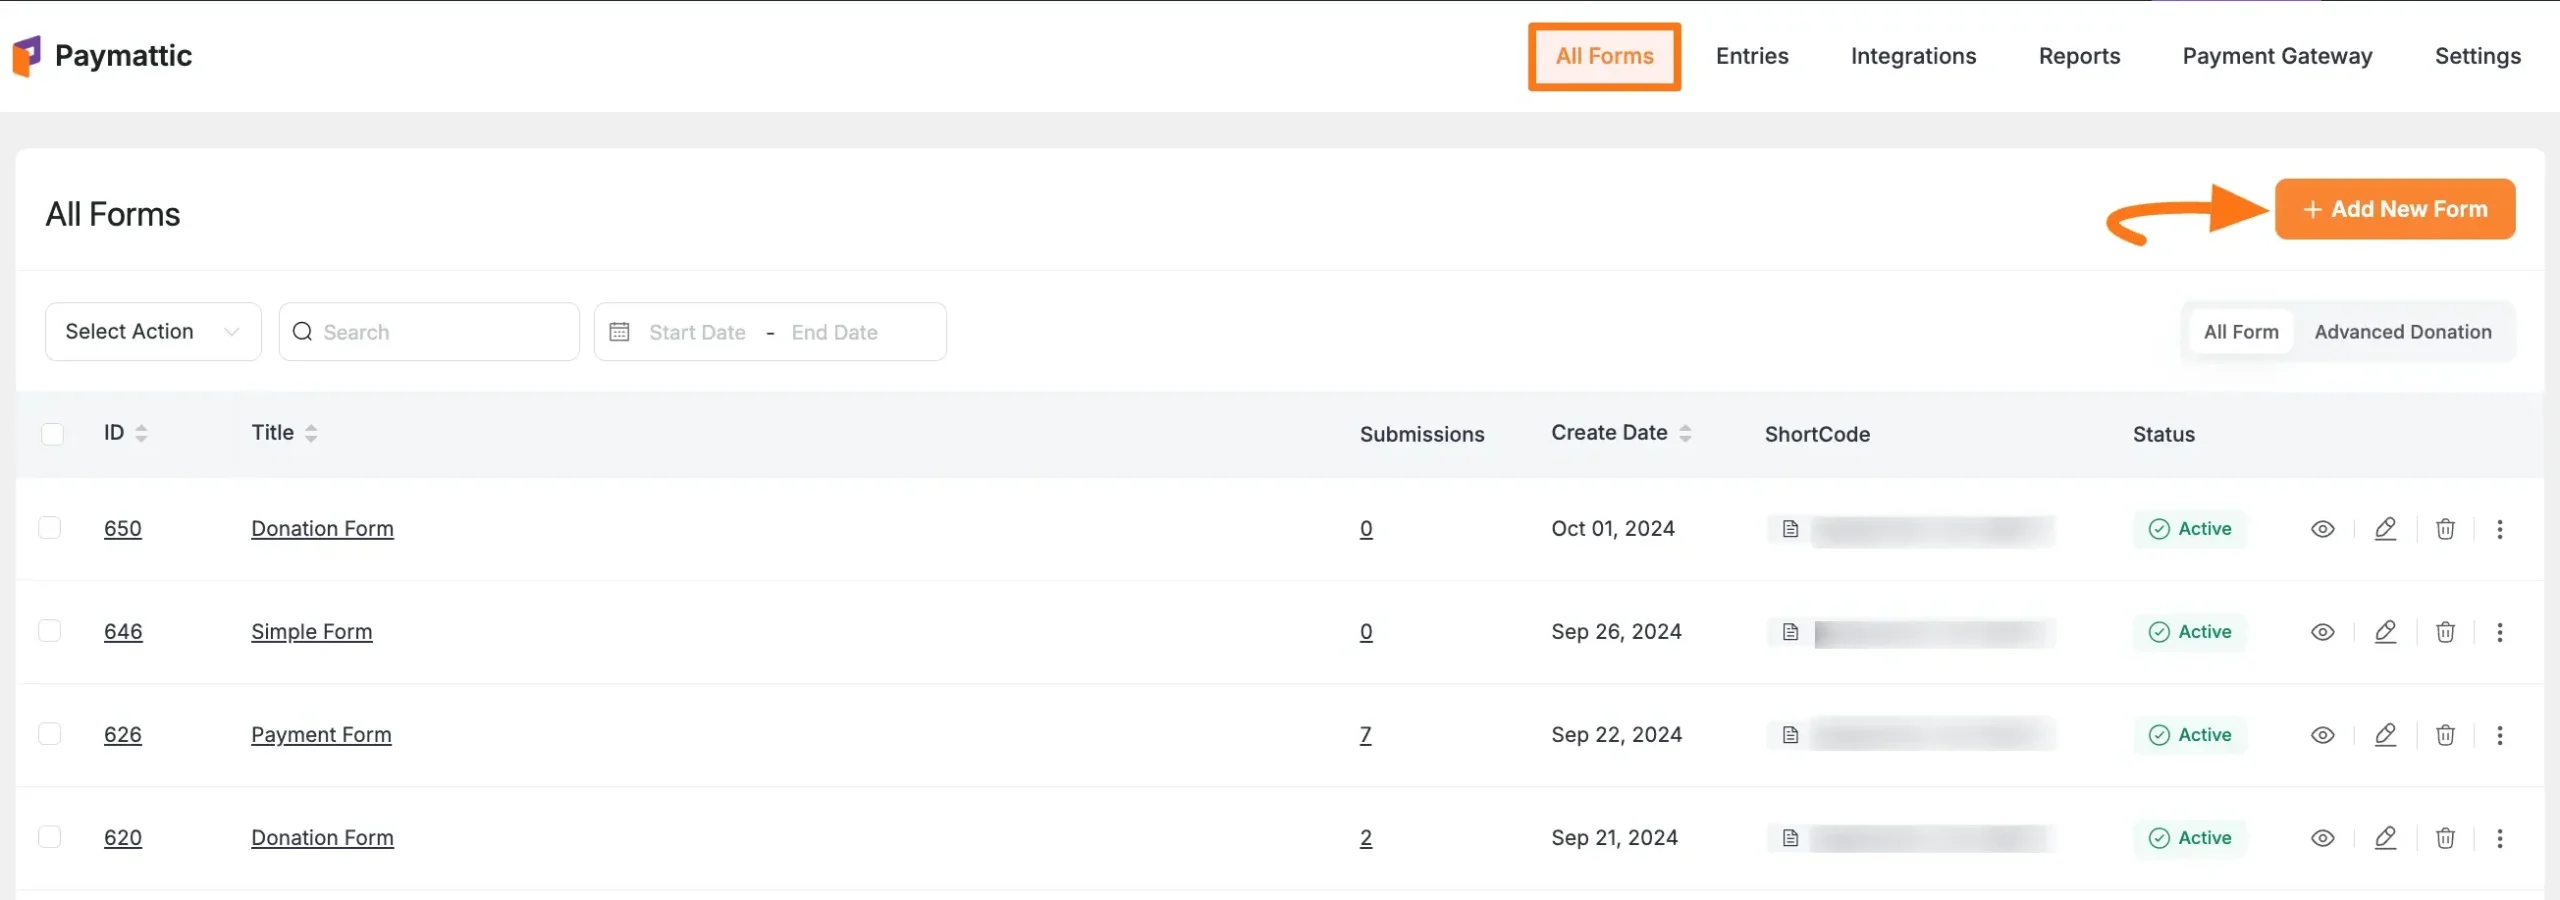
Now, click on the edit option below your form name.
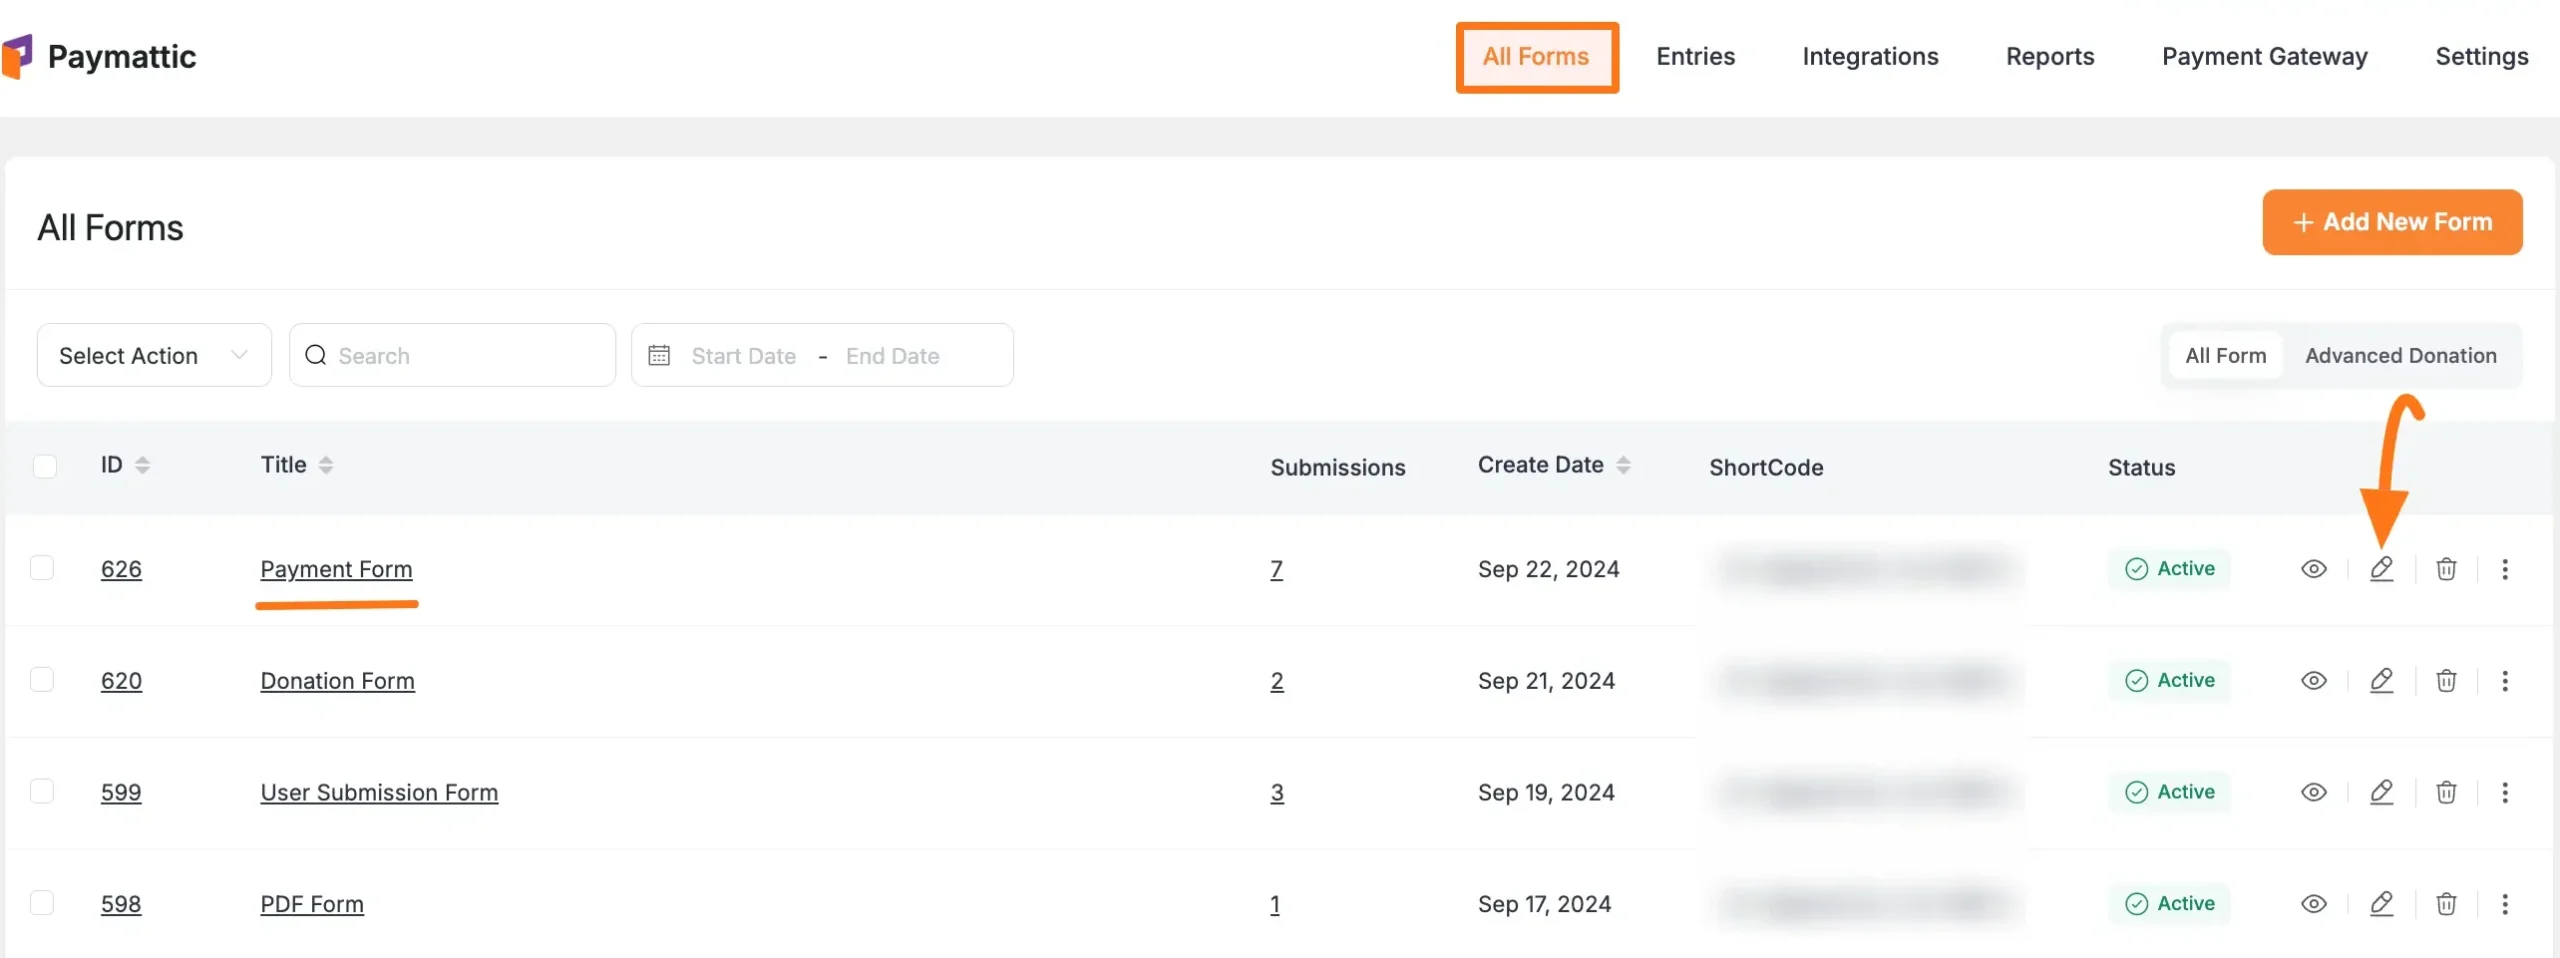
Then add desired fields and click on the Setting icon from the left side of the field name.
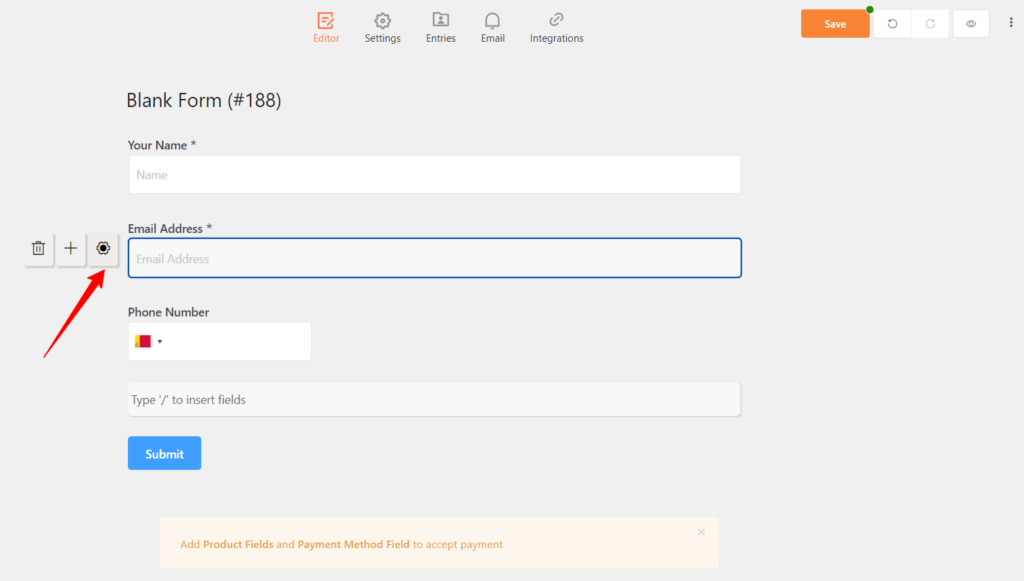
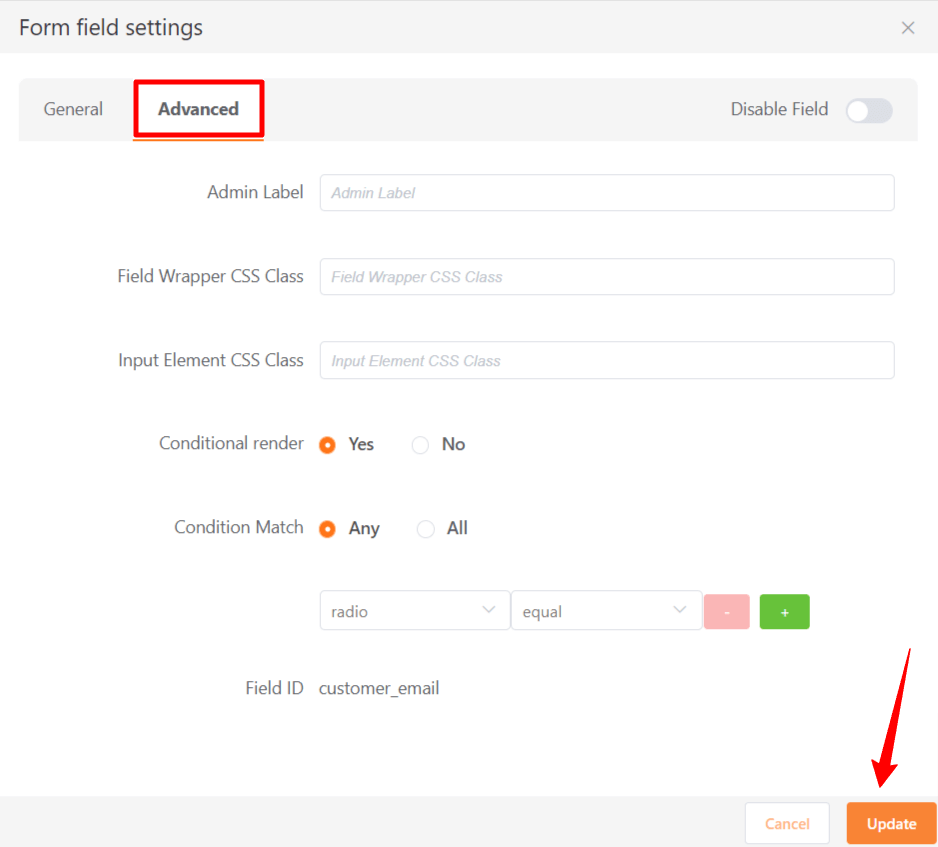
Click on the Advanced tab. Here you will find a Conditional render checkbox. Click on the Yes button.
Then in the parameter field, select an input field that needs to be matched with the value. Now put the trigger on the condition field and set the Condition match from Any or All.
You can add more triggers by pressing the + button.
Finally, click on the Update button to set conditional logic in your form.
Conditional logic on integration
You can also apply conditional logic with integration. Suppose, you have a form with a name, phone number, and email field. And you want to add the contacts and email addresses to your marketing CRM. Just enable FluentCRM from your Integration module. You can add this feature with any other integration given by Paymattic.
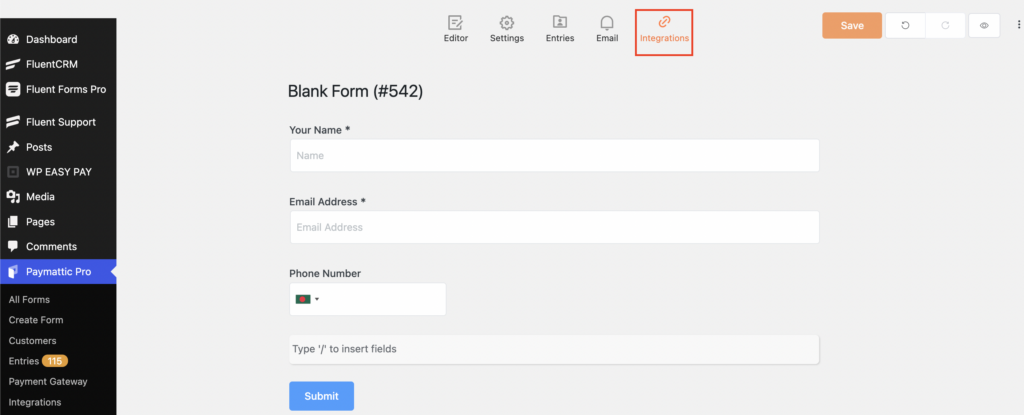
For this, open your form and click on Integrations.
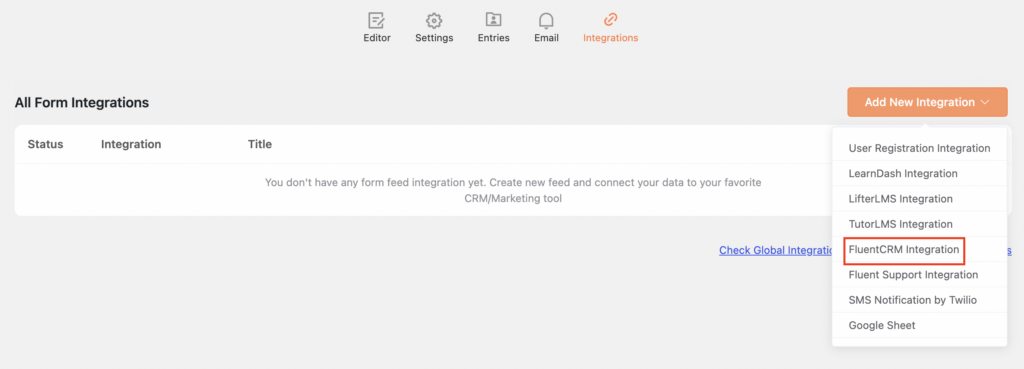
You will find the Add New Integration button, click here and select FluentCRM Integration.
Create FluentCRM Feed with the required information. If you scroll down below, you will notice a Conditional Logic checkbox. Here you can set suitable conditions.
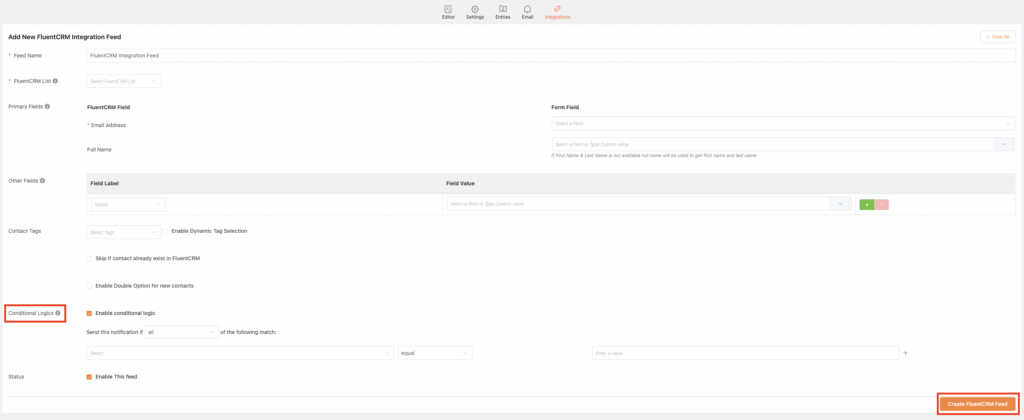
Finally, click on the Create FluentCRM Feed button to save the configuration.
Now your contact will be automatically added to the entitled email list.
Conditional logic on email notification
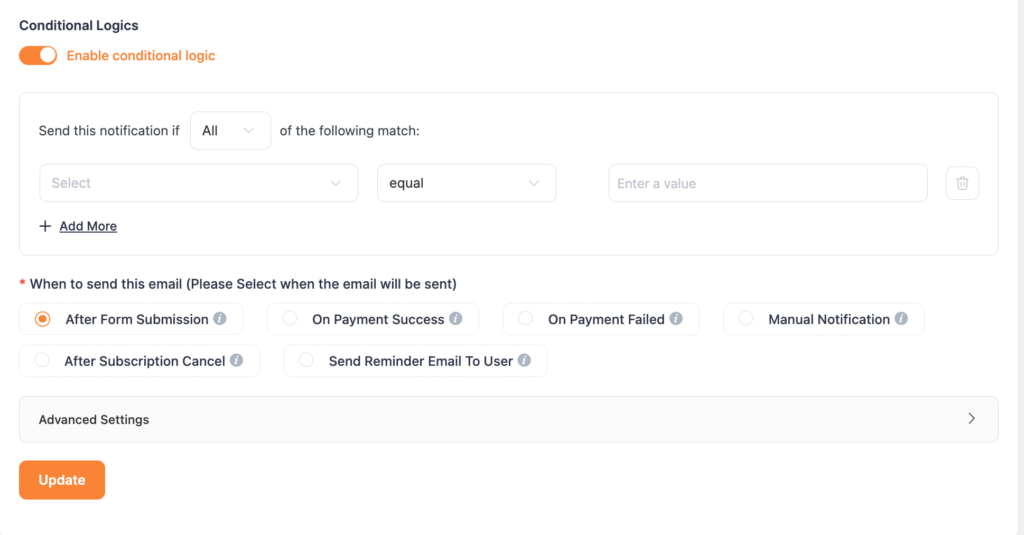
Conditional logic on email notifications allows you to set when an email notification is sent. If conditions are met, then an email notification will be sent to the user at the selected time.
To set up conditional email, first, go to Paymattic dashboard > All forms to use conditional logic on email notifications. Click on the Settings option below your form name.
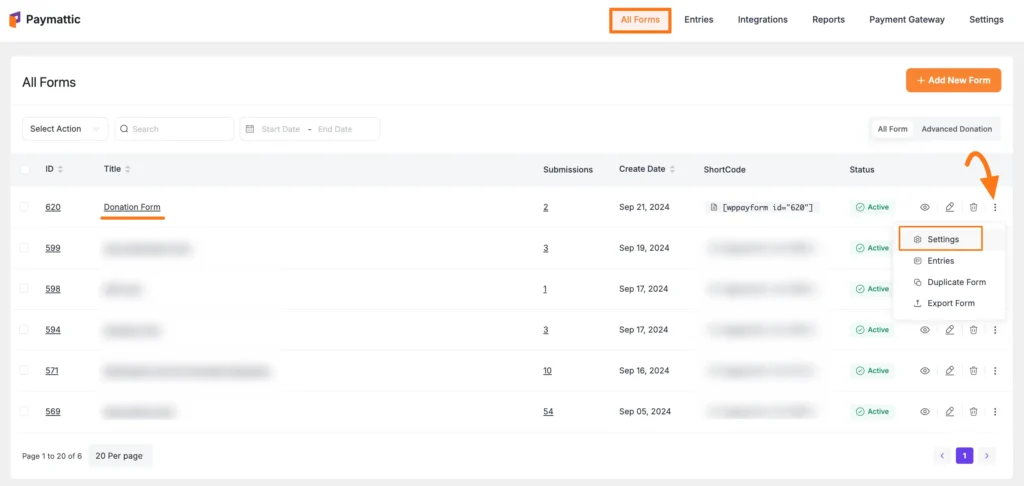
Then click on the Email tab and Add New Notification button.

Below the email body section, you will find an conditional logic check box. Enable this field and apply conditional logic as you want.
For example, if you choose “Customer Email” as a parameter, “Contains” as conditions, and enter “@gmail.com” and “@yahoo.com” as the respective values. And, select the “Any” option for the conditional match. As a result, only users who meet the condition of having an email address with @gmail.com or @yahoo.com in their submission email address will receive the email notification.
After setting the conditions, press the Update button.
That’s all! With the process mentioned above, you can easily set conditional logic on WordPress forms with Paymattic.
Ready to build WordPress forms with conditional logic?
WordPress forms with conditional logic are essential to the business toolkit for a positive user experience. Using conditional logic, you can create clean, personalized forms that respect the user experience. So, use conditional logic smartly to build high-converting forms which your users will love.
The WordPress payment and donation plugin Paymattic comes with various simple-to-use functions and a clean, uncomplicated interface. The functionality of Paymattic is extensive.
So what are you still holding out for? Try experiencing Paymattic Pro for yourself.
Frequently asked questions
Here are some frequently asked questions about conditional logic on WordPress forms.
1. What is conditional logic in WordPress forms?
Conditional logic is a feature that lets you show or hide form fields based on the user’s input or selection.
2. Why should I use conditional logic in my forms?
It makes your forms cleaner and more user-friendly by only displaying relevant fields, which can improve completion rates.
3. Can I add conditional logic to a form without coding?
Yes, most WordPress form plugins like Paymattic, let you set up conditional logic with just a few clicks.
4. Does conditional logic affect form performance or speed?
No, when used properly, conditional logic won’t slow down your form. In fact, it can make forms feel faster by reducing the number of visible fields.
5. Which is the best WordPress plugin for conditional logic?
Paymattic is a great choice for both beginners and advanced users. It offers conditional logic even in the free version, along with payment and donation features.
Join the thousands already enjoying Paymattic Pro!







Leave a Reply