A Complete Guide to Form Entries in WordPress with Paymattic
Table of Content
Download Paymattic – it’s Free!

Subscribe To Get
WordPress Guides, Tips, and Tutorials
We will never spam you. We will only send you product updates and tips.
Looking for the simplest way of managing your form entries in WordPress? Collecting the user data and managing the entries without any hassle sounds unfamiliar, doesn’t it?
Here comes Paymattic, making these complicated things simple for you. Offering tons of features including effortless form entry management. Its form entry management feature offers an easy-to-use interface to view and handle all entries from a single page.
So, in this article, we’ll provide you with a complete guide to form entries in WordPress with Paymattic to make your entry management the most straightforward than ever.
What is form entry?
Imagine you’re buying something online. Before making the transaction you’re asked to provide some information about yourself, such as your name, billing address, email, mobile number, and finally transaction method to purchase.
Or, assume you’re giving a donation to an animal shelter for animal welfare. Obviously, there’ll be a form to collect the donor’s information. You complete the form submission and make a donation.
This little information you provide is stored in a form on the seller or fundraiser dashboard. This is what a form entry is called.
In short, a form entry is the user data that someone provides via a form while submitting it. It can be anything like their contact details, shipping information, opinions or views on things, requests, payments, etc.
Form entries are an easily accessible way to manage and review the details your users share with you.
Manage all form entries in WordPress
The Paymattic WordPress plugin comes with an easy-to-use form entry management feature. It allows you to view and manage all the form entries from a single page.
To view all entries just go to the Paymattic Pro dashboard.
- Click Paymattic > Entries
You can find the Entries option in the left sidebar or on the top navigation bar.
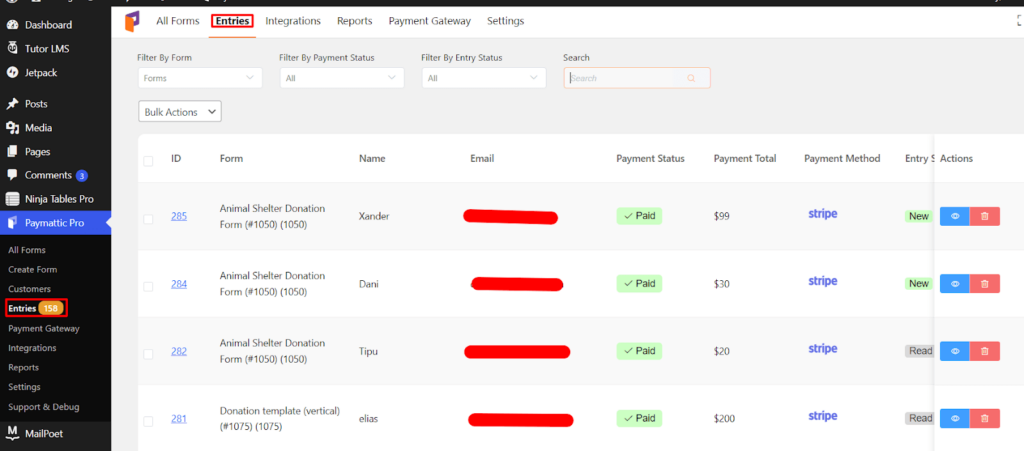
In Entries, you can find all the entries from all forms on your website. It includes:
- Name of the form
- Donors name
- Payment status
- Payment total
- Payment method
- Entry status
- Submission date
There is also an ‘Action’ option that includes a preview button to view the entry details and a trash button to delete it.
Say goodbye to the hassle of looking for different information about a form in different places. To easily manage the form entries, you can filter the entries by form name, payment status, and form entry status.
The form name filter allows you to find all the entries from a specific form. You can filter the form entries by payment status such as who has already paid, whose payment is processing, whose payment is pending, and who you have refunded.
There is also a search bar for you so that if you need to find any specific donor information. You don’t need to go by every entry of the form individually.
Just search by the donor name or email and see the magic. Your desired information is in front of you.
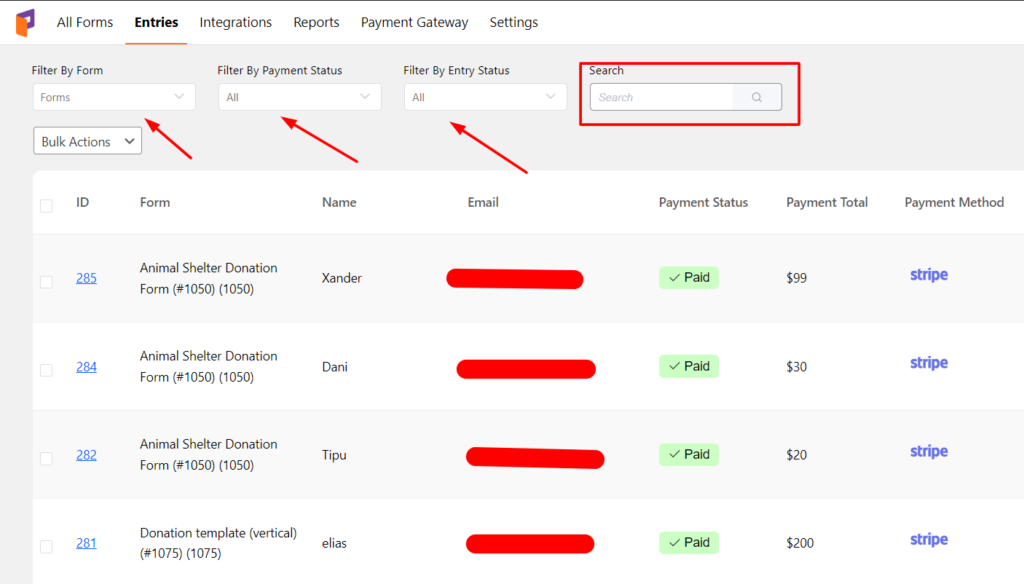
If you want to access any submission data in detail click on the blue eye icon on the right side of each entry. To delete an entry, click on the trash icon.

Subscribe Newsletter
Subscribe to our newsletter for updates, exclusive offers, and news you won’t miss!

Manage submission data in Paymattic
Managing form submissions data in Paymattic is simple. Click on the blue eye icon as described above. The submission page will appear here.
On this page, you can access all the data that your user has provided including payment amount, order items, transaction details, and submission activity.
You can see the amount the customer has paid in the top left corner. Also, the payment status is beside. Below this option are the details of the customer in the form entry section.
This page also allows you to see the customer’s meta info. It covers your customer’s browser, platform, and IP address.
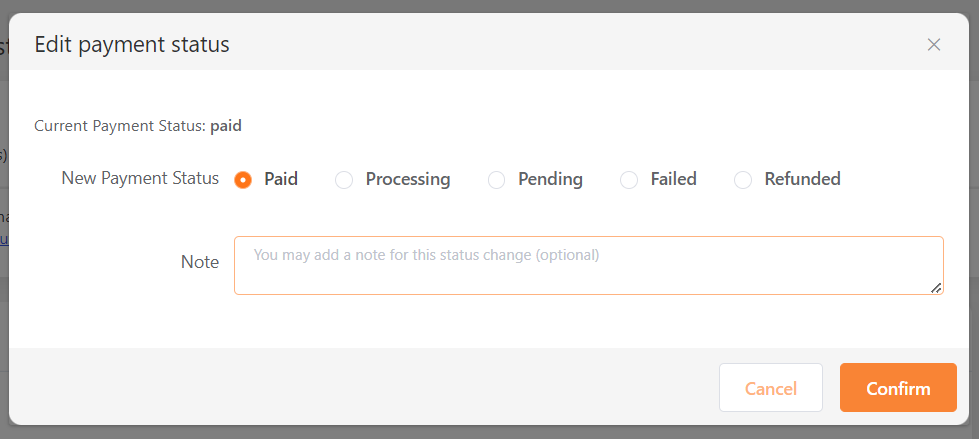
In the right corner, there is an option named “Actions”. Hover over it and you’ll find an option that appears “Change Payment Status”.
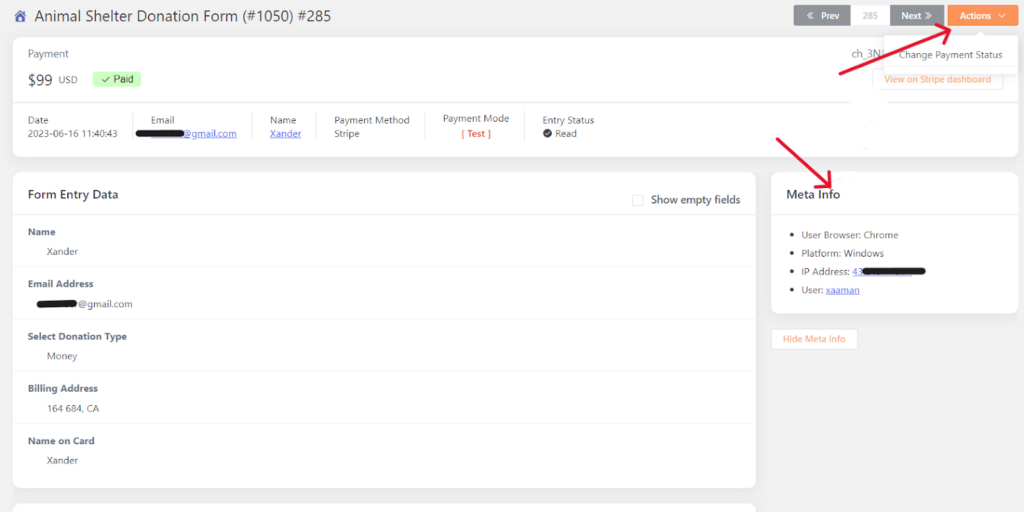
You can change the payment status by clicking on it. There are five options for you.
- Paid
- Processing
- Pending
- Failed
- Refunded
You can also add a note if you want while changing the payment status.
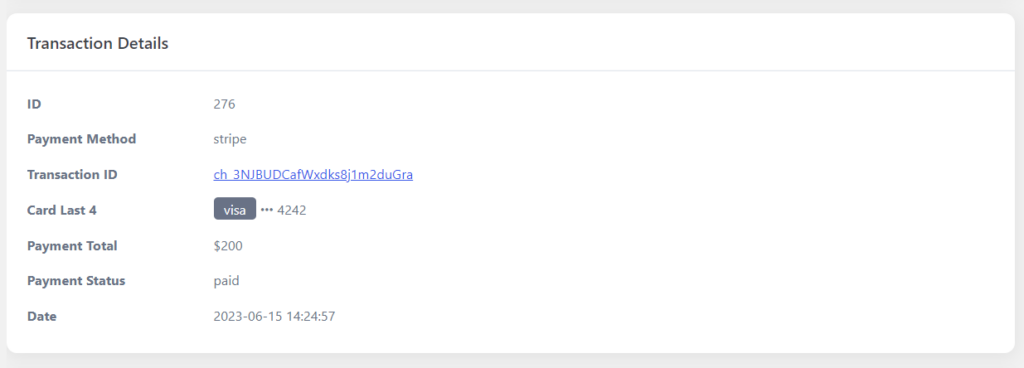
Scrolling down, you’ll see the most important “Payment Items and Transaction Details” of an entry. On the “Payment Items” field, you’ll find the name of the items that your customer has bought, their quantity, item price, and the total amount to pay.

On the “Transaction Details” field you’ll see the transaction method, the all-important transaction ID, and the transaction date.
You can print the entry details, export them in a JSON file, and also send email notifications manually.

How to export form entries in WordPress with Paymattic?
In Paymattic there are two methods to export form entries. We’ve already described how to export a specific form entry in a JSON file. Now let’s move to the bulk actions.
Go to Paymattic > All Forms
You’ll see all the forms you’ve created on your website. Hover over a certain form and there’ll be some options appearing. Click ‘Entries’ from these. On the right, you can see how many entries you get from this form.
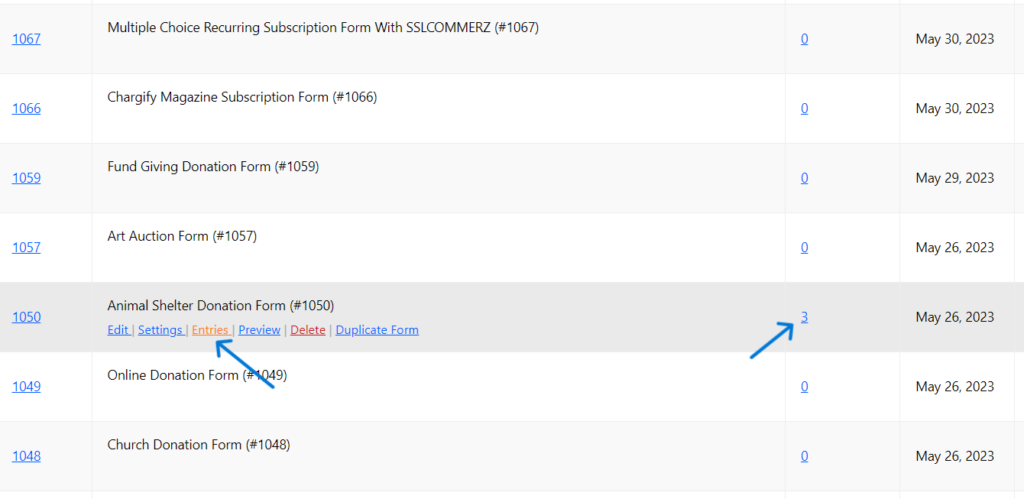
After clicking ‘Entries’ a report will appear about the form. This report will provide all the submission data and payment summary. You can find all the collected data here about this form.
For bulk export, hover over the ‘Export’ button. You can export selected entries or all the entries at once. Export the form entries in CSV, Excel, ODS, or JSON files.
From here, you can also find the details of a particular entry by clicking the blue eye icon on the right.
For bulk action, click the ‘Bulk Actions’ button right below the Form Entries. A drop-down menu will appear with delete or send emails. Here you can delete entries or send email notifications to the selected entries.
To send an email notification in bulk, choose ‘Send Email’. Select the number of entries you want to send the email notification to and then click on ‘Send Email Notification Manually’.
You’re also allowed to search by the entries’ certain keywords to take any action.
Manage subscription payments in WordPress?
If you want to accept a subscription or recurring payments to your WordPress website, Paymattic is a great choice for you. WordPress subscription payment helps you to collect payment or donation from your customer or donor at a specific set of time intervals.
Collecting subscription payments in WordPress can scale up your business or donations too. To collect subscription payments,
Go to Paymattic Pro > All Forms.
Hover on your subscription form and click on ‘Entries’. All the entries from this form will appear.
Click on the view icon to go into details.
Scrolling down you can find the subscription payment field. This field will provide you with the summary of a subscriber. Click ‘Sync’ to refresh all the subscription details of a customer.
The latest billing information is in the ‘Related Payments’ fields.
If the customer has made the payment through online payment gateways such as Stripe, then you can see a ‘View on Stripe’ button to redirect you to the Stripe dashboard. From the dashboard, you can cancel the subscription if you need to.
Wrapping up
Form entries play a crucial role in WordPress, allowing you to collect and manage essential information about your users, whether it’s about purchasing, donating, or recurring payments.
In essence, Paymattic simplifies the process of handling form entries in WordPress, providing you with a comprehensive and efficient way to manage your user data, track transactions, and streamline your workflow.
Experience the convenience and significance of Paymattic to enhance websites form entry management today.
Join the thousands already enjoying Paymattic Pro!







Leave a Reply