How to Accept Payment on PayPal with WordPress


Table of Content
Download Paymattic – it’s Free!

Subscribe To Get
WordPress Guides, Tips, and Tutorials
We will never spam you. We will only send you product updates and tips.
TL;DR:
To accept PayPal payments on WordPress, you need a PayPal Business account (free to upgrade) and SSL on your site. While PayPal’s built-in buttons work for basic needs, a plugin like Paymattic gives you professional payment forms, customer data collection, and recurring subscriptions without leaving your site.
Install Paymattic → connect PayPal in settings → create a payment form → test in sandbox mode → go live.
PayPal fees run about 2.99% + $0.49 per transaction domestically.
You’ve built your WordPress site, got products to sell, services, or memberships to offer. But there’s one critical piece missing: a way to get paid.
If you’re wondering how to accept payment on PayPal through your WordPress website, you’re not alone.
Thousands of small business owners, freelancers, and course sellers face this challenge every day. While setting up PayPal payments on WordPress is far simpler than most people think, you don’t need to be a developer to do it.
PayPal is secure, familiar to customers, and works seamlessly across borders. Your customers already have accounts. The only question is whether you’ll make it easy for them to pay you
So, in this guide, we’ll walk you through everything you need to know about accepting PayPal payments on WordPress, from choosing the right method to setting up your first payment form. Let’s turn those visitors into paying customers.
Why is it important to accept PayPal payments?
Before jumping into the technical steps, it’s worth understanding why so many small business owners trust PayPal as their payment gateway.
Global trust and brand recognition
According to recent data, PayPal processes over $1.6 trillion in payments annually across 200+ countries for over 400 million active accounts worldwide. That’s a massive customer base already comfortable with the platform.
When your customer sees the PayPal logo at checkout, they know what to expect and that familiarity translates into trust and higher conversion rates.
Supports cards + PayPal balance
Here’s something many people don’t realize: when you accept credit card payments with PayPal, customers don’t actually need a PayPal account. They can check out using any major credit or debit card through PayPal’s gateway.
This dual functionality means you’re not limiting yourself to only PayPal users; you’re opening your doors to virtually anyone with a payment card.
Safer checkout for customers
PayPal doesn’t share customers’ financial details with merchants. This layer of privacy protection makes nervous shoppers more willing to complete transactions, especially on newer or smaller websites.
From your perspective as a business owner, you also don’t have to worry about storing sensitive card data, which dramatically reduces your security liability.
Also, PayPal offers protection for both sides of a transaction. Buyers get refunds if something goes wrong, and sellers get protection against fraudulent claims.
Ideal for international payments
PayPal supports over 200 markets and 25 currencies. The platform handles currency conversion automatically, making it incredibly easy for websites that accept PayPal payments. This removes a major barrier for global sales.
What you need before accepting PayPal payments
Before you set up PayPal payments, make sure you have these essentials in place.
A Self-Hosted WordPress Website
This guide assumes you’re using WordPress.org (not WordPress.com) with full access to install plugins. If you’re on a basic WordPress.com plan, you’ll need to upgrade or consider moving to a self-hosted solution.
A PayPal business account
This is crucial. While you technically can use a personal PayPal account to receive money, it’s not recommended and has some limitations. Online stores that accept PayPal payments require a PayPal business account to access important features for running a store smoothly.
A Business account gives you:
- Access to PayPal’s merchant tools
- The ability to accept credit and debit cards through PayPal
- Invoice creation and management
- Multiple user access for your team
- Detailed reporting and analytics
Setting up a Business account is free. Just log in to PayPal and upgrade from your account settings.
SSL certificate
This is non-negotiable. Your site needs HTTPS (the padlock icon in the browser). An SSL certificate encrypts data between your website and your visitors.
Most hosting providers now include free SSL certificates these days. If you don’t have one, contact your hosting provider to get this sorted. Payment processors require SSL, and so do your customers’ browsers.
Subscribe Newsletter
Subscribe to our newsletter for updates, exclusive offers, and news you won’t miss!

Different ways to accept PayPal payments on WordPress
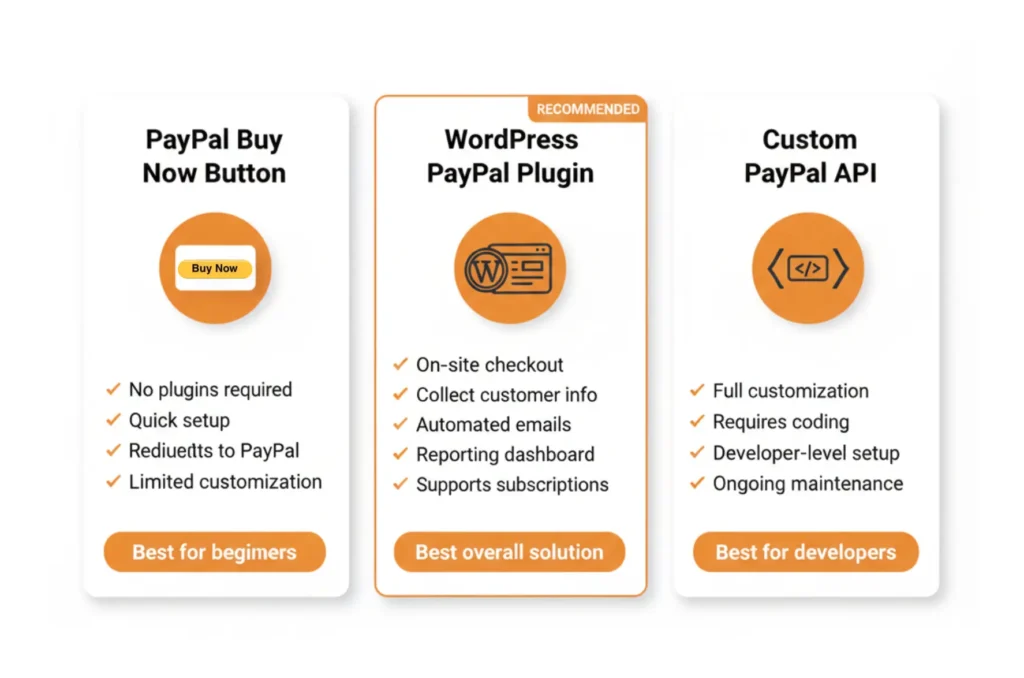
There are three main approaches to accepting PayPal payments on WordPress. Each has its place depending on your needs and technical comfort level. Let’s explore each one so you can choose what fits your situation.
PayPal Buy Now or Donate buttons
If you want to learn the most basic method for how to accept payment on PayPal without installing any plugins, use PayPal’s built-in “Buy Now” button.
PayPal offers simple HTML buttons you can generate directly from your PayPal account and paste into WordPress pages or posts. These buttons create a basic “Buy Now” or “Donate” link that redirects customers to PayPal’s website to complete payment.
How do you accept a payment on PayPal using the PayPal “Buy Now” button?
- Log in to your PayPal Business account
- Navigate to Pay & Get Paid > Accept Payments
- Select PayPal Buttons from the options
- Choose your button type (Buy Now, Add to Cart, Donate, or Subscribe)
- Configure the button settings
- Click the Create Button to generate the HTML embed code
- Copy the code and paste it into your WordPress page using the HTML block
Setting up a “Buy Now” or PayPal Donate button is incredibly simple, and no plugins are required for this. But it has very limited customization, a poor user experience that redirects customers away from your site to complete payment, no control over checkout flow, and limited tracking and reporting.
Best for: Absolute beginners with one or two items to sell, occasional transactions where you don’t need customer data or a professional checkout experience.
Accept PayPal payments using a WordPress plugin (Recommended)
A dedicated payment plugin handles the heavy lifting while keeping customers on your site.
Websites that accept PayPal payment are most likely use WordPress PayPal plugins to provide a professional checkout experience.
Why plugins are better:
- Better checkout experience: Customers complete payment without leaving your site. This professional appearance builds trust and reduces cart abandonment.
- Collect customer information: Plugins give you complete control over your payment forms while keeping everything within WordPress. You can customize fields, match your branding, collect additional customer information (names, emails, addresses), and manage everything from your WordPress dashboard.
- Automation: PayPal plugins for WordPress automatically send confirmation emails, update customer records, trigger thank-you pages, and integrate with email marketing tools. This automation saves hours of manual work and ensures nothing falls through the cracks.
- Multiple payment types: Quality plugins handle one-time payments, subscriptions, partial payments, donations, and more, all through the same interface.
- Reporting: Track payments, customers, and revenue from your WordPress dashboard
- Form flexibility: You can create any type of payment forms that match your exact needs, plus many plugins offers ready to use, customizable payment forms.
Custom PayPal API integration
PayPal provides APIs that developers can use to build custom payment solutions. This involves writing code to connect directly to PayPal’s servers.
This is for experienced developers building custom platforms with very specific requirements that existing plugins can’t meet.
Why beginners should avoid it:
Unless you have solid PHP knowledge and understanding of WordPress development standards, you should avoid it. Most WordPress plugin provides everything you need without touching code.
Custom API work is expensive, time-consuming, and requires ongoing maintenance.
How do I accept a payment on PayPal with WordPress?
Now we’re getting to the good stuff. This is where you’ll actually set up your payment system.
Whenever you ask this question, “How do I accept a payment on PayPal?”, the first thing you’ll need is a good WordPress plugin with PayPal support.
When choosing a plugin for accepting credit card payments via PayPal, look for these key features: regular updates (check the plugin’s last update date), active support (how quickly do they respond to questions?), solid reviews from real users, and, of course, reliable PayPal integration.
For this tutorial, we’ll use Paymattic Pro, a powerful yet beginner-friendly WordPress payment plugin that checks all these boxes. It’s specifically designed for non-technical users while offering enough flexibility for growing businesses.
Install a PayPal payment plugin
From your WordPress dashboard:
- Go to Plugins → Add New
- Search for “Paymattic“
- Click Install Now, then Activate
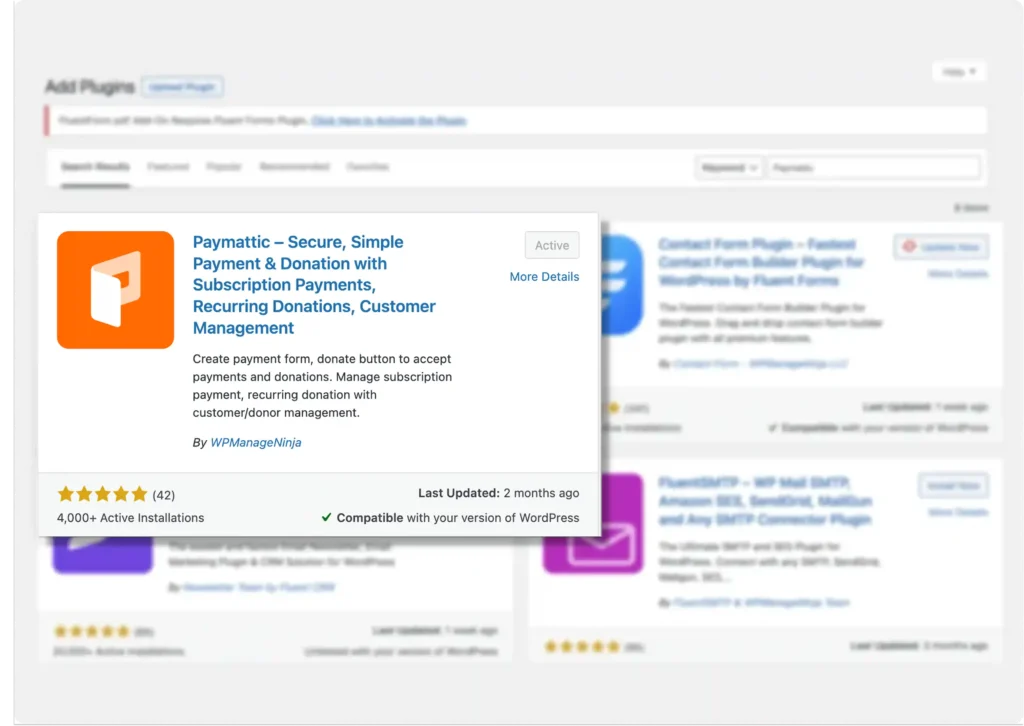
Paymattic offers a free version with Stripe payment gateway and other essential features, and a Pro version that unlocks advanced capabilities like 13 region-focused payment gateways, including PayPal, recurring payments, customer dashboard, and detailed reporting, etc.
You can also download the plugin and upload it to your WordPress dashboard, and then install it.
- Go to Plugins → Add Plugins
- Click on Upload Plugin → Upload the ZIP file
- Click on Install, and you’re done
Configure PayPal integration
- Paymattic (Pro) → Payment Gateway from your WordPress dashboard.
- From the payment gateways list, choose PayPal.
You’ll find two modes here, “Sandbox and Live Mode,” to accept payment with PayPal. Choose Sandbox Mode for testing and Live Mode to receive payments via PayPal.
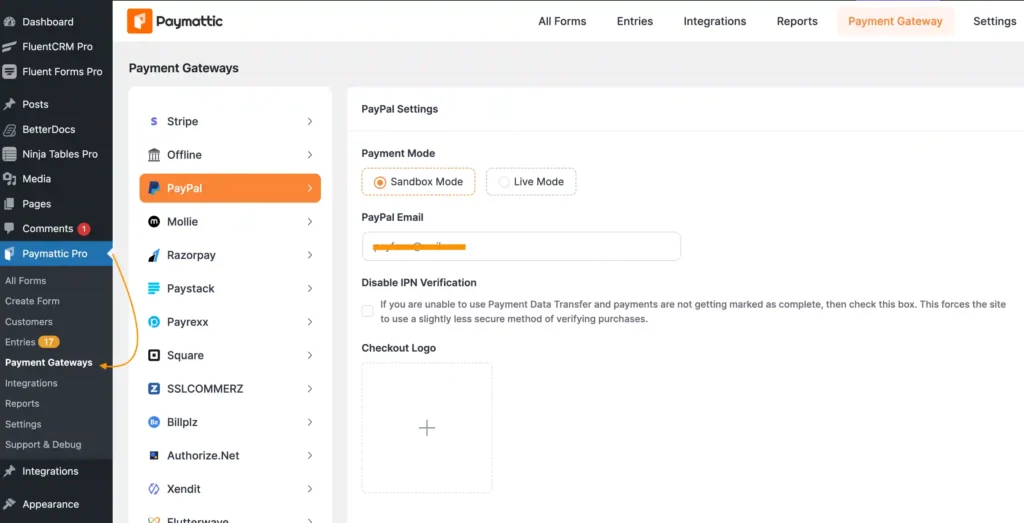
For now, we’ll show you how to configure the Live Mode (both types of modes follow the same configuration process).
- Select the Live Mode.
- Enter your PayPal account email.
- If you are unable to use Payment Data Transfer and payments are not getting marked as complete, then turn on Disable PayPal IPN Verification.
- In the Checkout Logo field, set a logo to display during checkout.
Set up the Confirmation Page Settings to choose what will display after a successful payment or any failure.
- Click Save Settings.
You’re now ready to accept one-time payments with PayPal worldwide.
Accept PayPal recurring payment
With Paymattic, you can also accept PayPal recurring payments.
To do so, you need to set up the IPN notification. Just put the notification URL on your PayPal account dashboard.
Scroll down a bit on the same dashboard, and you’ll find the notification URL there.
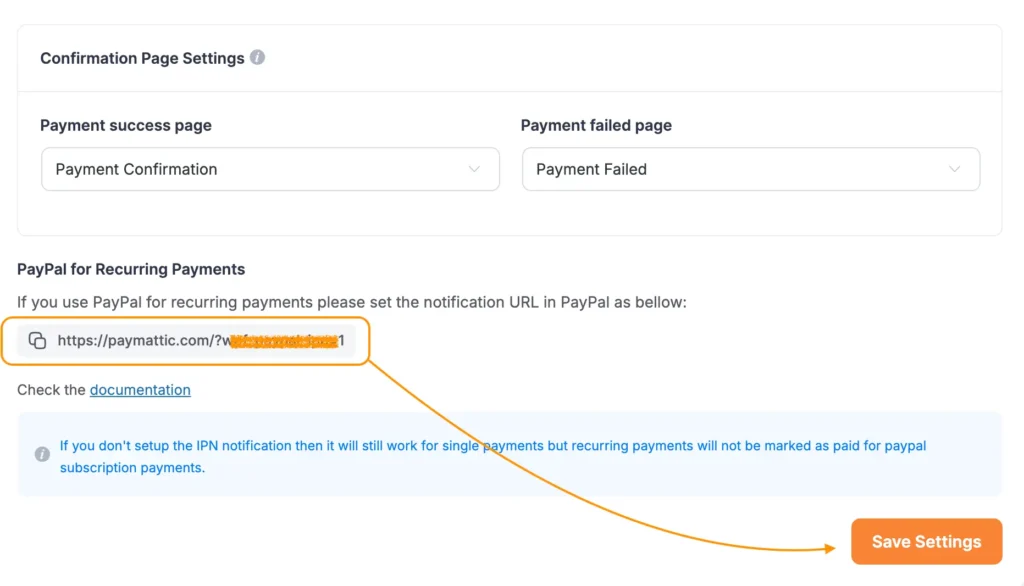
- Copy the URL and paste it into your PayPal user (IPN settings) dashboard.
And you’re set to receive PayPal recurring payments with Paymattic.
Create a PayPal payment form
Now you’ll need to build the form customers use to make payments:
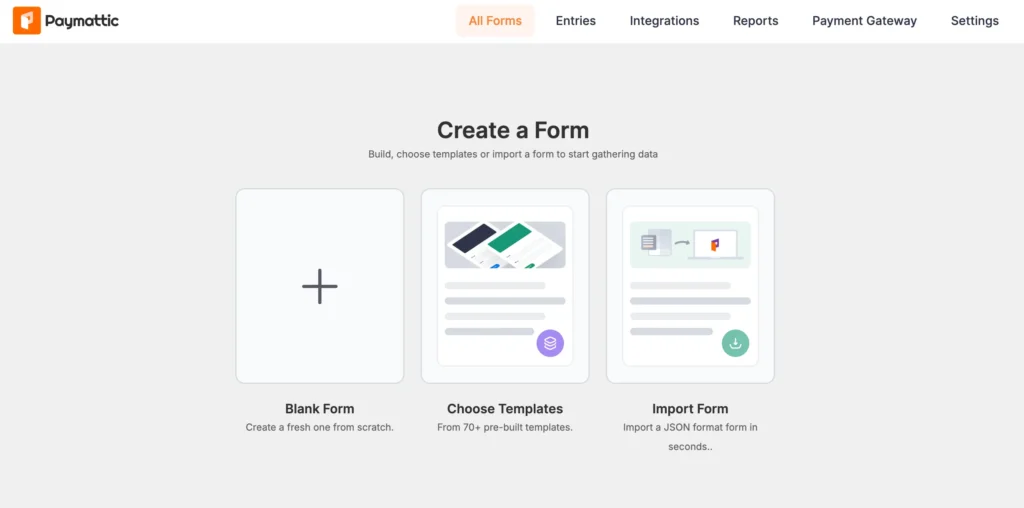
- Go to Paymattic > Create Form from your dashboard.
- You’ll see template options. Choose a template that matches your use case (Product Payment, Donation, Service Payment, Recurring Payments, etc.) or select Blank Form to start fresh.
- The form builder opens with a drag-and-drop interface.
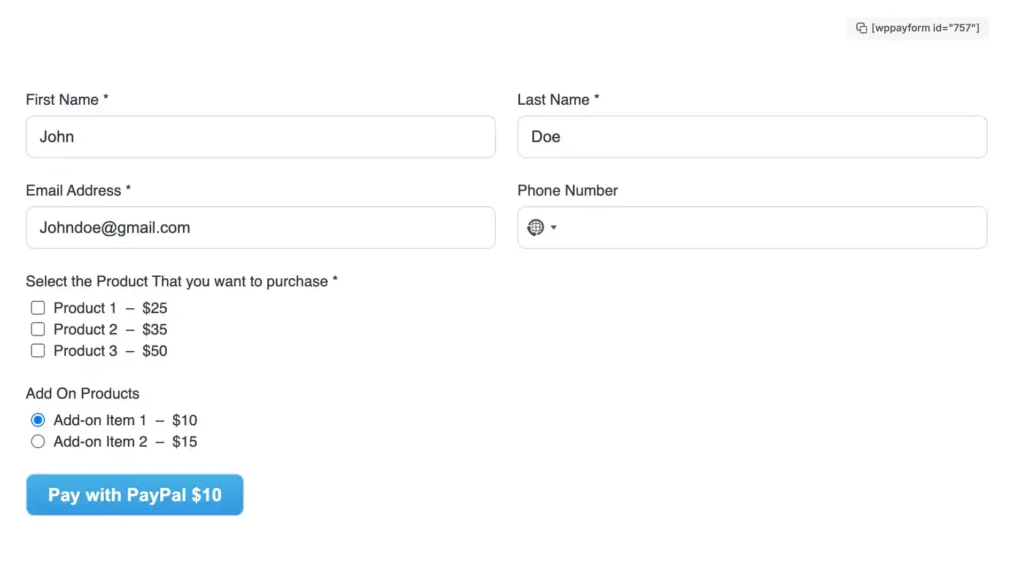
Add essential fields:
- Customer Name (First and Last Name fields)
- Email Address (required for payment receipts)
- Payment Item field for product selection or custom amounts
- Payment Method field to display PayPal as an option
- Preview and Save your form
Publish the form and receive payment through PayPal
Getting your form onto a page takes just a few clicks:
- After saving your form, Paymattic displays a shortcode like this: [wppayform-id=”X”]
- Copy this shortcode
- Create a new page in WordPress or open the page you want to use the form on
- Add a Shortcode block and paste your Paymattic shortcode
- Publish or update the page
That’s all about how to accept payment on PayPal on your WordPress website using the Paymattic plugin. It’s that simple to set up. When customers fill it out and click pay, they’ll see PayPal’s secure payment window. After completing payment, they return to your site and see your confirmation message.
Common mistakes to avoid when accepting PayPal payments
Learn from others’ mistakes instead of making them yourself. Avoid them, save yourself headaches when setting up PayPal payments.
Using a personal PayPal account
Personal accounts can receive money, but they lack business features. You’ll hit receiving limits quickly, miss out on invoicing tools, and may face account restrictions. Always use a PayPal Business account for accepting payments on your website.
Not testing payments
Test everything before going live. Test again after making changes. Test on different devices and browsers. Test payments reveal problems with your setup before real customers encounter them.
Ignoring currency settings
If your WordPress plugin is set to USD but your PayPal account primarily uses EUR, you may encounter conversion issues or failed payments. Make sure currencies match across your PayPal account and payment plugin settings.
Not setting up email notifications
Payments without notifications lead to missed orders. Configure email notifications so you know immediately when money comes in. Set up customer receipts so buyers have confirmation of their purchase.
Ignoring mobile users
A significant portion of your customers will pay from their phones. Test your payment forms on mobile devices. Forms that work perfectly on desktops can be frustrating on smaller screens. Paymattic forms are mobile-responsive by default, but always verify.
PayPal costs and fees
Let’s talk money. Setting up a PayPal account is free, and accepting payments with PayPal isn’t free. They charge fees for processing payments. Understanding these costs helps you price products appropriately and avoid surprises.
Transaction fees
For standard commercial transactions in the US, PayPal charges:
- Domestic payments: 2.99% + $0.49 per transaction
- Online card payments: 2.59% + $0.49 per transaction
Rates vary by country and may be different for your region. Check PayPal’s current fee schedule for your location. Also, these rates can vary based on your monthly sales volume; higher volume can qualify you for lower rates.
International and currency conversion fees
Accepting payments from other countries adds costs:
- International transactions: Additional 1.5% on top of standard fees
- Currency conversion: 3-4% above the base exchange rate
If you do significant international business, these fees add up. Consider whether to price in multiple currencies or let PayPal handle conversion.
Chargeback and dispute fees
When customers dispute a payment:
- Chargeback fee: $20 per dispute (may be waived if resolved in your favor)
- Investigation time: PayPal holds funds during review
Good customer service and clear product descriptions reduce disputes. Respond promptly to any claims PayPal sends you.
Wrapping up
Now you know exactly how to accept payment on PayPal with your WordPress website. From basic PayPal buttons to professional payment forms with recurring subscriptions, you have multiple options to choose from.
Using Paymattic or similar WordPress PayPal plugins strikes the perfect balance between ease of use and professional functionality. You get complete control over your checkout experience without needing to write a single line of code.
Join the thousands already enjoying Paymattic Pro!

Tipu Deb
Hey! Tipu here, working as a Marketing Strategist at WPManageNinja & Paymattic. A nature lover and a person who is addicted to exploring historical events. In my leisure, you’ll find me playing with different musical instruments.


Leave a Reply