
How to Accept Google Pay Payments in WordPress [Free]
Table of Content
Download Paymattic – it’s Free!

Subscribe To Get
WordPress Guides, Tips, and Tutorials
We will never spam you. We will only send you product updates and tips.
Just think of the scenario, you have to make an urgent payment online but don’t have the card details with you! So, wouldn’t it be amazing if you could pay on any website simply just using your Google account instead of putting your card details every time you make a new purchase?
Yes, we are talking about the phenomenal digital wallet system Google Pay. It’s a fast-paced and interconnected world now. Everyone wants simplicity in payments and never likes to put the card details repeatedly when they can do the same with a single tap.
If you are taking online payments on your website, you must provide a swift payment process & better checkout experience to beat the competition behind. The easier the checkout process, the higher the conversion rate.
In this blog today, we will guide you on how to accept Google Pay payments into the WordPress website so that you can increase your conversion rate manifold.
What is Google Pay?
Google Pay is a digital payment platform developed by the tech giant Google. It allows users to make payments, send money, and manage their finances using their mobile devices and the internet. Google Pay offers a convenient and secure way to make transactions without the need to carry physical cash or credit cards.
Google Pay also facilitates online transactions on various websites and apps. Users can choose Google Pay as their preferred payment method during checkout, making the process faster and more streamlined.
Moreover, users can add their credit or debit cards to the Google Pay account. With the Near Field Communication (NFC) technology, they can make contactless payments at supported point-of-sale (POS) terminals by simply tapping their phones on the payment terminal.
How does Google Pay work?
Google Pay is very simple to use with your Google account and smartphone. Basically, all you need to do is set up your debit or credit card in your Google Pay account. You can download the Google Pay app or do it directly from the browser accessing your Google account.
Whenever you need to make an online payment, select the Google Pay option and put in your Google credential. Google will automatically debit the balance from your card that you set up in the payment method option. It saves you time to put card details every time you purchase from a new website.
Is Google Pay safe?
Google Pay is one of the most secure payment platforms. Google Pay implements multiple security measures to protect users’ financial data and transactions.
When the users add their credit or debit card to Google Pay, the system generates a virtual card number known as a “token.” This token is used for authenticating the transaction instead of your actual card details. It ensures that your sensitive card details are not shared with merchants during payment processing, reducing the risk of your information getting exposed in case of a data breach.
Besides, Google Pay sends notifications to your registered email or phone number for every transaction. If there is any suspicious activity, you can quickly identify and report it.
Google Pay uses encryption technology to secure your payment data during transmission. This ensures that your information remains private and protected while it travels between your device and the payment processing network.
Subscribe Newsletter
Subscribe to our newsletter for updates, exclusive offers, and news you won’t miss!

Accept Google Pay payments in WordPress
I am confident that you are totally convinced by the amazing features of Google Pay. Maybe you are wondering how you can accept Google Pay payments to your WordPress website.
The process is so simple that you will end up setting Google Pay payment on your website by following some simple steps in this blog. Without further ado, let’s jump into the key steps to add the Google Pay payment method in the WordPress site with the help of the Paymattic plugin.
Install & Activate Paymattic
First of all, you only need the free version of the Paymattic WordPress plugin to accept the Google Pay payment method in WordPress. To install the plugin –
- Go to your WordPress admin dashboard and click on Plugins → Add New. Search for Paymattic plugin and install it, then activate the plugin.

The Paymattic free version is enough to take payments through Google Pay using Stripe but we recommend you to upgrade to the pro version to receive Google Pay payments using other payment gateways such as Square, Paystack, Razorpay, etc.
Besides, the pro version of Paymattic offers you a bundle of 13 payment gateways that allow you to receive payments in 135 currencies globally.
Create a payment form
Once you have activated the plugin you need to create a payment form to receive payment. You can use this payment form as a checkout form. Let’s see how to create a payment form in a blink.
Check this blog to learn how to create a payment form in more detail
Add payment method
Adding a payment method in Paymattic is simple like adding a form field. Just click the “+” icon and select the payment method. You can select a single or multiple payment methods to receive payments with Google Pay. You can accept Google Pay payments through Stripe (free), Square, Paystack & Razorpay using the Paymattic plugin.
For example, we are choosing Stripe here to receive Google Pay payments. You can add other payment methods as the same way we added Stripe here. However, the Stripe payment gateway is a free feature of Paymattic, so you can add this payment gateway in the free version.
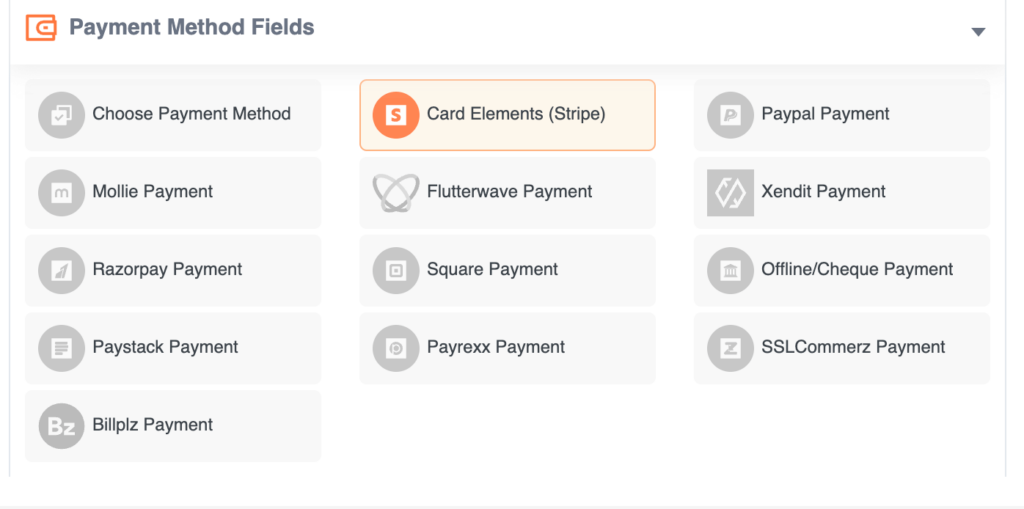
You have to upgrade to the pro version in case you want to use all the other available payment methods along with Stripe.
Remember, it’s important to configure Stripe with Paymattic to function all the payment processing properly. Check this blog to learn how to integrate your Stripe account with Paymattic
You also need to turn on the Google Pay module in your Stripe dashboard to enable Google Pay on the checkout page.
Publish the payment form
You are almost done! You have created the payment form & added the payment gateway too. Now, it’s time to publish the form on your checkout page.
- Go to Paymattic → All Forms & select the form you want to publish on your payment page.
- Copy the shortcode of the payment form & paste it on the payment page.
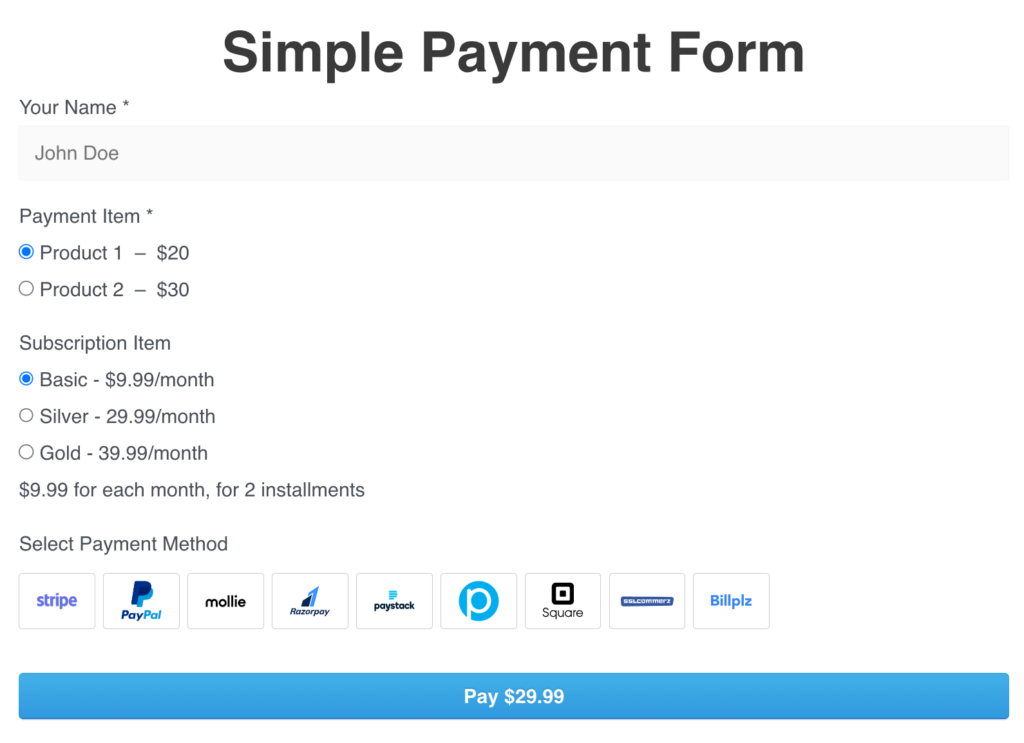
- Finally, publish the page & you are ready to accept payment with Google Pay! Here is a sample preview of how your payment form may look like.
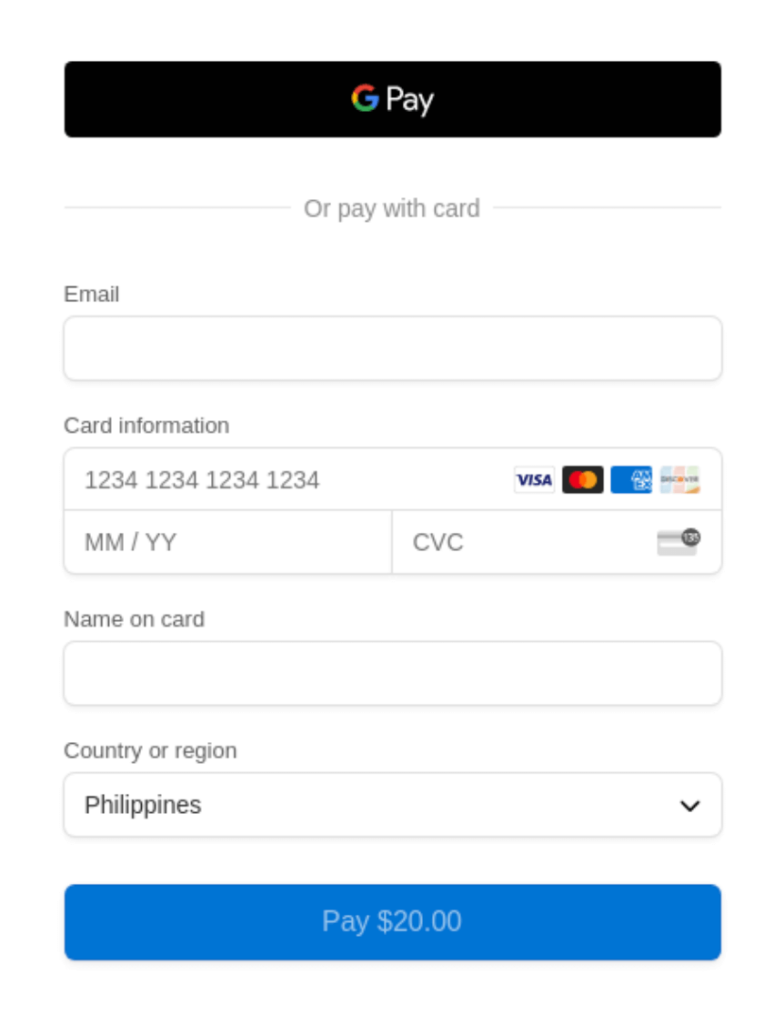
- Now, your customer can view the Google Pay payment option in the Stripe checkout page.
Final words
Google Pay payment method has undoubtedly revolutionized the way we handle payments in the digital age. The seamless, secure, and user-friendly platform makes it a preferred choice for millions, and as technology advances, we can expect Google Pay to continue setting new benchmarks in the digital payment industry.
Paymattic is the most easy-to-use tool to add Google Pay payments into your WordPress website. If you already loved our plugin, share with us which feature you love the most about Paymattic & what else can we cook for you next.
We are all ears!
Join the thousands already enjoying Paymattic Pro!






Leave a Reply