Stripe Payment Form Styling Made Easy: A Step-by-Step Guide Using Paymattic


Table of Content
Download Paymattic – it’s Free!

Subscribe To Get
WordPress Guides, Tips, and Tutorials
We will never spam you. We will only send you product updates and tips.
TL;DR: Stripe Payment Form Styling on WordPress
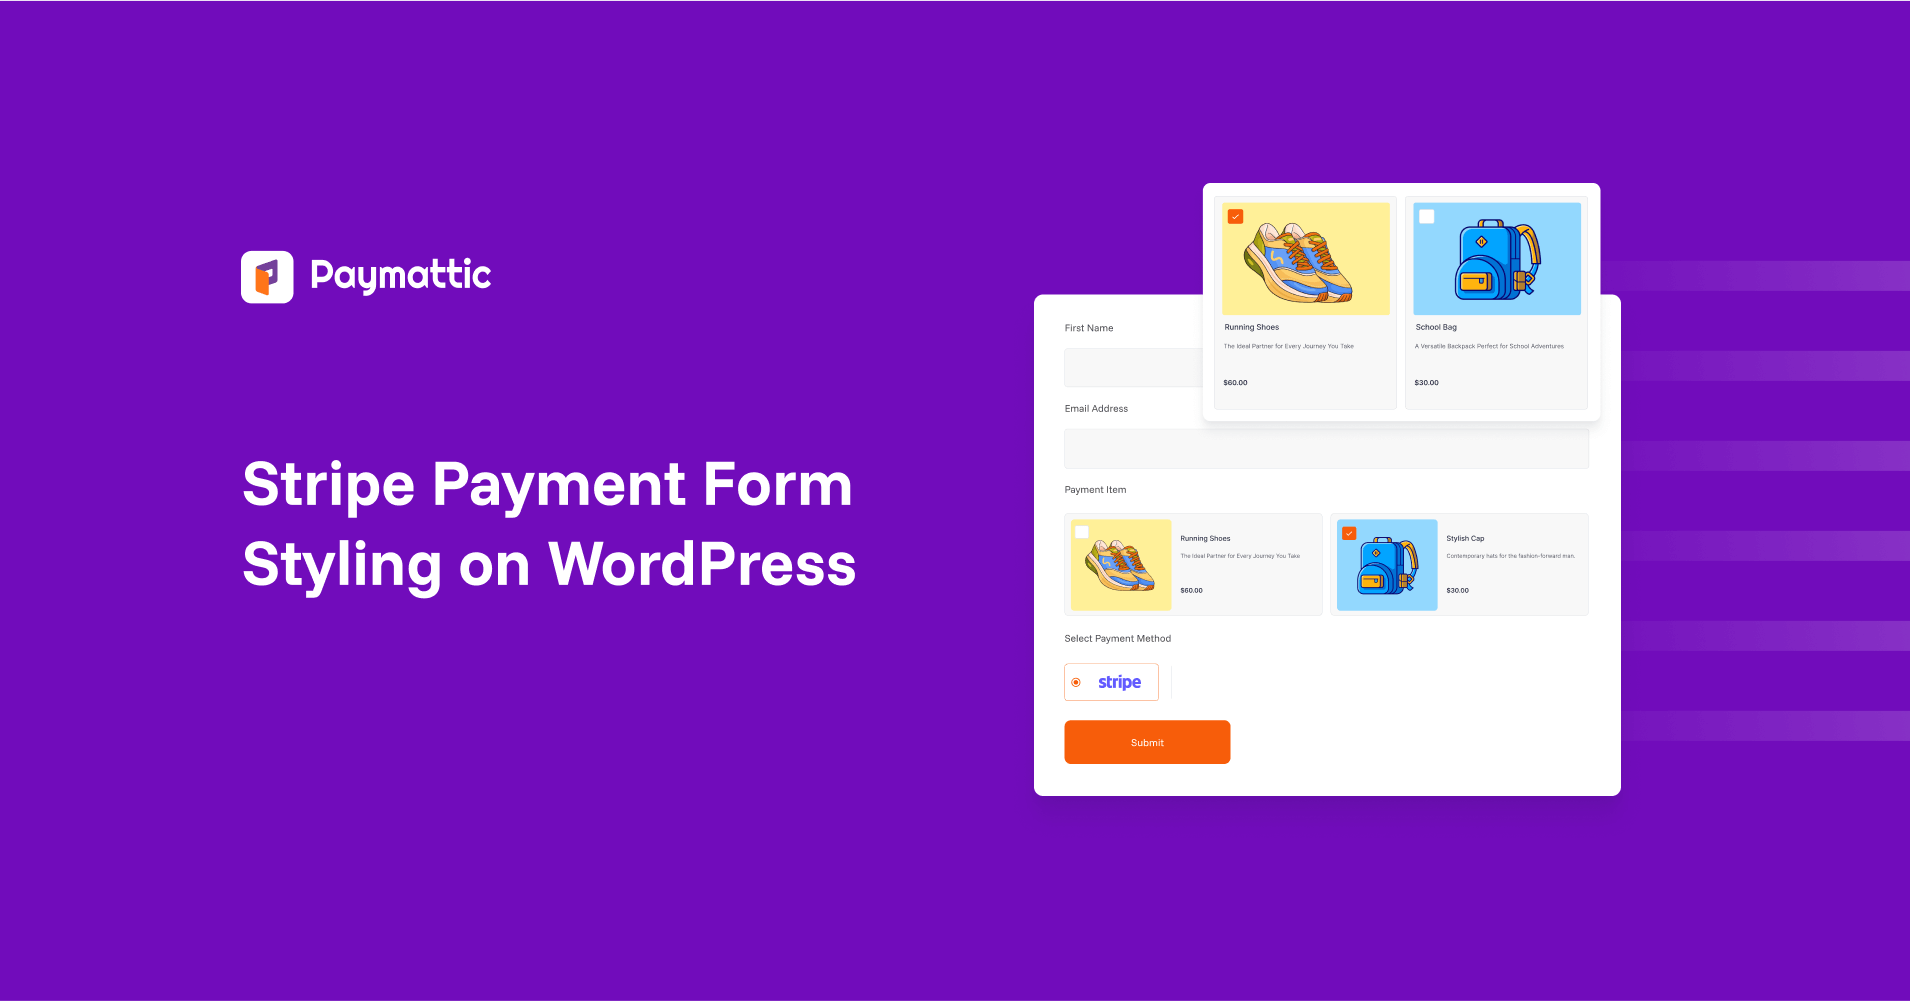
A plain payment form can make your website feel boring, and doesn’t look professional and trustworthy. But don’t worry, styling it is super easy with Paymattic. You can customize the layout, tweak the button style, and even add your brand colours using built-in options or a bit of custom CSS. Whether you’re using the free version or upgrading to Pro for extra control, Paymattic allows you to create a Stripe payment form that perfectly fits your brand.
Have you ever changed your mind and skipped a purchase just because the payment form looked so dull or confusing?
Once I saw a small online store selling handmade candles. Their website looked beautiful, but when I went to check out for payment, the forms looked messy, the buttons were tiny, and the colours didn’t match the rest of the site. It makes me confused to share card credentials, and honestly, I didn’t complete the purchase.
That’s how powerful the payment form role is on your online store. Even if your product is amazing, a poorly designed form can deter people. But when your form says about your brand, it automatically builds trust and encourages people to complete the payment.
Now, the good news is, you don’t need to be a developer or designer to make your payment form look great. You can style your payment form on WordPress using Paymattic, without any technical hassle.
In this blog, we will show you how to customize your form’s layout, button styles, and even use a little bit of custom CSS if you want to fine-tune things more.
So, let’s get started and give your Stripe payment form the glow-up it deserves!
Why should you style your Stripe payment form?
Stripe is one of the most popular payment gateways for online businesses. It makes accepting payment online simple and secure for online e-commerce stores, and others who selling digital products, or collecting funds for a project. That’s why so many businesses trust Stripe to handle their transactions.
The final step of running an online business is to make a sale. But just connecting Stripe to your website isn’t enough to increase sales. It doesn’t mean people will purchase on your site because your offer Stripe. People are completing their payments, mostly depending on how they feel about the look of your payment form.
If the payment form looks totally different from the rest of your website, it can create doubt in your customer’s mind. Styling your payment form helps you match it with your brand, improve user experience, and remove any distractions that might stop a customer from completing the payment.
Moreover, a well-designed web form makes people feel confident, and that confidence turns into more completed payments.
And yes, Paymattic can help you build a payment form that complements your brand perfectly and increases your sales rates.
Paymattic – The best WordPress payment plugin
Paymattic is a powerful WordPress payment & donation plugin that simplifies online payments, donations, and subscriptions in one place.
With support for Stripe, PayPal, offline payments, subscriptions, multi-currency, and detailed reporting, it’s your all-in-one solution for collecting payments, managing donations, and growing your business with ease.
Some notable features of Paymattic:
- 13+ global payment gateways covering the whole world.
- Supports 155+ currencies.
- Supports both one-time or recurring payments.
- Offers a detailed customer dashboard to manage subscriptions.
- Offers a detailed report dashboard.
- Integrates with major tools.
- Offers a built-in drag-and-drop form builder with 35+ custom input fields.
- PCI-DSS compliance and built with security best practices.
- Advanced fraud protection with Honeypot, ReCAPTCHA V2 and V3, and Cloudflare Turnstile.
- Offers hooks, filters, and extensive documentation for custom development.
Ready to get started?
Experience WordPress payment and donation like never before. Try Paymattic now!
How to style Stripe payment forms using Paymattic
Before we begin, please ensure that you have set up Paymattic on your site.
Step 1: Install and activate Paymattic on WordPress
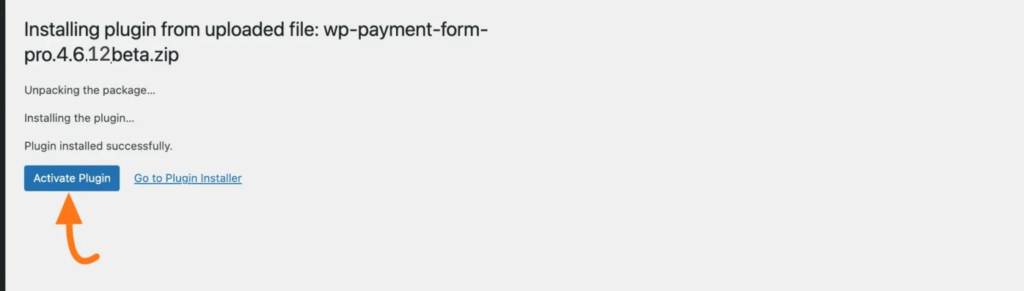
To install and activate Paymattic Pro, first download the Paymattic Pro plugin (.zip file) to your device. To get the zip file, first purchase the pro plugin from here.
Once you get the zip file, go to the Plugins section from your WordPress Dashboard, and click on Add New Plugin. Now, upload the zip file and click the “Install Now” button. Then, to activate, click on the Activate Plugin.
Step 2: Create your Stripe payment form
Paymattic allows you to create a form in two ways: either by using a prebuilt form template or by building one from scratch.
If you want to build one from scratch. Then, go to the Paymattic dashboard > Add New Forms > Blank Form. Here you will find all form fields, and input the necessary fields on your form.
To collect payment through the Stripe payment gateway, ensure that you have added Stripe as your payment gateway on the form.
Click here to learn the full process of creating a payment form with Paymattic
Step 3: Design your form using the built-in style settings
Paymattic offers the built-in design settings option, which allows you to style your form’s design as you want.
For that, go to the form editor page, click the Settings tab from the topbar, and you will get the Design settings option to customize your form’s design.

Here, you will get two different sections for customizing the design. These are:
- Form Layout
- Form Element Styling.
With the Form Layout settings, you can set the label alignment, choose where the required field asterisk appears, and adjust the submit button position to match your site’s style.
On the other hand, Form Element Styling options allow you to control the appearance of your form labels and input fields. You can make form labels bold for better visibility and apply Paymattic’s default input field styles to keep your form clean and consistent.
After completing the setup, click the Save Design Settings button to save all your changes.
Click here to learn more about Paymattic’s built-in customization option
Step 4: Customize the payment button
Paymattic gives you full control to style your payment button and make it match your form design. Earlier, you saw how to set the button’s position, Paymattic lets you play more with the payment button.
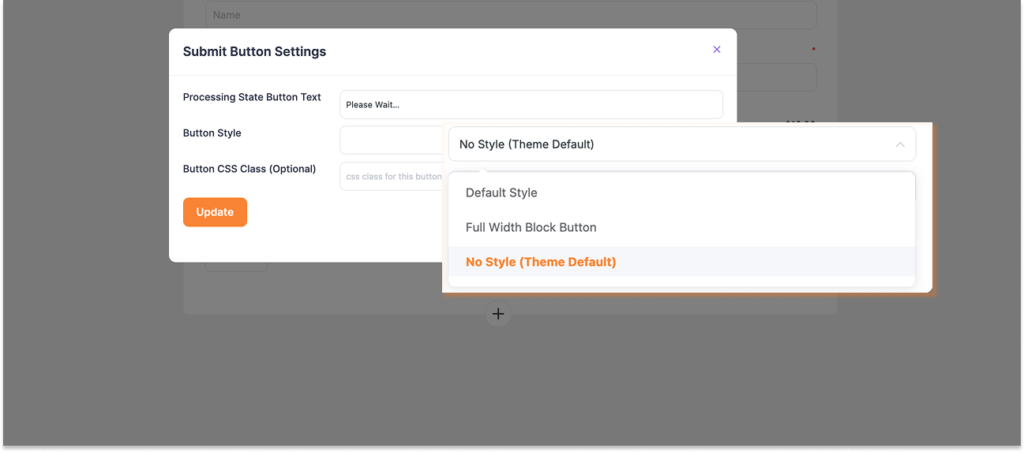
Here’s what you can do:
- Change the button text to match your payment goal (like “Pay Now”).
- Choose the button style, keep the default look, make it a full-width block button, or select no style to use your theme’s default button design.
- For extra personalization, use custom CSS to change the button colour and style it your way.
This flexibility helps you create a button that grabs attention and aligns perfectly with your website.
Step 5: Add custom CSS for advanced styling (optional but powerful)
Let’s say you want to change your form colour, and give it a colour that aligns with the brand well. Yes, Paymattic also lets you do that.
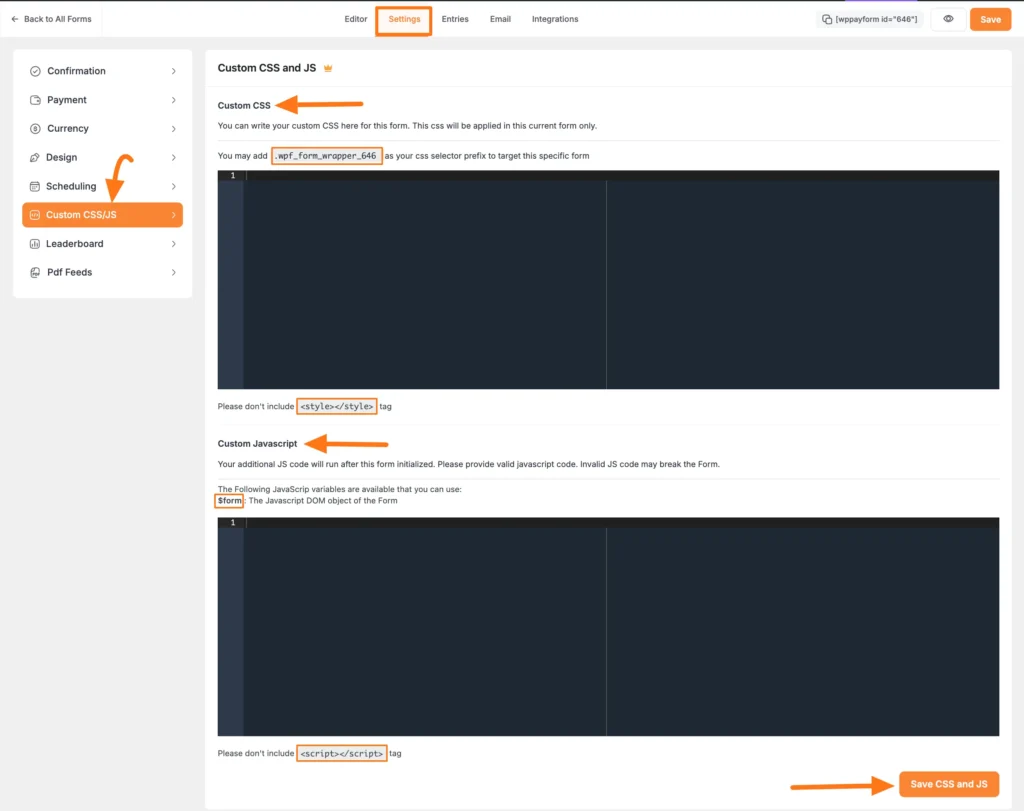
Paymattic lets you add Custom CSS/JS to style a specific form just the way you want. You can easily add your styles or scripts without affecting other forms on your site.
To do this, go to Form Editor > Settings > Custom CSS/JS. You’ll find a space to add your custom CSS or JavaScript. Once you’re done, just hit Save CSS & JS to apply the changes.
And that’s it, your payment form will now reflect the custom styles you’ve added. Here’s a quick demo of a payment form designed using Custom CSS.
Bonus tips: Use AI to create CSS recipes
Paymattic is a no-code form builder plugin. You don’t need to be a developer to create a beautiful form with Paymattic. But sometimes you may want something extraordinary, and at that time you might need a little extra touch with custom CSS.
Not everyone is an expert at writing CSS code from scratch. Even we use AI to generate simple CSS codes to make thing easy. Just give the AI a prompt of what you want to achieve in your own words. For example:
‘Write CSS code to give the Paymattic a subtle gradient background and make the text bold.’
Then AI will generate the ready-to-use CSS for you. Quick, simple, and hassle-free.
Ready to style your payment form with Paymattic?
We all want our website to look beautiful from top to bottom, and the payment form is no exception. A well-organized web form can completely change your website’s appearance.
You have already learned how to create a customizable payment form using Paymattic’s built-in design option and use of custom CSS to gain more control of your payment form.
Now, let me share some good news: Stripe payment gateway and the built-in design settings are available in Paymattic’s free version. So, if you really want to create a stunning Stripe payment form for your website, Paymattic will be the best option for you.
For advanced customizations, such as custom CSS, you need to purchase Paymattic Pro.
What are you waiting for? Get started with Paymattic today.
Frequently asked questions
Here are answers to some frequently asked questions about WordPress payment form styling:
1. How do I customize a Stripe payment form in WordPress?
You can easily customize a Stripe payment form using Paymattic’s built-in design settings and custom CSS.
2. Can I style the Stripe payment button without coding?
Yes, Paymattic lets you change the button text, style, and position without any coding.
3. Is custom CSS supported in Paymattic’s free version?
No, custom CSS/JS is a Pro feature, but you can use basic design settings in the free version.
4. Will the Stripe form match my WordPress theme?
Yes, you can select the “No Style” option to let your form inherit your theme’s default styles.
5. Can I preview the form styling before publishing?
Yes, Paymattic’s form editor lets you preview the styling changes in real-time.
Join the thousands already enjoying Paymattic Pro!

Madhobi
This is Madhobi, a content writer at WPManageNinja with expertise in technical writing and email marketing. Outside of work, she likes traveling and exploring new places.


Leave a Reply