
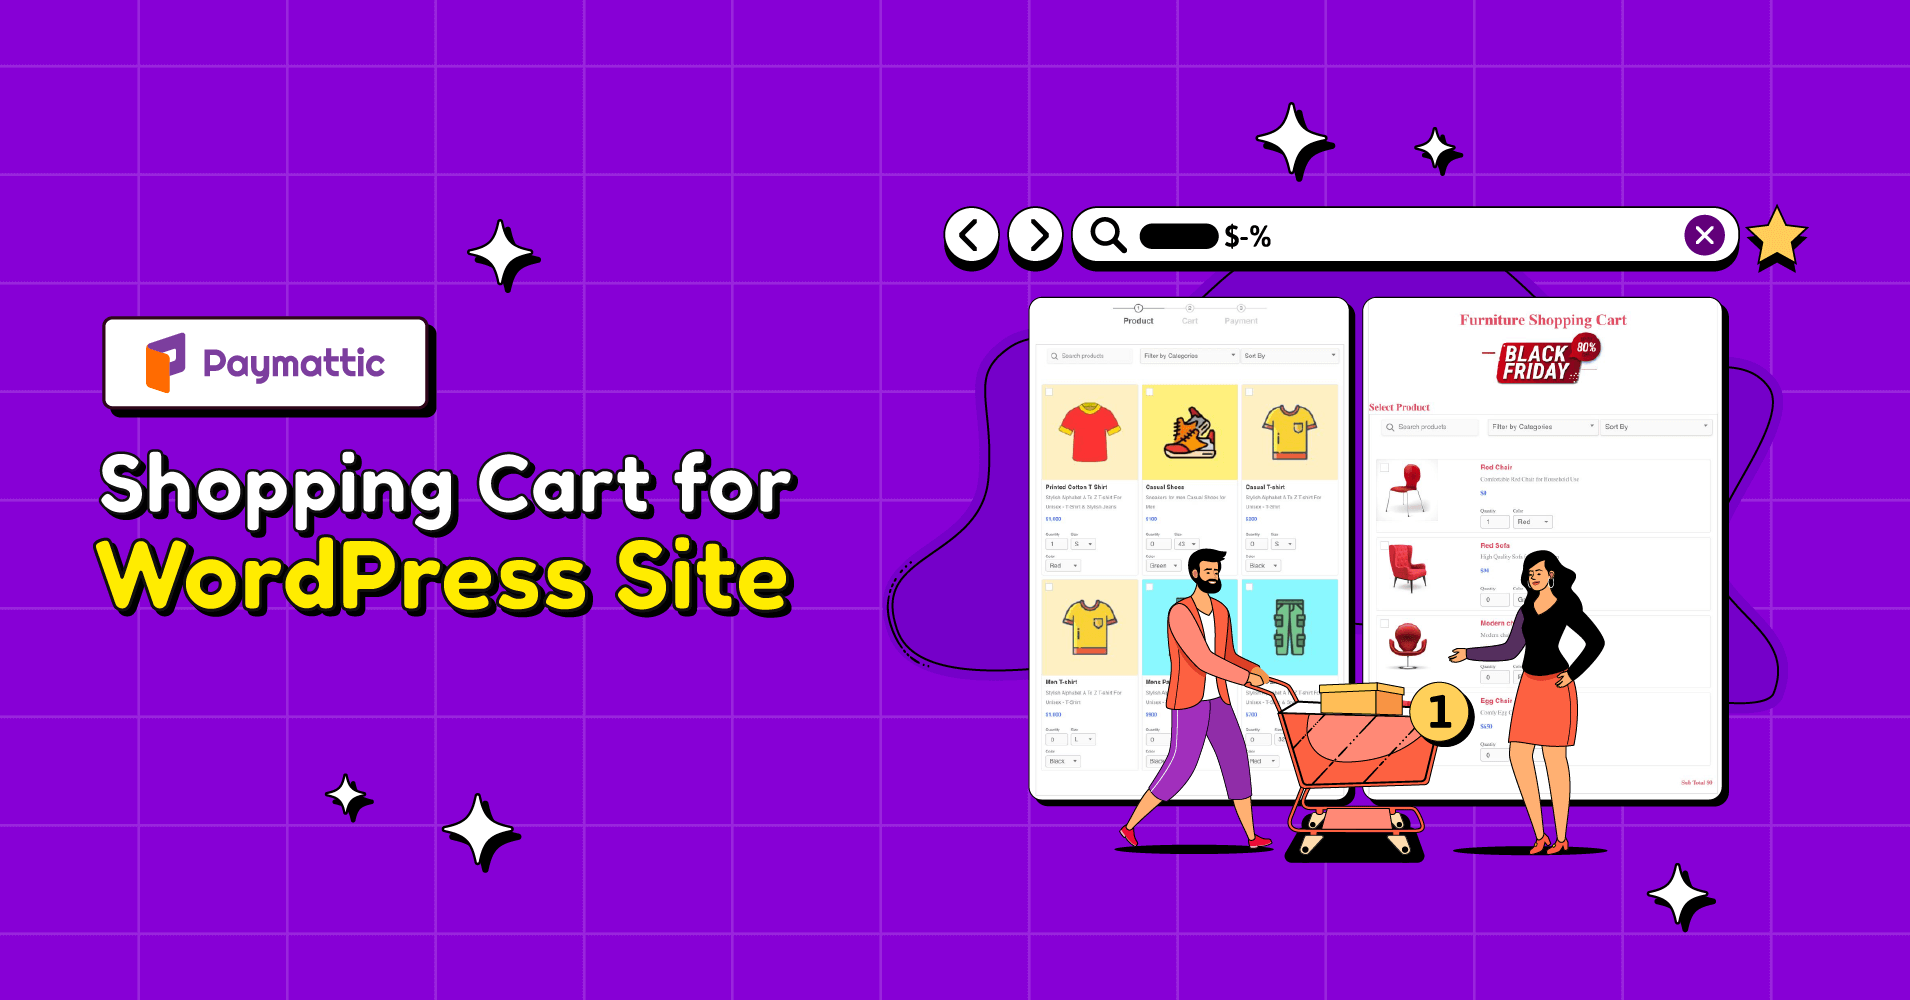
How to Add WordPress Shopping Cart to Your Form?


Table of Content
Download Paymattic – it’s Free!

Subscribe To Get
WordPress Guides, Tips, and Tutorials
We will never spam you. We will only send you product updates and tips.
Do you want to sell something online? If so, you must be looking for a tool that can collect payments as well as create a shopping cart. You can’t entice your customers to buy more unless you don’t merchandise your products in a selling approach.
Luckily, Paymattic is here to help you with your online startup. Now, you can present your products in shopping cart style and accept payments using the Paymattic payment plugin. It saves you from the hassle of using multiple plugins and lets you create shopping carts for WordPress website.
In this blog, we will guide you on how to add a WordPress shopping cart to your website in easy steps.
Why use the Paymattic payment plugin for WordPress
Though WordPress is a very popular content management system, it has no built-in eCommerce feature. You can’t add a shopping cart or checkout functionality to your website unless you use an external plugin. The shopping cart feature is vital for any website selling products online. So, you can’t think of an online business without a shopping cart and payment functionality.
Paymattic is the ultimate payment plugin that comes with dynamic features. You can accept payments, create payment forms, add shopping carts and sell products through your website using Paymattic.
Paymattic supports 13 payment methods so that you can receive payments around the globe. The payment methods include Stripe (free), PayPal, Square, Billplz, Payrexx, Paystack, Mollie, Razorpay, Xendit, SSLCOMMERZ and offline payments.
Other mind-blowing features of Paymattic are –
- Subscription payment
- 14+ integrations
- WordPress shopping cart
- Donation item
- Advanced editor
- Customer profile
- Advanced reporting
- World-class support and many more.
Ready to get started?
Experience payments and donations for WordPress like never before. Try Paymattic now!
How to add WordPress shopping cart to your website
A shopping cart is a big feature on your website, but it takes only a few clicks to add this functionality to your WordPress website. Let’s jump into the process and learn how to add WordPress shopping cart to a website using Paymattic.
Install & activate Paymattic Pro
First of all, you need to install and activate the Paymattic WordPress payment plugin. To install and activate the plugin, follow these steps:
- Log in to the WordPress dashboard of your site.
- In the left menu, click on the Plugins menu and then Add New.
- Use the search bar to find Paymattic that you want to install. Alternatively, you can click on the Upload Plugin button at the top of the page and select the plugin’s .zip file from your computer.
- Once you have found the plugin, click the Install Now button. After the installation is complete, click the Activate button to activate the plugin on your site.
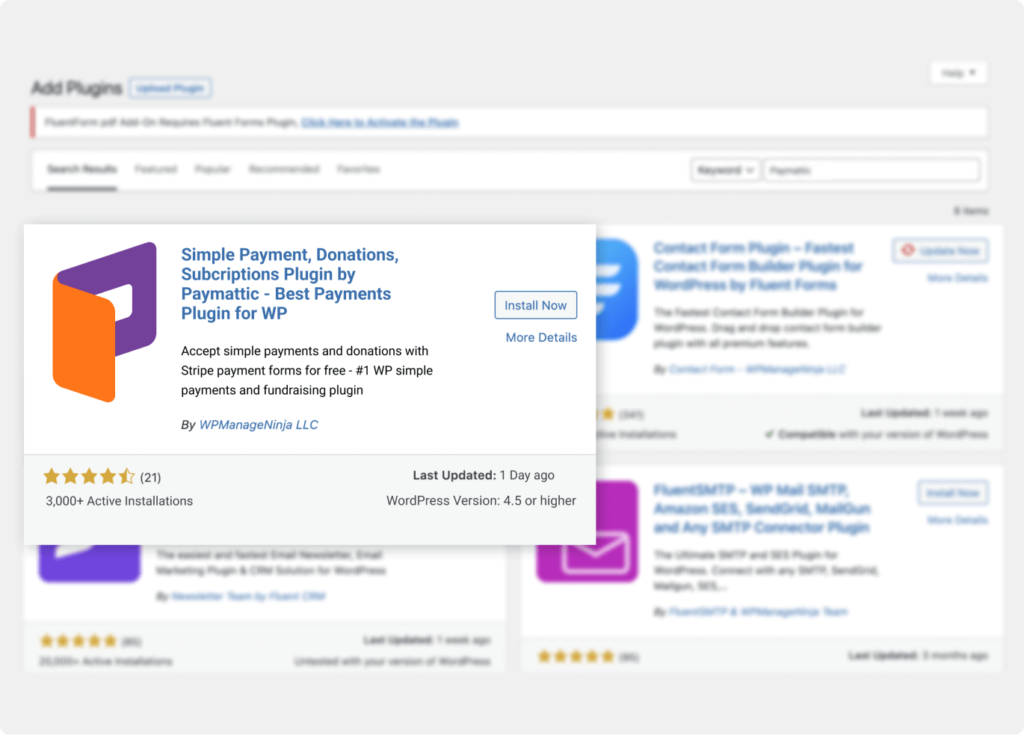
That’s it! The Paymattic plugin should now be active and you can start using it on your WordPress site.
[Shopping cart is a pro feature of Paymattic. Upgrade to the pro version of Paymattic to use the shopping cart feature.]
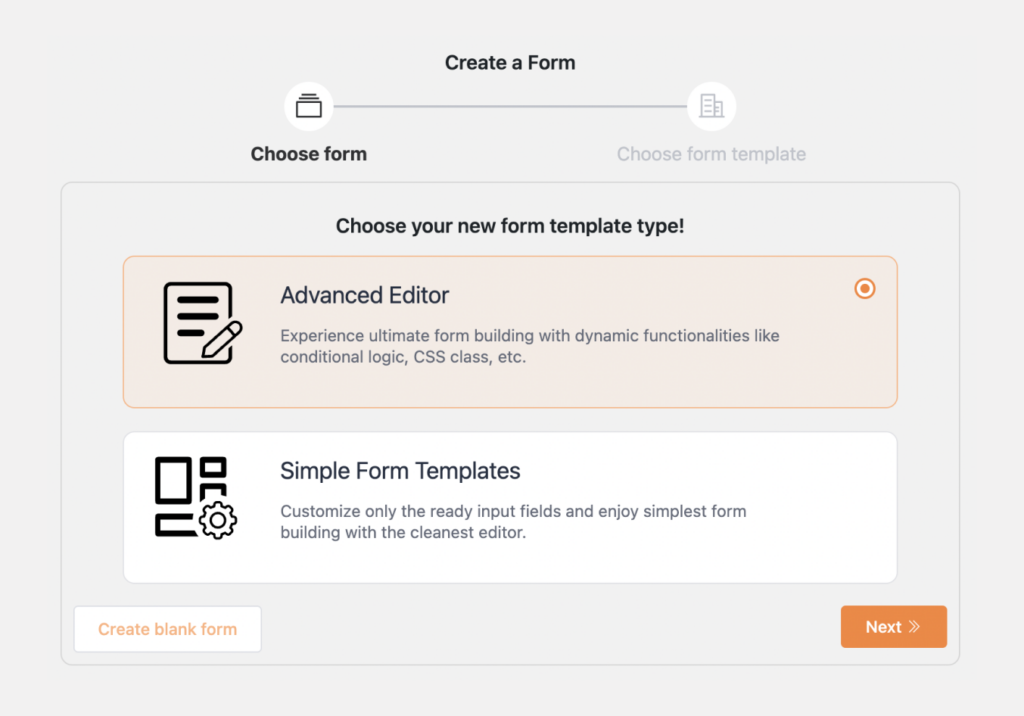
Create a payment form
Now you are ready to create a payment form with Paymattic. It’s so simple to create a payment form in WordPress using Paymattic. To create a form –
- Click on the Paymattic Pro → Create Form menu from the left sidebar in your WordPress dashboard.
- Then, click on the Advanced Editor tab.
- You can customize a ready-to-use template or start from the blank.
- Click on the New Blank Form option to start creating from the beginning.
Read this blog and learn how to design a payment form in WordPress
Add a shopping cart
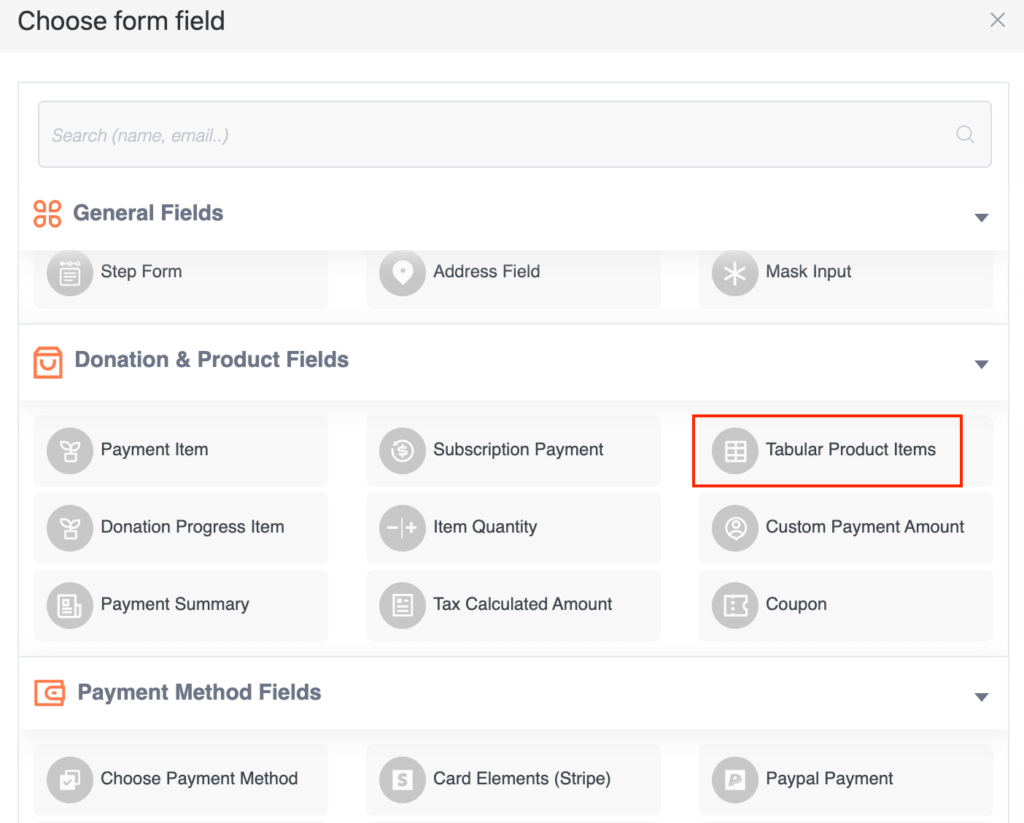
Upon clicking the New Blank Form you will be landed on the form editor page. Here, you can add products and customize how they appear on your website. To do so –
- Click on the ‘ + ‘ icon or simply type ‘ / ‘ to open up the form fields panel.
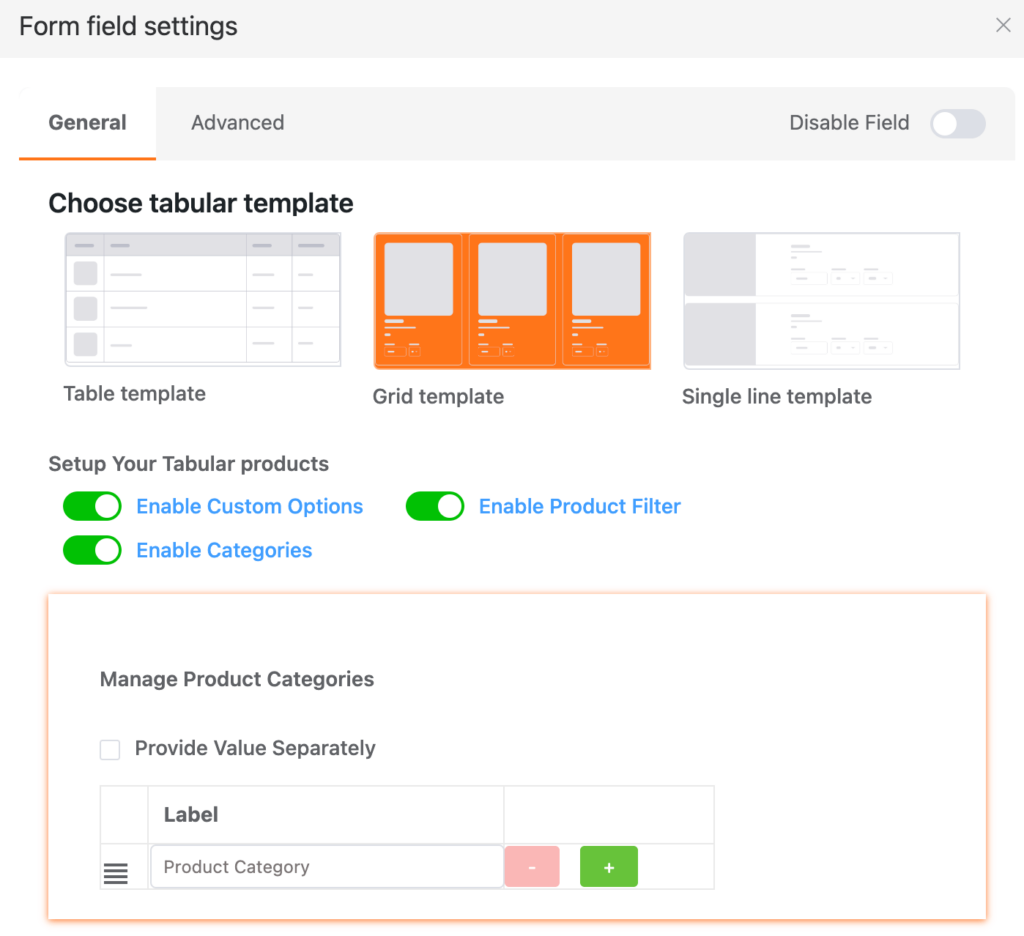
- Select the Tabluar product items field from the Donation & Product Fields section.
- It will add the product fields to your payment form.
- Then press the gear icon at the left side of the field.
- It will pop up the Form Field Settings page.
- Here, you can customize your shopping cart and add products to it.

- Select the Grid Template or Single Line Template so that your products are displayed in a shopping cart style.
- You can enable product filters, categories and custom options from the template.
- Next, you can add product categories if you want to categorize them.
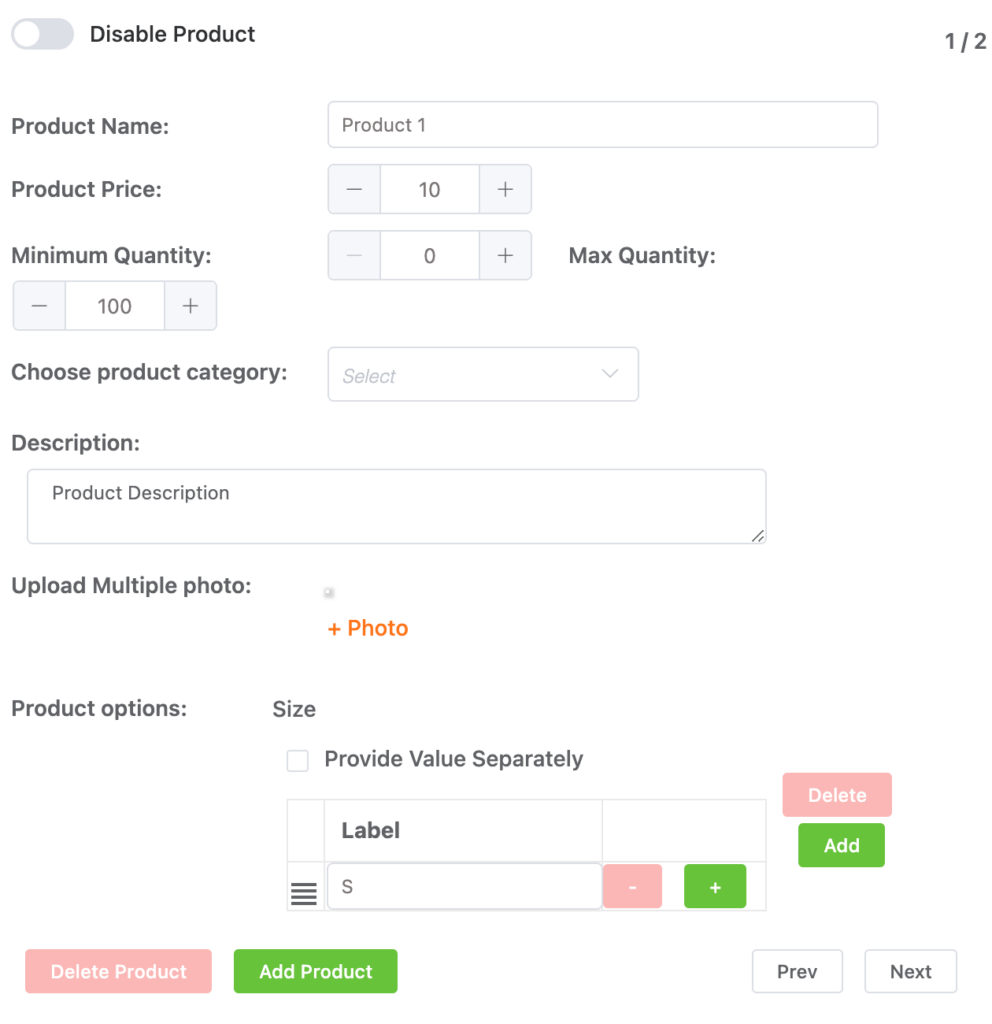
- Then, you will jump into the product settings section.
- Here, you can set the name of your product, price, minimum and maximum quantity, product category and description.
- You can also add various product options such as image, size, color etc.
- Toggle the Disable Product switch if you want to hold the product temporarily. This option is helpful in case of out of stock, or you do not want to take orders for any specific product.
- Click the Delete Product button to remove a product or Add Product button to add new products.
- Toggle on the Subtotal switch if you want to show the subtotal amount to the users.
- Use the Next and Prev button to navigate between other products.
- Don’t forget to click the Update button to save the settings.
Add payment methods
That’s great! You have already created your shopping cart. Now, you need to add payment methods so that you can accept payments from your customers. You can add a single payment method or multiple payment methods in the same form. To add payment methods. Follow the steps below:
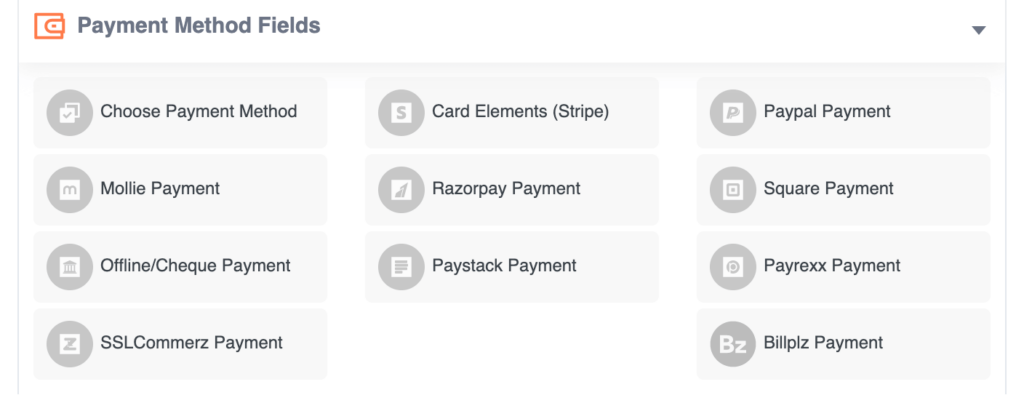
- Click on the ‘ + ‘ icon in the form editor.
- Then select a payment method from the Payment Method Fields section.
- If you want to add multiple payment methods, then select Choose Payment Method option.
- Then, click the settings icon on the left side of the field.
- Select your required payment methods from here.
- You can also select a default payment method and enable image to appear during checkout.
- Click on the Advanced tab for more customization options.
- At last, press the Update button to save the changes.
After setting up your shopping cart, make sure the shopping experience doesn’t drop off at checkout. Customize your checkout page to be just as seamless and user-friendly as the cart so that customers continue their buying journey all the way to purchase.
Publish the form
It’s pretty simple to publish a shopping cart form in WordPress. You will get a shortcode of your form from your WordPress dashboard. Navigate to Paymattic Pro → All Forms to obtain your shortcode. Paste the shortcode into your desired webpage and publish the page.

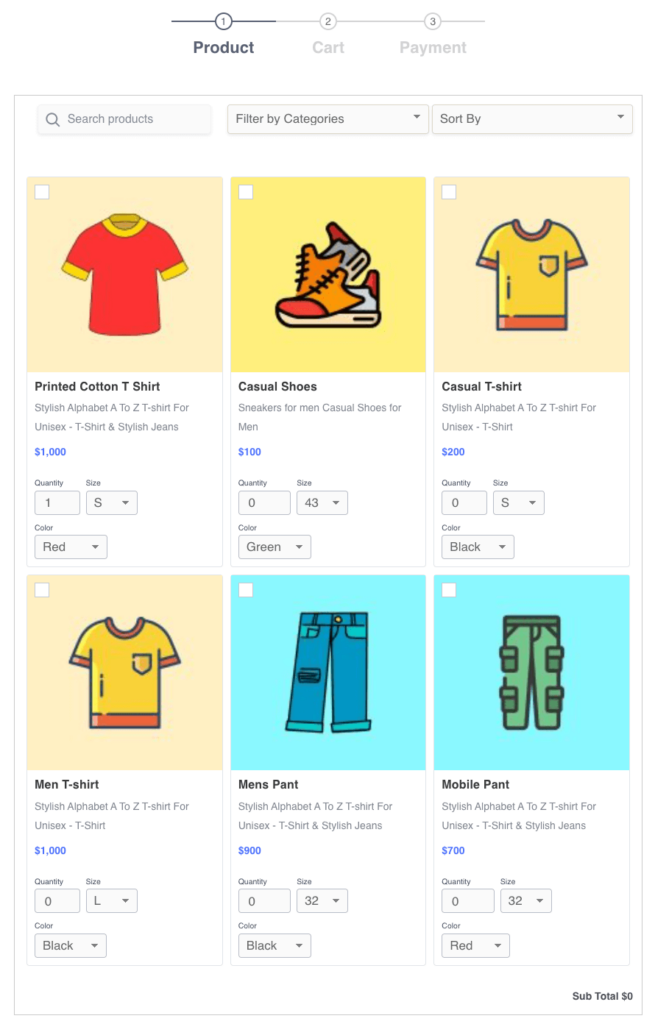
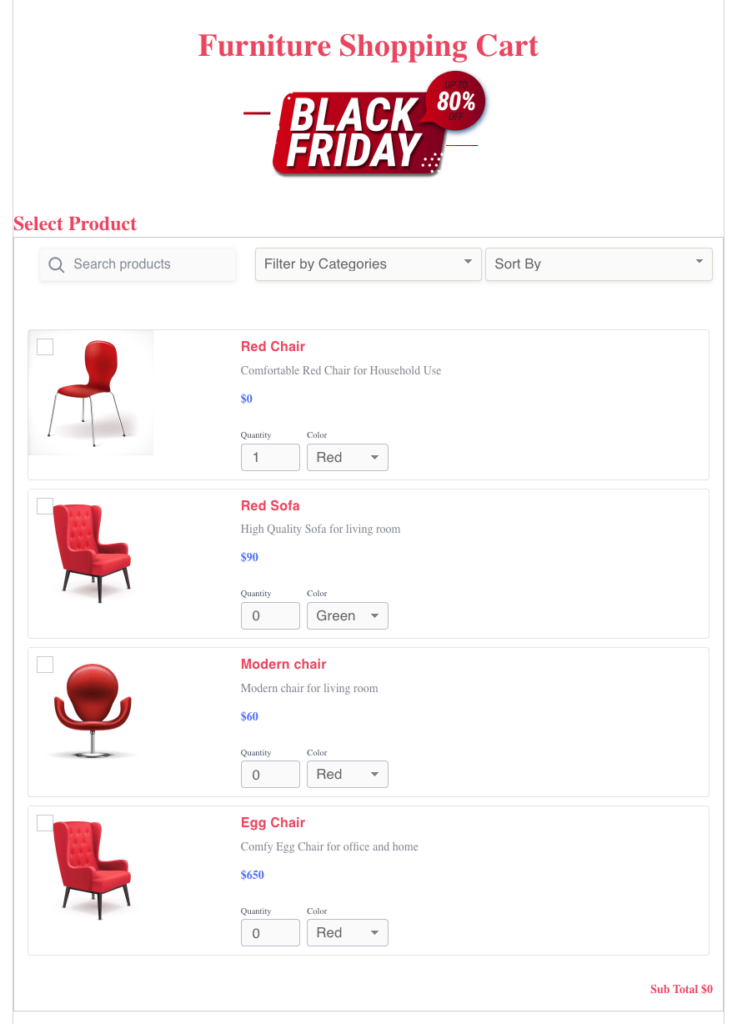
Now, you can preview your WordPress shopping cart live. That’s so amazing! Here we present some examples of how your shopping carts for WordPress might look like.
Grid-style shopping cart
Single-line shopping cart
To wrap up
Paymattic is the most secure plugin to accept payments online and showcase your products. It uses multi-layer security to protect your site from any spam attacks.
Other than the WordPress shopping cart, you can use this plugin to raise donations, create multi-purpose forms, accept global payments and many more. The Paymattic payments plugin continues to release new features frequently. Subscribe us below to get more latest news and updates from Paymattic.
Happy selling!
Join the thousands already enjoying Paymattic Pro!

Shuyeb Ahmed
Hi, This is Shuyeb. I am a digital marketing enthusiast, love to write about WordPress products and new updates. At the weekend, you will find me exploring nature & beautiful places.


One response to “How to Add WordPress Shopping Cart to Your Form?”
-
Great job Paymattic Team, No wonder why you guys lead the industry. You are a really well delivered company!

Leave a Reply