
Create WordPress Payment Form with Paymattic Advanced Editor


Table of Content
Download Paymattic – it’s Free!

Subscribe To Get
WordPress Guides, Tips, and Tutorials
We will never spam you. We will only send you product updates and tips.
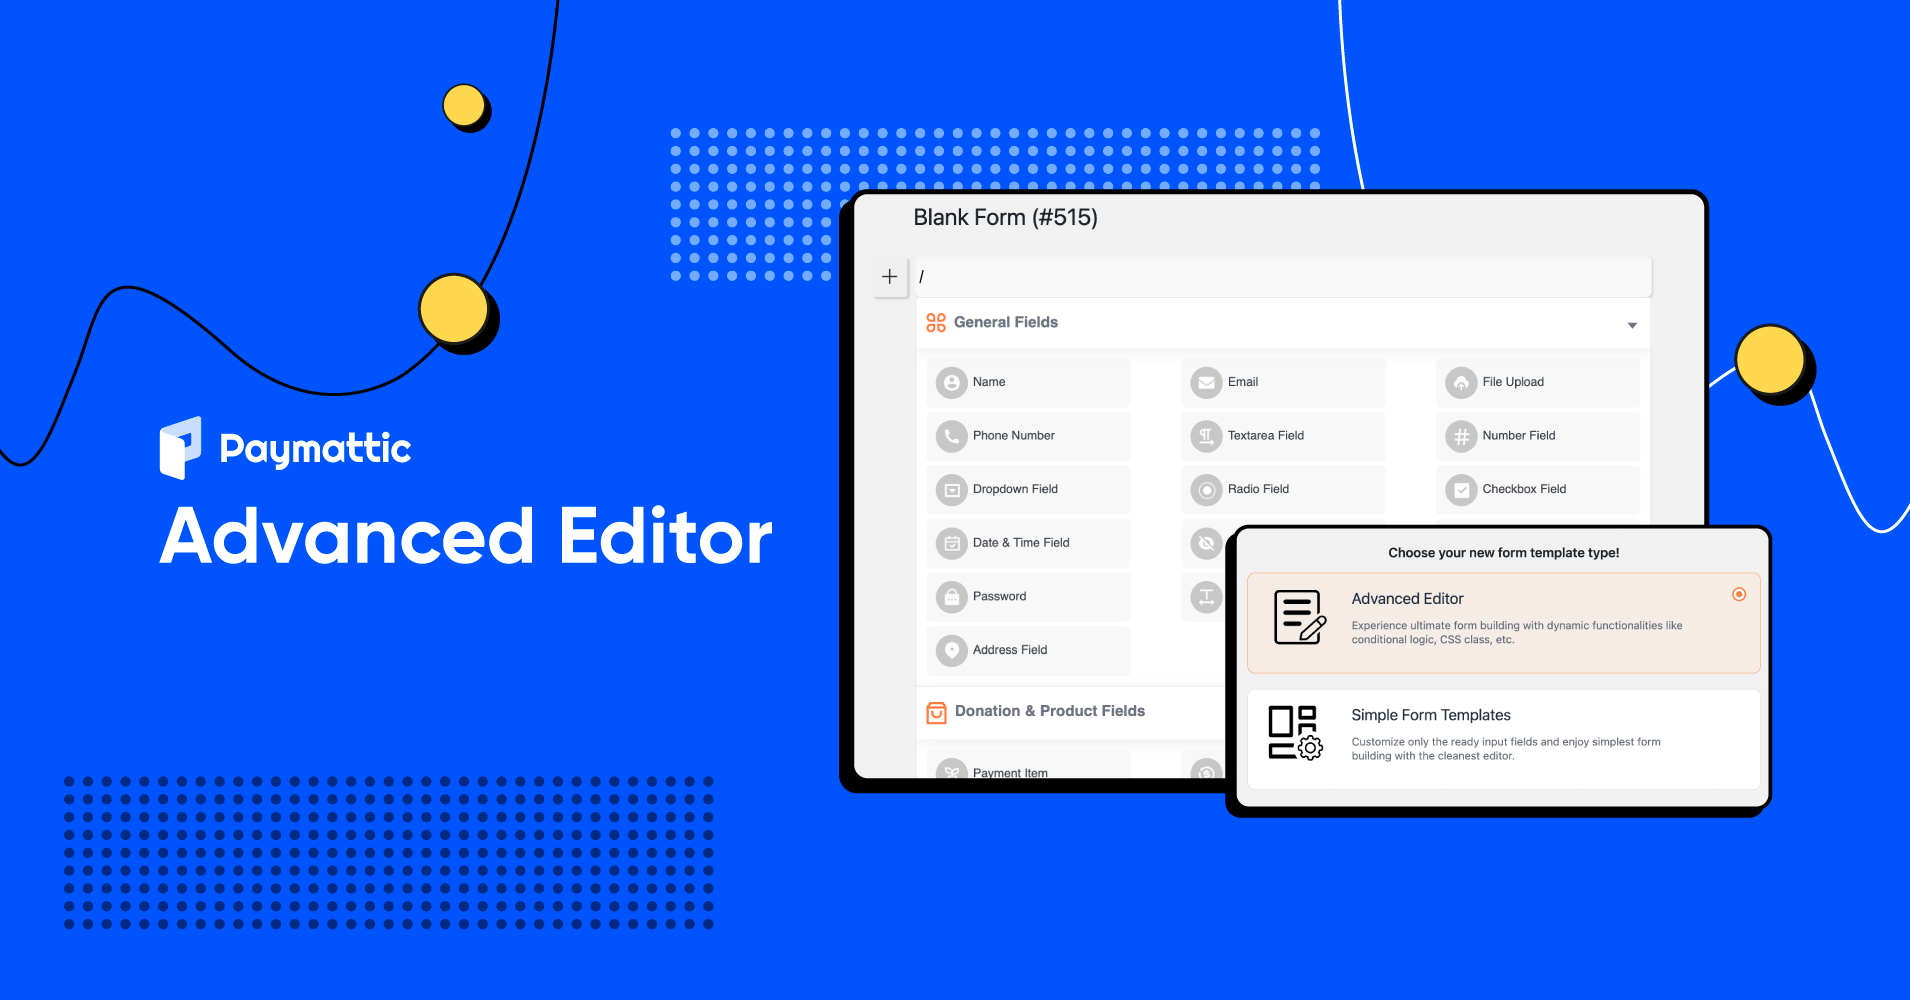
The new release of Paymattic version 4.3.0 comes with a powerful tool that is Advanced Editor. This new form editor works like the Gutenberg block editor. It provides a different experience when you create payment forms in WordPress.
In this blog, we will show you how to master Paymattic Advanced Editor and build stunning payment forms for WordPress.
Paymattic payment plugin for WordPress
Paymattic is already in the buzz for its outstanding donation and payment features. This payment plugin for WordPress lets you create full-fledged payment forms with multiple payment gateways.
It provides pre-built form templates so that you can launch your business website without any hassle. Besides, you can also integrate your forms with multiple platforms like FluentCRM, Zapier, Slack, Telegram, Mailchimp, Tutor LMS, LearnDash, Fluent Support and many more!
Take a look at the most worthy features of the Paymattic payment plugin –
- Subscription payments
- 13 payment gateways integration
- 70+ pre-built form templates
- Payment Item Field
- Integrations with multiple platforms
- Individual customer profile
- 135+ currencies support
- Form import-export
- Reports and analytics
Ready to get started?
Experience payments and donations for WordPress like never before. Try Paymattic now!
Difference between the old editor and the new Advanced Editor
Before diving into the new features of Advanced Editor, let’s compare it to the old one. So you can figure out the differences sharply.
The big change in the new editor is its user interface which is completely different than the old editor, both visually and in terms of functionality.
In the old editor, you had to select form fields from the right-side panel and scroll down frequently to add any product fields or payment method fields.
The Advanced Editor lets you add any field directly in the form editor like Gutenberg. Simply type ‘/’ or click on the + icon to pop up all fields you want to add.
Here is what the old editor in Paymattic looked like.

And here is what the new Advanced Editor looks like in the Paymattic WordPress payment and donation plugin.

Besides, editing and deleting multiple fields using the old editor was a little time-consuming. You had to click on each field separately to reveal the Delete button. However, you can delete or configure any field in the Advanced Editor by simply hovering the mouse over the field.
You can undo or redo any step you have done in the new Advanced Editor. Click on the Undo or Redo button on the top or press Ctrl+Z /Ctrl+Shift+Z as a keyboard shortcut.
Create WordPress payment form with Advanced Editor
Let’s see how you can create a WordPress payment form with the Advanced Editor of Paymattic plugin for WordPress payment.
First of all, log in to your WordPress admin dashboard and go to Paymattic → Create Form.
Then, select the Advanced Editor and click on the Next button to go further.
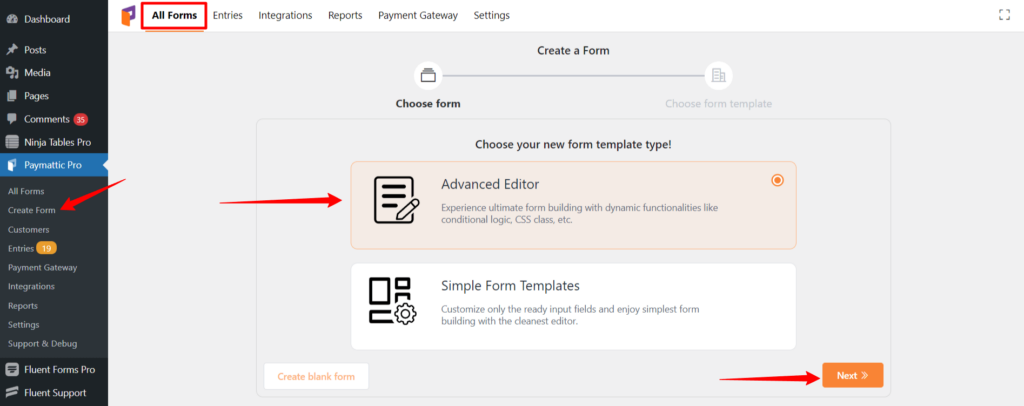
Here you can view some form templates or select New Blank Form to start from scratch.
Now, it will land you on the form editor page.
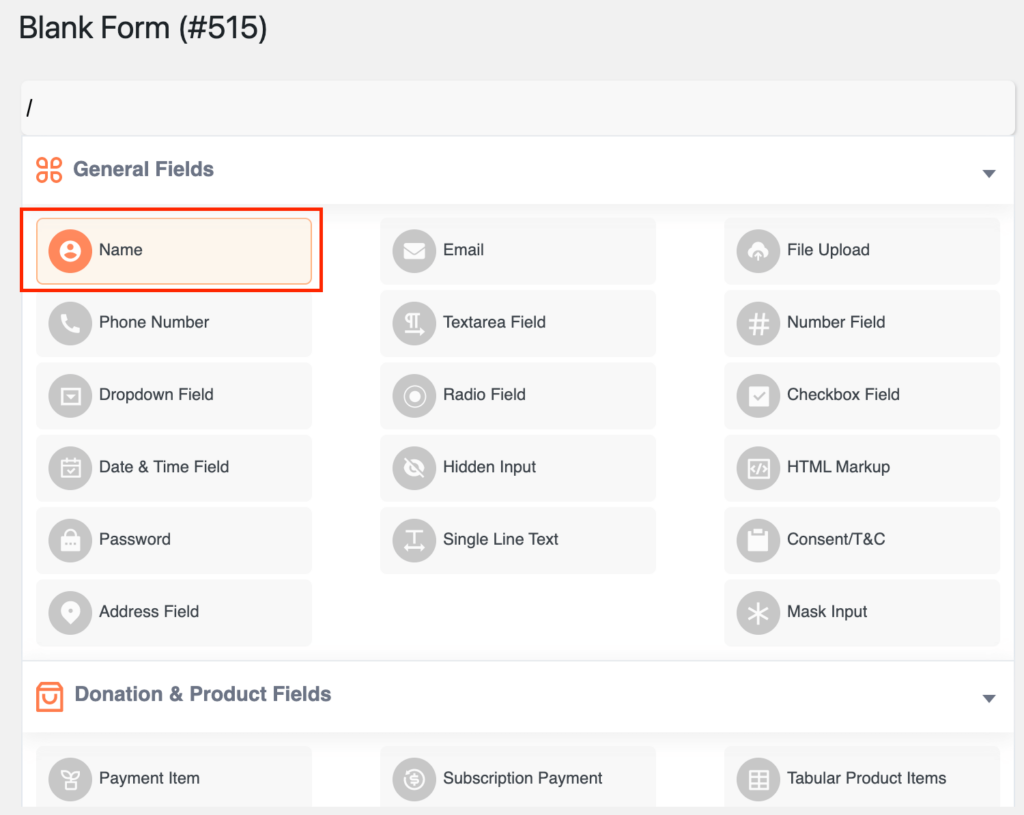
Type ‘/’ or click on the + icon to add a new field.
For demonstration purposes, I am adding a Name field first. Simply click on the field title to set a name for the field. You can also set a placeholder for each field by clicking on the field. Hover the mouse over the field and a configuration button will appear here. Press the configuration button to enter into the advanced settings panel. You can make the field mandatory by switching the Required button on. Remember, you need to click on the Update button to save any field. You cannot jump to any other page without clicking the update button.
After adding the Name field, I am going to add an Email field in the same process.
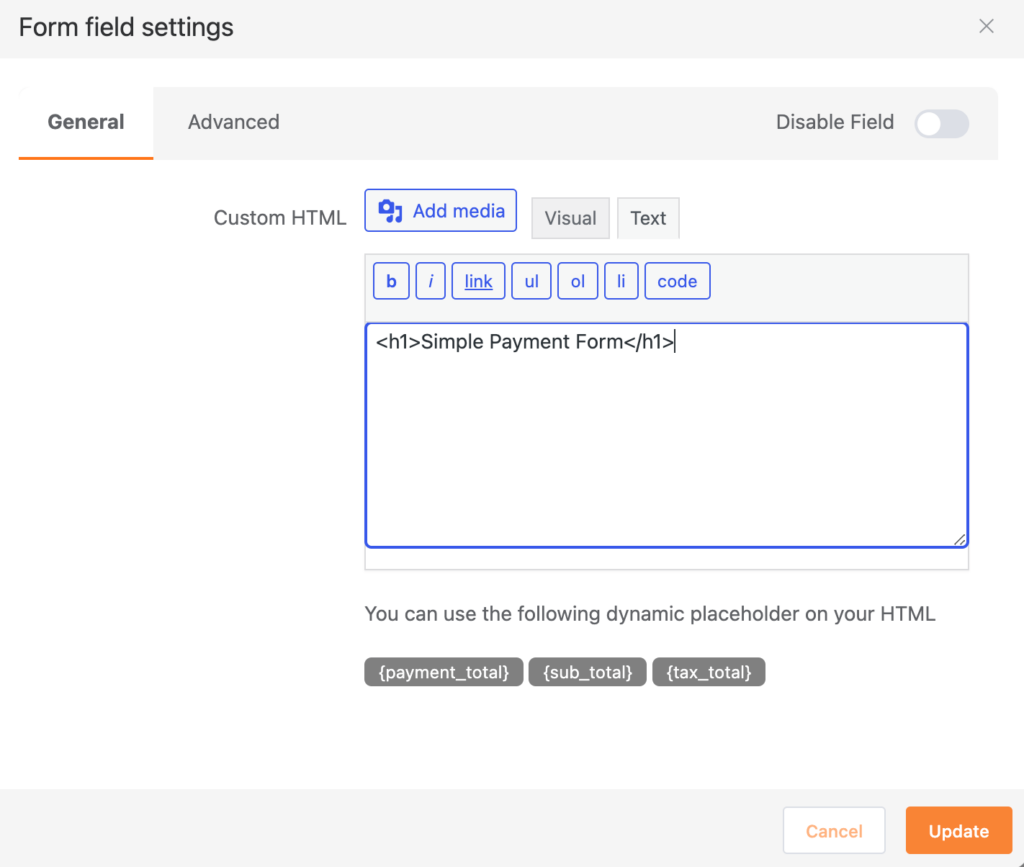
Now, I am adding an HTML Markup field to place a header and an image on the top of the form. Click on the Add Media button to insert images on the form and type custom HTML in the text editor box. For example, <h1>Simple Payment Form</h1> – HTML tag will display the text “Simple Payment Form” on the form header. Drag the HTML Markup editor on the top of all fields to place all HTML elements on the form header.
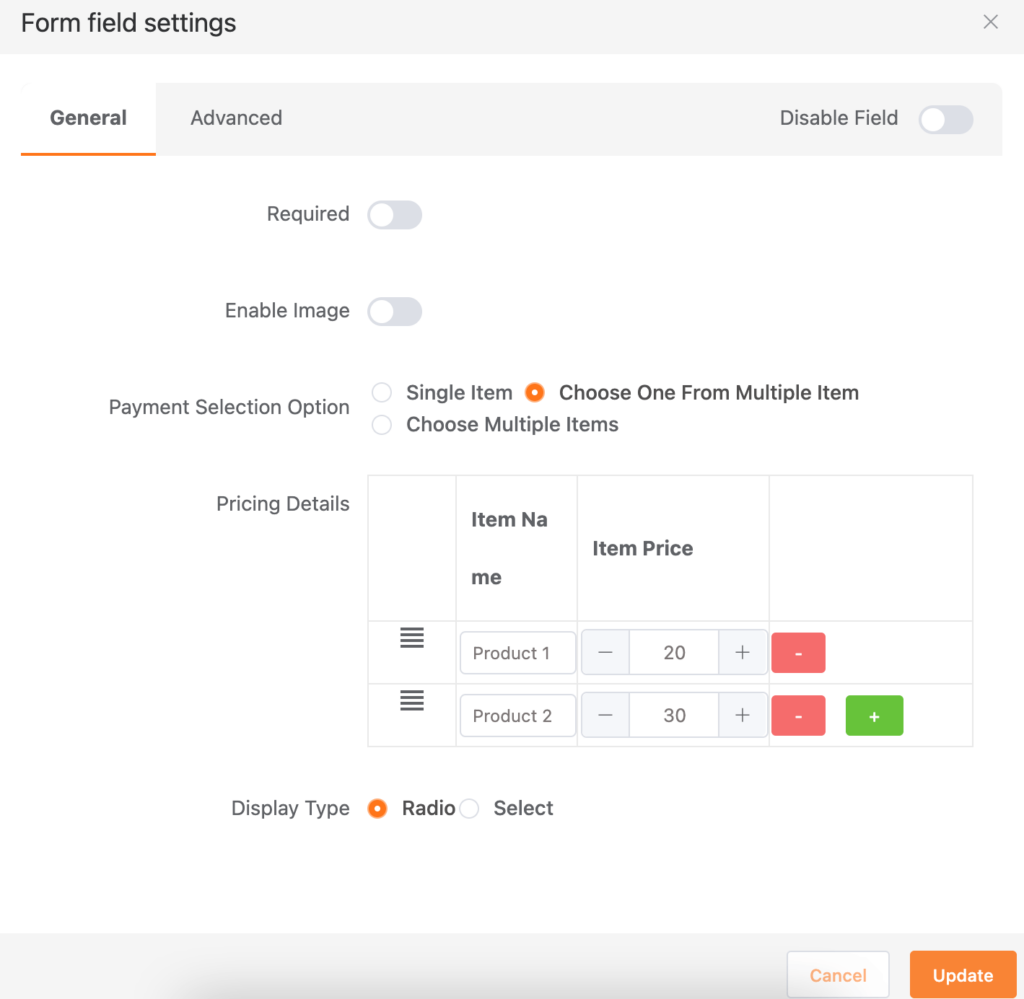
Then, I am going to add a Payment Item field so that I can add some products to the form. You can set the item name, price and enable image for each item in this field. Turn on the Required button to make the field mandatory.
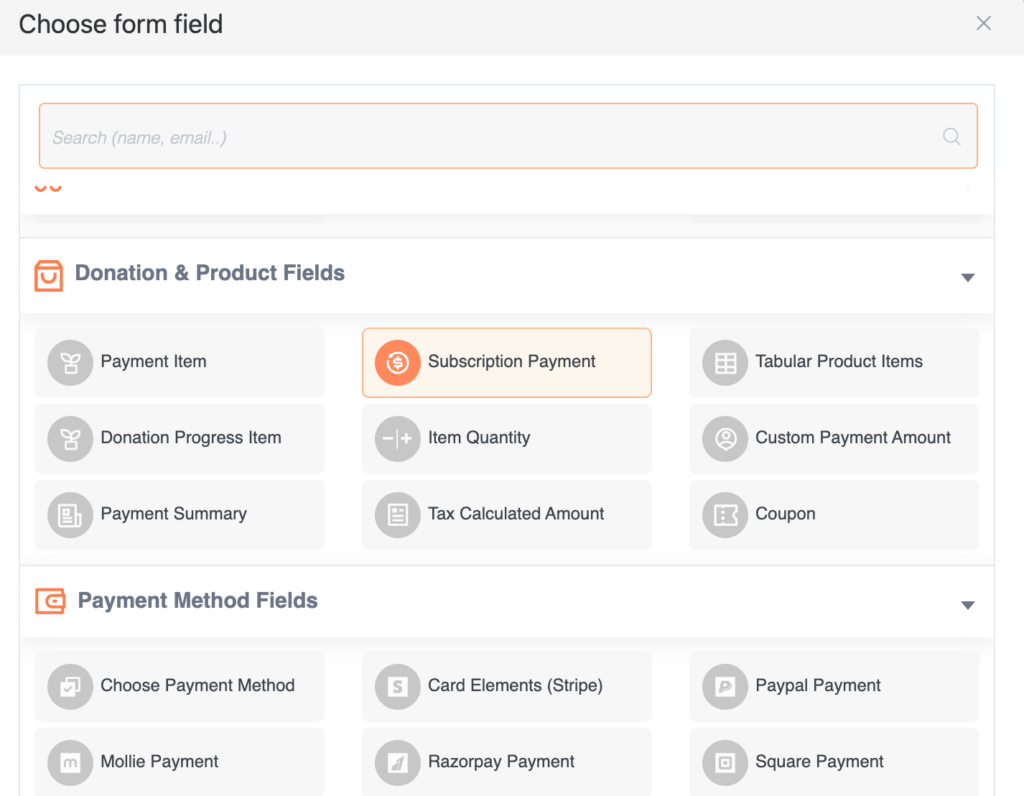
If you want to accept subscription payments, you can add the Subscription Payment field located under the Donation & Product Fields section. Click on the settings icon on the left side and you will enter into the configuration panel. Here, configure your subscription plan as per your business need and press the Update button.
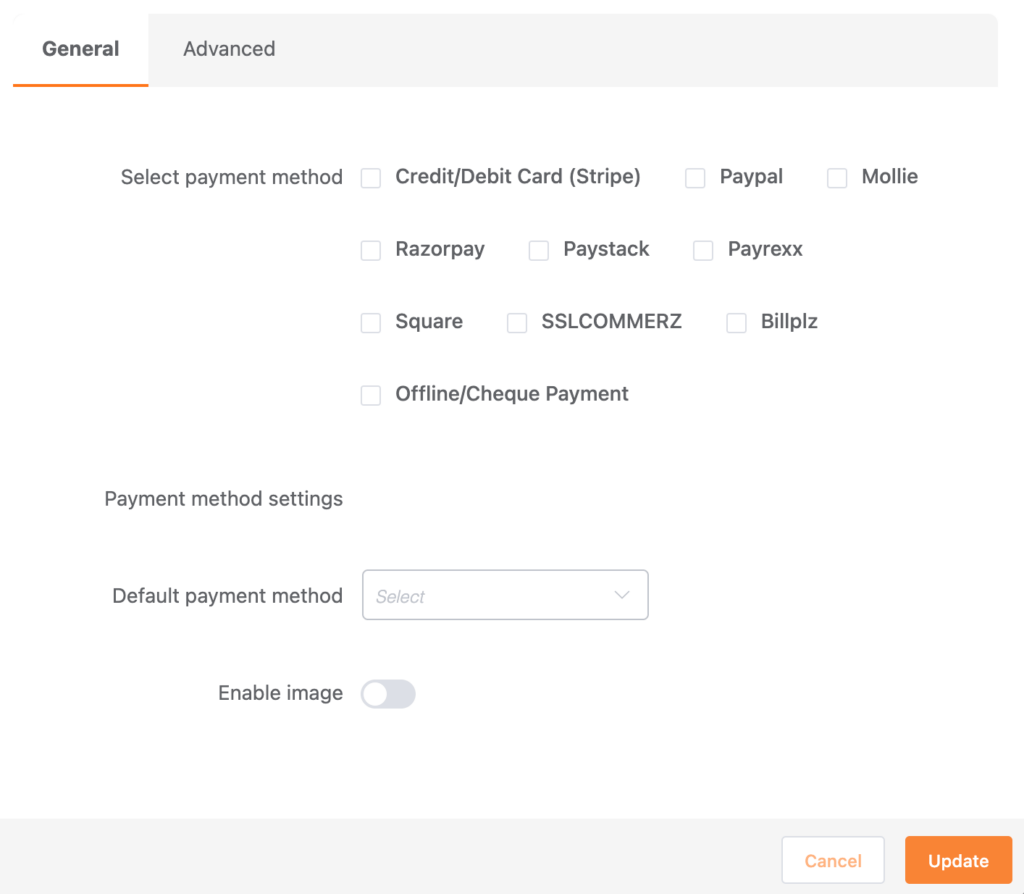
At last, you need a payment method to accept online payments. I am adding choose payment method field to allow payments from multiple payment gateways. Simply check all the payment methods that you want to activate and enable images to show the logo of the payment methods in your form.
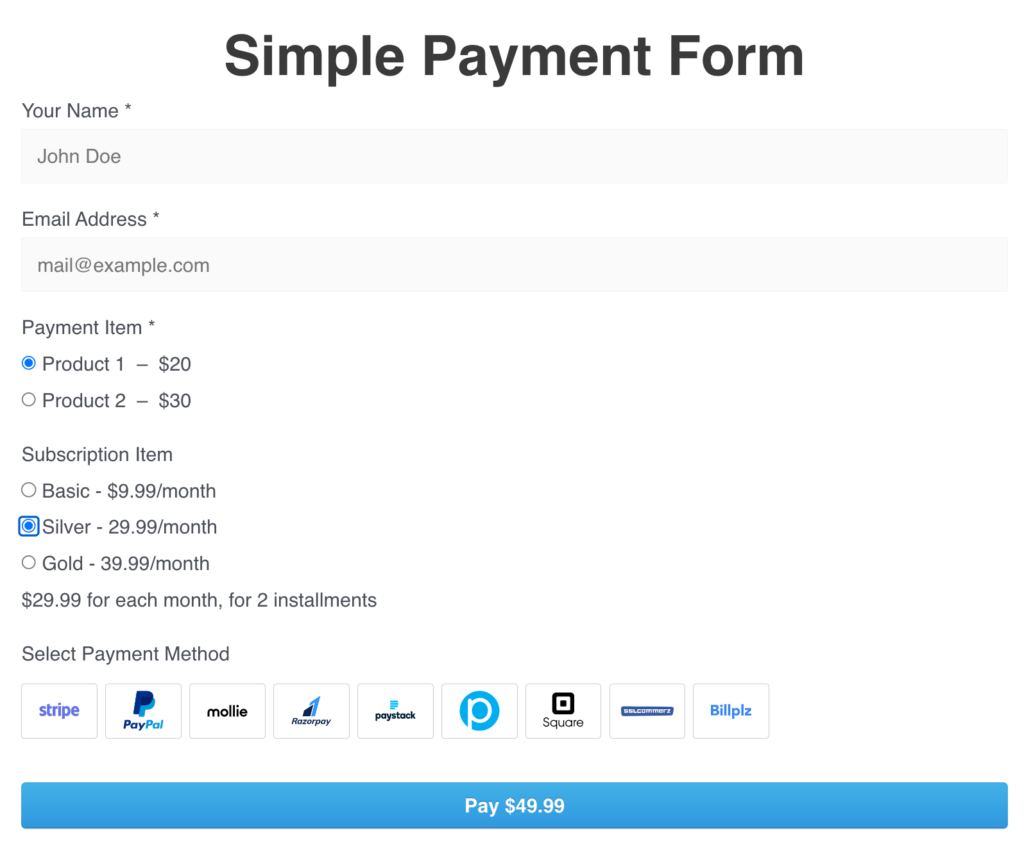
Finally, click on the Save button in the top right corner to save the form. Press the preview icon beside the Save button to view your form. Your new payment form may look like the one below.
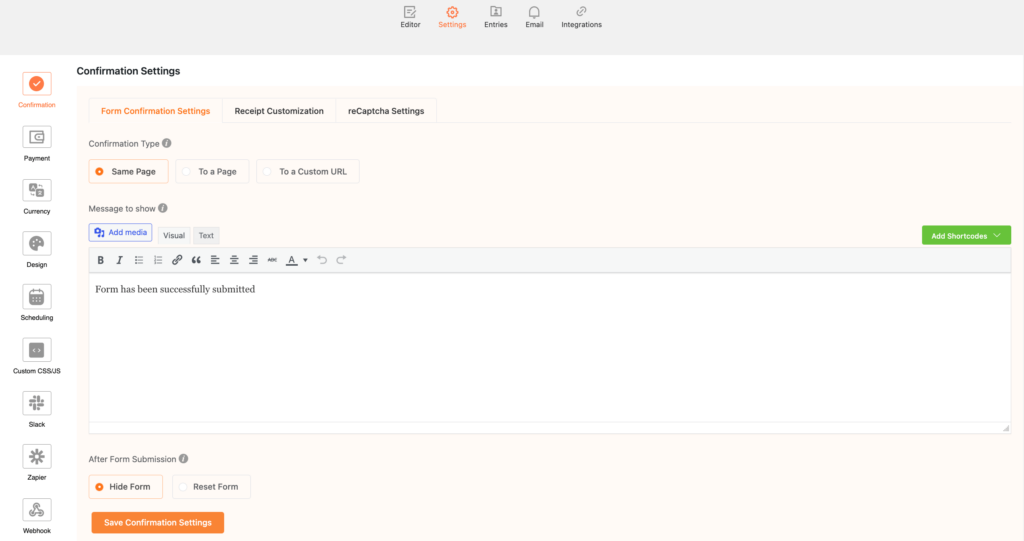
After adding all the necessary fields, you might want to set the confirmation text, form currency, custom design and layout, custom CSS and JS, form scheduling and so on. Simply click on the Settings tab from the top bar and make all your desired changes.
Paymattic lets you see all the entries from the form editor panel. Click on the Entries tab on the top bar and you will be landed on the entries page where you can see all of your together. Even this page gives you summary data of all entries based on payment status.
Read this blog and learn how Paymattic differs with Stripe payment plugin
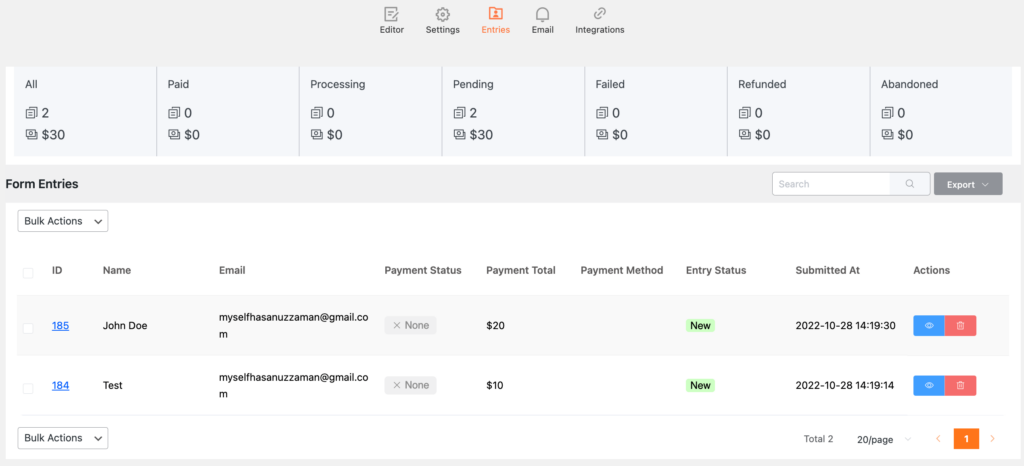
Do you need to access these data offline or want to send them somewhere else? No worry. There is an Export button at the top right corner and export all your entries in CSV, Excel, ODS and JSON format.
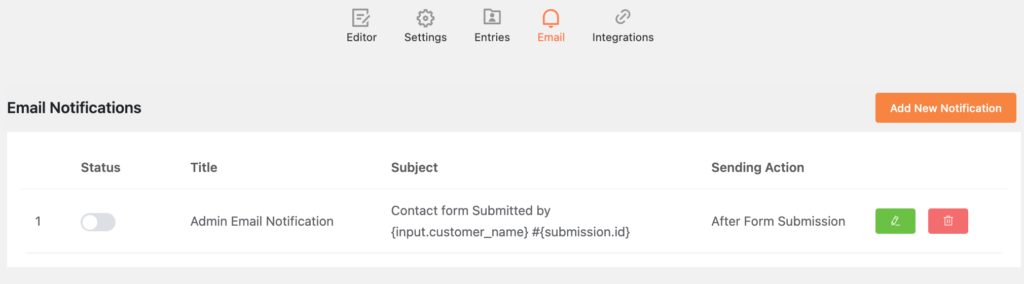
Next, you can find the Email tab that lets you set up email notifications both for admin and users. Also, integrate your form with multiple platforms right from the Integration tab.
See how easy it is to create a WordPress payment form with Paymattic for WordPress. Copy the shortcode of the form and paste it on your payment page.
Wow! You are completely ready to fly with your online payment form.
To conclude
You can’t feel how amazing the new Advanced Editor is unless you try it yourself. This new editor will save a lot of time in making classic payment forms so that you can focus on your business better. The best part is you get this smart editor with the free version of Paymattic. Get Paymattic today and let us know your experience with the new editor.
Good luck!
Join the thousands already enjoying Paymattic Pro!

Shuyeb Ahmed
Hi, This is Shuyeb. I am a digital marketing enthusiast, love to write about WordPress products and new updates. At the weekend, you will find me exploring nature & beautiful places.


Leave a Reply