

PayPal Test Card Numbers With CVV: Free Examples


Table of Content
Download Paymattic – it’s Free!

Subscribe To Get
WordPress Guides, Tips, and Tutorials
We will never spam you. We will only send you product updates and tips.
If you’ve ever built a PayPal payment integration, you already know how important it is to test everything before going live. Using a real credit card during development is risky, inconvenient, and just unnecessary.
That’s where PayPal’s Sandbox environment comes in. It gives you a safe, isolated space to test your entire payment flow without touching real money or real accounts.
Whether you’re debugging a checkout bug at 2 AM or helping a client launch their eCommerce store, the sandbox is your best friend.
But here’s where a lot of people get stuck: they know the sandbox exists, they set it up, and then they stare at the card input field, wondering, “What do I actually type here?”
This guide answers that question. By the time you finish reading, you’ll know exactly what PayPal test cards are, how to use them with the correct CVV and expiry formats, and how to simulate different payment scenarios like failed transactions, card declines, and refunds.
Let’s get into it.
Key Takeaways
- PayPal test cards only work in the Sandbox environment and have no connection to real money or real bank accounts.
- You need a PayPal developer account to access the sandbox and create test buyer and seller accounts.
- Visa and Mastercard test cards use a 3-digit CVV. American Express uses 4 digits.
- Stick to these documented test card numbers rather than using a PayPal credit card generator or third-party sites.
- Always test beyond successful payments. Declined cards, insufficient funds, and refunds are just as important to get right.
- Test cards will never work in a live production environment, which keeps your real customers completely safe during your testing phase.
What are PayPal test cards?
PayPal test cards are fake credit card numbers specifically designed to work inside the PayPal Sandbox environment to simulate checkout behavior.
They look like real card numbers, they behave like real card numbers during testing, but they have absolutely no connection to any real bank account or financial system.
Think of them as props on a movie set. They look convincing enough to make the scene work, but nobody’s actually spending real money.
Real Cards vs. Test Cards
The distinction matters more than you might think. Here’s a quick breakdown:
| Feature | Real Credit Card | PayPal Test Card |
| Works in production | Yes | No |
| Works in Sandbox | No | Yes |
| Charges real money | Yes | No |
| Issued by a bank | Yes | No |
| Has actual CVV | Yes | Uses test CVV |
Real cards won’t work in the sandbox. Test credit cards won’t work in production. They live in completely separate worlds, which is actually a good thing. It means there’s no chance of accidentally charging a customer while you’re running tests.
Where PayPal test cards actually get used
Developers and testers rely on PayPal test card details across a wide range of scenarios:
Payment gateway integration: When you’re wiring up PayPal to your app or website for the first time, you need a way to trigger real checkout flows without using real money.
Checkout flow testing: Making sure your order confirmation page fires correctly, that webhooks are triggered, and that email receipts go out.
Debugging: Something broke in your payment flow and you need to reproduce it ten times in a row. Test cards let you do that without consequences.
QA and regression testing: Before every release, QA teams run through payment flows to make sure nothing broke. Test cards are essential here.
Learning and experimentation: If you’re new to PayPal integrations and just want to understand how everything connects, the sandbox with test cards is the perfect playground.
How to create PayPal sandbox accounts
Before you can use any PayPal test card numbers, you need a properly configured sandbox environment. This part trips up a lot of beginners, so let’s walk through it clearly.
Step 1: Set up a PayPal developer account
Go to the PayPal developer and log in using your regular PayPal account. If you don’t have one, creating a PayPal account is free and takes about two minutes.
Once you’re logged in, you’ll land on the developer dashboard. This is your control center for everything sandbox-related.
Step 2: Create sandbox accounts
In the left sidebar, go to Sandbox > Accounts. PayPal usually creates two default test accounts for you automatically:
- A Personal (buyer) account
- A Business (seller/merchant) account
If they’re not there, click Create Account and set them up manually. You’ll want at least one of each.
When creating the buyer account, PayPal lets you set a starting balance (fake money, of course). Set it to something like $5,000 so you don’t run into fake “insufficient funds” issues during basic testing unless you specifically want to simulate that.
Step 3: Note your sandbox credentials
Each sandbox account has its own login credentials (email and password). You’ll use the buyer account credentials when you’re filling out test payment forms.
Go to Apps & Credentials and create a new app. This gives you a Client ID and Secret Key for the sandbox environment. You’ll need these when integrating PayPal into your application or plugin.
Step 4: Link your test environment
If you’re using a platform like WordPress, WooCommerce, or a custom application, you’ll paste those sandbox credentials into your PayPal integration settings and switch the environment toggle to “Sandbox” or “Test Mode.”
At this point, your environment is ready. Now you need the actual card numbers.
Free credit card numbers with CVV for PayPal (Examples)
Here are the PayPal test credit card numbers you can use in the PayPal Sandbox. These are standard test card details that work within sandbox environments and are widely recognized for payment testing purposes.
Important: These cards only work in sandbox/test mode. They will not work for real transactions and should never be used outside of a testing environment.
Visa test cards:
| Card Number | CVV | Expiry Date |
| 4005519200000004 | 123 | 12/2026 |
| 4012000033330026 | 123 | 07/2027 |
| 4012000077777777 | 123 | 01/2028 |
| 4012888888881881 | 123 | 01/2028 |
| 4217651111111119 | 123 | 01/2028 |
| 4500600000000061 | 123 | 01/2028 |
| 4772129056533503 | 123 | 04/2030 |
| 4915805038587737 | 123 | 12/2031 |
For non-AMEX cards, use any 3-digit CVV. For American Express, use any 4-digit CVV. Keep the expiration date in the future.
American Express test card numbers
| Card Number | CVV | Expiry Date |
| 371449635398431 | 1234 | 12/2026 |
| 376680816376961 | 1234 | 07/2027 |
| 378734493671000 | 1234 | 01/2028 |
Note: Amex cards use a 4-digit CVV, not 3.
Mastercard test card numbers
| Card Number | CVV | Expiry Date |
| 2223000048400011 | 123 | 12/2026 |
| 5555555555554444 | 123 | 07/2027 |
| 378734493671000 | 123 | 01/2028 |
Other PayPal test cards
| Card Name | Card Number | CVV |
| Dinurs Club | 36461510000039 | 123 |
| Dinurs Club | 36461510000013 | 123 |
| Maestro | 6304000000000000 | 123 |
| Maestro | 5063516945005047 | 123 |
| JCB | 3636500000000260 | 123 |
| JCB | 3636500000000989 | 123 |
| CUP | 6200680000000004 | 123 |
| CUP | 6200680000000038 | 123 |
Use any future date for “Expiry Date.”
A few things to keep in mind
CVV format: Most test cards use a 3-digit CVV (123 works almost universally). American Express uses 4 digits (1234 is the standard test value).
Expiry dates: Any future date works. Using dates in 2027 or 2028 is safe for now. Just make sure the date isn’t in the past, or the sandbox will reject the card.
Name on card: You can type anything here. “Test User” or “John Doe” works fine. The sandbox doesn’t validate cardholder names.
Billing address: Use any valid-looking address. The sandbox won’t actually verify it, but some forms require the field to be non-empty.
One thing worth clarifying upfront: you might have seen terms like “PayPal credit card generator” or “virtual credit card generator” floating around online.
These tools claim to generate card numbers on the fly. For sandbox testing, you don’t need any generator. The numbers listed above are the actual test card details that PayPal recognizes.
Using randomly generated numbers from unverified sources can lead to unpredictable results in your sandbox, so it’s better to stick with known, documented values.
These fake credit card numbers are built for testing. So, better use those free credit card numbers and get your sandbox testing done.
Subscribe Newsletter
Subscribe to our newsletter for updates, exclusive offers, and news you won’t miss!

How to use PayPal test cards
Having the free credit card numbers with CVV for PayPal is one thing. Knowing how actually to use them in a real testing workflow is another.
Here’s a practical walkthrough using Paymattic, a popular WordPress payment plugin that supports PayPal integration.
Step 1: Install Paymattic
Log in to your WordPress dashboard
- Go to Plugins > Add New.
- Search for “Paymattic” and install it.
- Activate it, and you’ll see the Paymattic menu in your sidebar.
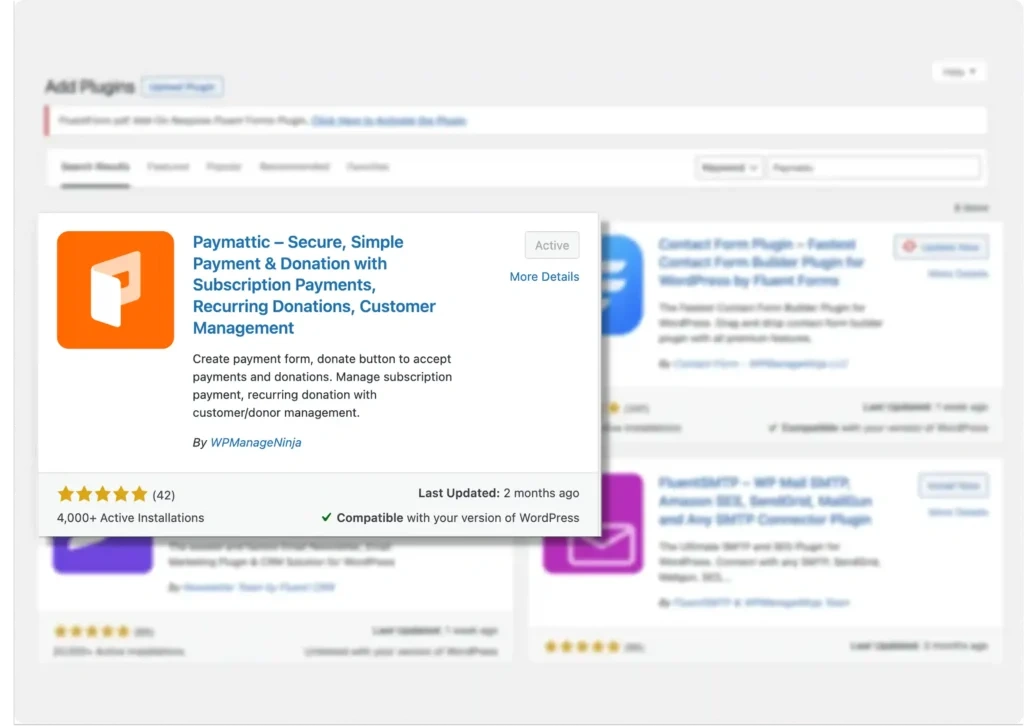
You can also download the plugin and upload it to your WordPress dashboard, and then install it.
- Go to Plugins → Add Plugins
- Click on Upload Plugin → Upload the ZIP file
- Click on Install, and you’re done
Step 2: Integrate PayPal sandbox
PayPal is in the Paymattic Pro version. So get the Paymattic Pro first and then
- Go to Payment Gateways > PayPal.
- You’ll see Sandbox Mode and Live Mode.
- Select Sandbox Mode
- Paste in the sandbox email you got earlier from the PayPal developer dashboard
- Upload your checkout logo
- Hit Save Settings
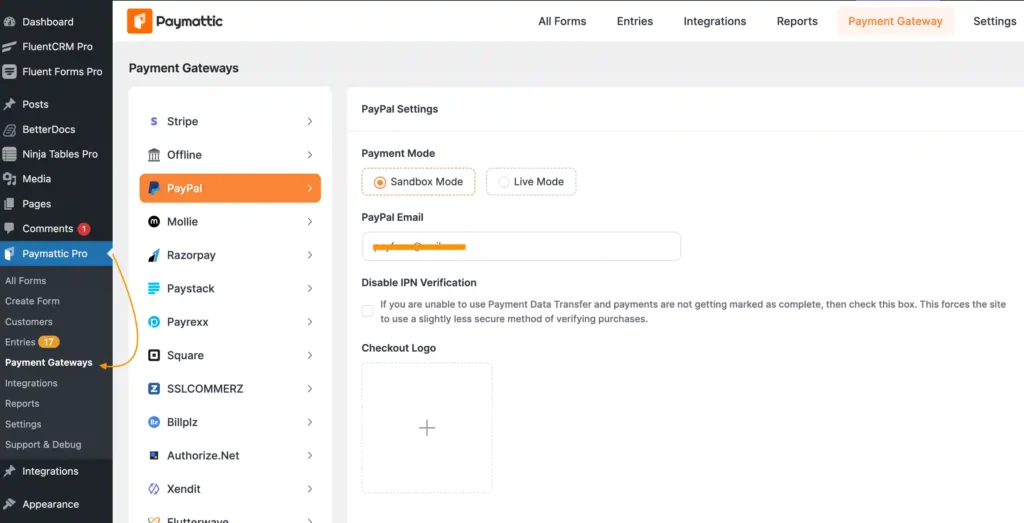
You’re done with the PayPal sandbox integration part.
Now to test these dummy card details, you’ll need to create a payment form.
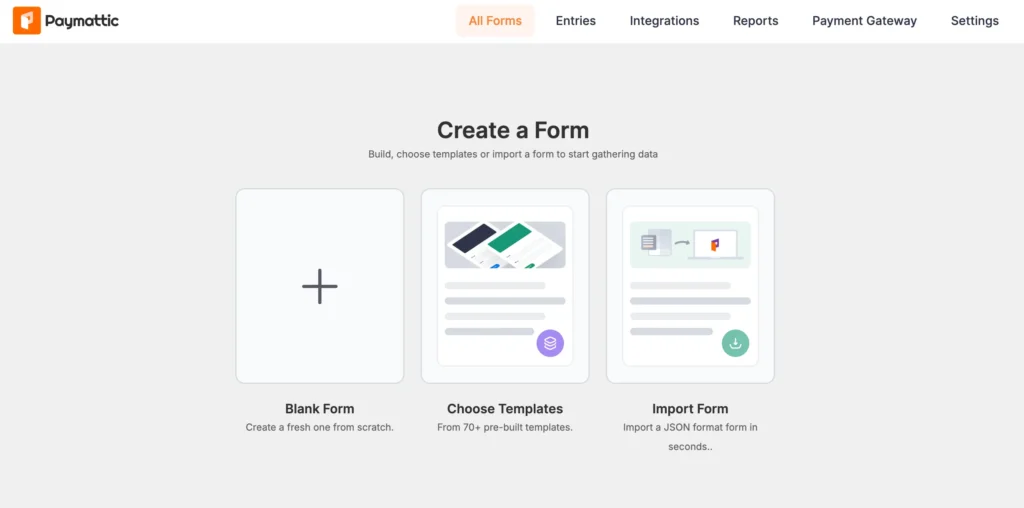
Step 3: Create a PayPal payment form
- Go to Paymattic > Create Form.
- You can choose a template that matches your use case (Product Payment, Donation, Service Payment, Recurring Payments, etc.) or select Blank Form to start fresh.
- The form builder opens with a drag-and-drop interface.
Add essential fields:
- Customer Name (First and Last Name fields)
- Email Address (required for payment receipts)
- Payment Item field for product selection or custom amounts
- Payment Method field to display PayPal as an option
- Preview and Save your form
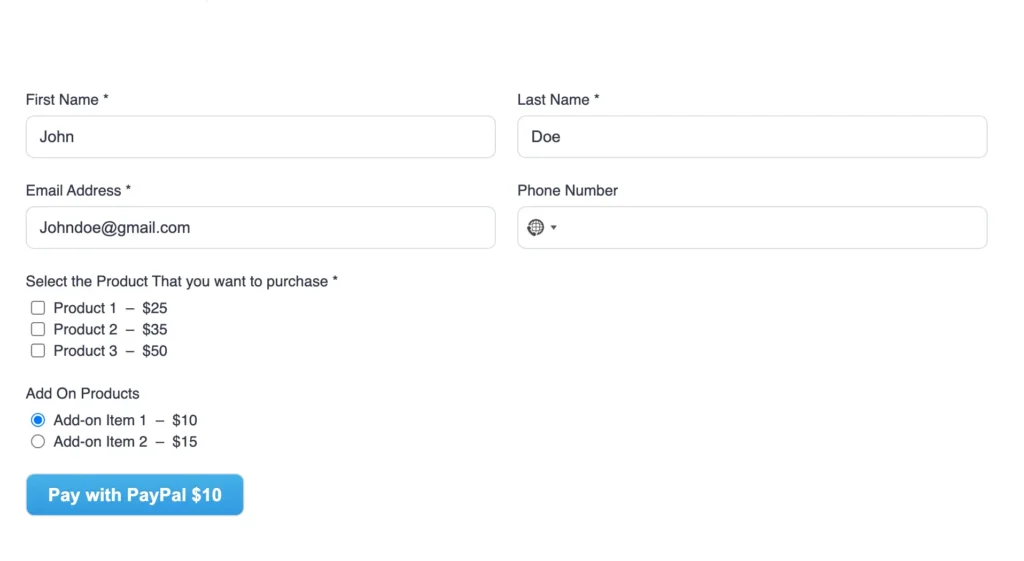
Step 4: Run a test payment
Fill out the form and click the payment button. You’ll either be redirected to the PayPal sandbox login page or see a card input field directly, depending on your configuration.
If you see the PayPal login prompt, log in using your sandbox buyer account credentials (the ones from the developer dashboard, not your real PayPal credentials).
If you see a direct card input, enter one of the Visa test cards or Mastercard test cards from the table above, add the CVV and expiry date, and submit.
If everything is configured correctly, you’ll see a successful payment confirmation. Check your Paymattic dashboard and your PayPal sandbox account to confirm the transaction appears on both ends.
That’s it. You’ve just processed your first fake payment successfully. And honestly, there’s something weirdly satisfying about it.
Testing different payment scenarios
Here’s something a lot of tutorials skip over: successful payments are just the beginning. Real testing means putting your integration through its paces with every scenario your users might encounter.
Let’s cover the important ones.
Successful payments
This is your baseline. Use any of the standard PayPal test cards listed above with a valid future expiry date and a 3-digit CVV. The transaction should go through and show up as “Completed” in your sandbox account.
Use this to verify your success page loads correctly, your webhook fires, your database updates, and your confirmation email sends.
Failed transactions
To simulate a payment failure, you can use specific card numbers that PayPal’s sandbox is designed to reject. Alternatively, some integrations let you trigger failures by manipulating the amount or using expired test cards.
For a deliberate failure, try entering an expiry date that’s already passed. Most sandbox environments will return a card declined or invalid card error, which lets you test how your error handling and user messaging look.
Insufficient funds simulation
This one’s useful if your application needs to handle partial payments or retry logic. In the PayPal sandbox, you can set the balance on your buyer test account to a very low amount (like $1) and then attempt a $50 payment. The sandbox should return an insufficient funds error.
Card declined scenarios
Different decline reasons require different handling. A card can be declined because of an expired date, an incorrect CVV, or a fraud flag. Each of these might warrant a different message to the user.
To simulate different decline types, experiment with obviously wrong CVVs (like 000) or cards from the “trigger specific responses” section of PayPal’s developer documentation.
PayPal provides specific card numbers that trigger specific decline codes, which is useful for more advanced error handling tests.
[Related article: Stripe Test Card Numbers For Testing Transactions]
Wrapping up
Getting your PayPal integration tested properly is one of those things that feels tedious until something breaks in production. Then it feels very important, very fast.
The sandbox exists so that never happens. Once you understand how PayPal’s sandbox works and have the right test credit card details on hand, the whole process becomes a lot more straightforward.
Use it generously. Test the happy path, sure, but spend just as much time on the edge cases. The declined cards, the insufficient funds errors, the refunds. Those are the moments that define how trustworthy your payment flow actually feels to real users.
Once everything checks out in the sandbox, you can push to production with actual confidence, not just hope. And that’s the whole point.
FAQs
Ques: Do I need a PayPal developer account to use test cards?
Ans: Yes. You need a PayPal developer account to access the sandbox and create test buyer and seller accounts before you can use any test card numbers.
Ques: Do PayPal test cards work in live mode?
Ans: No. Test cards only work in Sandbox or test environments. They will always fail in live production checkouts.
Ques: Can I use real credit cards in PayPal Sandbox?
Ans: No. Real cards are not designed for Sandbox testing.
Ques: Do PayPal test cards charge real money?
Ans: No. Sandbox transactions are completely fake and never charge actual funds.
Ques: What CVV should I use for PayPal test credit cards?
Ans: Most test cards use a 3-digit CVV like 123. American Express typically uses a 4-digit CVV such as 1234.
Ques: What expiry date should I use for test cards?
Ans: Use any future expiry date. Past dates usually trigger a failed payment response in Sandbox mode.
Ques: Can I test recurring payments with PayPal Sandbox?
Ans: Yes. Sandbox accounts support subscription and recurring payment testing for developers and merchants.
Ques: What name and billing address should I enter with a test card?
Ans: You can type anything. “Test User” or “John Doe” works fine for the name, and any valid-looking address works for billing, the sandbox doesn’t validate either.
Join the thousands already enjoying Paymattic Pro!

Tipu Deb
Hey! Tipu here, working as a Marketing Strategist at WPManageNinja & Paymattic. A nature lover and a person who is addicted to exploring historical events. In my leisure, you’ll find me playing with different musical instruments.


Leave a Reply