

Create A Stripe Donation Form in Minutes with Paymattic


Table of Content
Download Paymattic – it’s Free!

Subscribe To Get
WordPress Guides, Tips, and Tutorials
We will never spam you. We will only send you product updates and tips.
If you run a nonprofit, manage a fundraising campaign, or volunteer as a web admin for a local charity, you already know how important it is to make donating easy.
The fewer steps between a donor and the “donate” button, the better it is.
Because donors don’t abandon causes. They abandon complicated donation pages. confusing form, too many steps, or an untrustworthy checkout is all it takes to lose a gift that was already decided.
A clean, simple donation form with Stripe fixes that. And with Paymattic on WordPress, you can effortlessly build a Stripe donation form.
Here is a step-by-step guide.
How to create a Stripe donation form with Paymattic
Creating a Stripe donation form template for a one-time gift takes minutes with Paymattic free. You don’t need to write a single line of code. Here is how to set it up.
Step 1: Install Paymattic Free
To create your donation form, first, you need to install and activate Paymattic.
- Go to your WordPress admin dashboard
- Click on Plugins → Add New
- Search for Paymattic and install
- the plugin
- Click on the Activate button
Step 2: Configure Stripe
After installing the free plugin, you need to configure the Stripe payment gateway. Yes, Paymattic offers Stripe in the free version, so that you can easily accept donations with a credit card or debit card.
- Go to Paymattic > Payment Gateway
- From the left navigation bar, click on Stripe
Keep it on Test Mode. You’ll need to provide your Stripe credentials here. Input your Stripe API keys (Public Key & Secret Key) here and click “Save Settings.”
Step 3: Create a Stripe donation form
This is where the real work happens, and honestly, it is simpler than most people expect.
There are two ways you can create a Stripe donation form.
- Create one from scratch
- Choose a built-in template in the plugin
For most nonprofits, the donation form template is the fastest route. Here, we’ll show you how to create a Stripe donation form from scratch.
- Go to Paymattic > Create Form
Choose Blank Form, and it’ll open up the form editor.
Add a donation field
Click on the (+) icon, and select “Donation Progress Item.”
Here, add your fundraising campaign image, set your donation goal, and provide suggested donation amounts (e.g., $10, $25, $50, $100). You can also allow donors to enter a custom amount.
Both options work well depending on your campaign style.
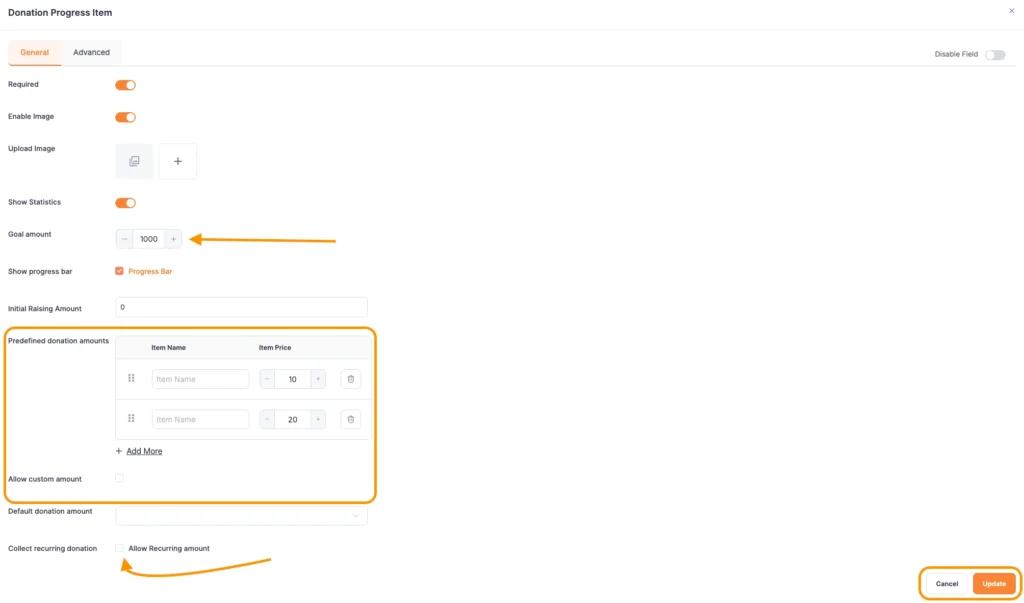
Enable recurring donations
One of the best features when using Stripe for donations is the ability to collect recurring gifts.
Click on the “Allow Recurring Amount” and let donors choose weekly, monthly, or annual giving. But you need the Paymattic Pro to accept recurring donations.
Click on update after finishing settings.
Add donor information fields
Include fields for donor name, email address, and any other details your organization collects. Keeping this minimal reduces form abandonment.
Step 4: Add Stripe as a payment method
Click on the (+) icon > scroll down to Payment Method Fields > select Stripe Payment.
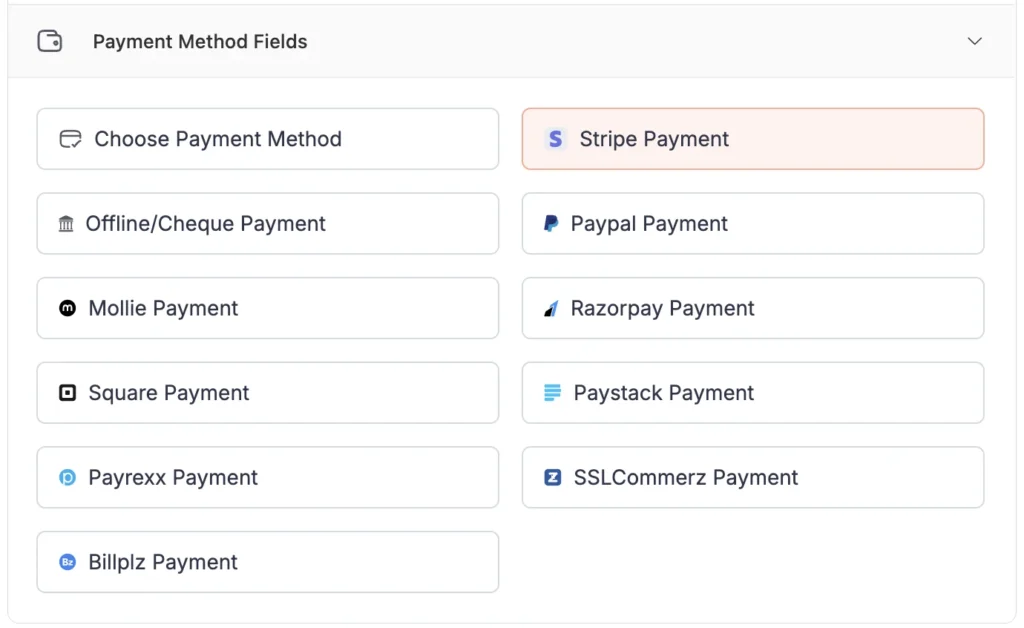
Click on Save, and now you’re ready to accept donations with Stripe
Step 5: Preview, test, and go live
Before embedding the form on your donation page, preview it and always test it. Stripe provides test card numbers (like 4242 4242 4242 4242) that you can use while Paymattic is in test mode.
Make a few test donations to confirm the payment flow, the confirmation message, and the data showing up in your Paymattic entries.
When everything looks good, switch Paymattic to Live Mode in the Stripe settings.
Now, embed your form on any WordPress page using the Paymattic shortcode. Paste it on your Stripe donation page, share the link with your donors, and you’re live.
Subscribe Newsletter
Subscribe to our newsletter for updates, exclusive offers, and news you won’t miss!

Stripe donation form template
Not sure what a well-built donation form looks like in practice? Here is a real-world example to give you a clear picture.
Below is a demo donation form built with Paymattic, designed for an orphanage. It shows exactly how a stripe orphanage donation form looks when put together thoughtfully.
This sample form includes:
- A short campaign headline
- Preset donation amounts ( $20, $50, $100), with a custom amount
- A recurring donation option
- Fields for the donor’s name and email
- A simple, trustworthy payment section powered by Stripe
This kind of layout works just as well for an animal shelter donation form, a sponsor donation form supporting a scholarship fund, or a charity page for a community food bank.
The structure stays the same. The story changes based on your cause.
Stripe fees for nonprofits
Let’s talk about the fees when you use Stripe for nonprofits. Specifically, what Stripe takes and what your organization actually keeps.
Standard Stripe fees
By default, Stripe charges 2.9% + $0.30 per successful card transaction. So if someone donates $100, you receive roughly $96.80 after fees. For high-volume campaigns, those Stripe donation fees add up quickly.
The Stripe nonprofit discount
Here is the good news: Stripe offers a discounted rate for registered nonprofits through its partnership with Stripe.org. Eligible organizations can apply for a reduced rate of 2.2% + $0.30 per transaction.
That might not sound like a dramatic difference, but over thousands of donations in a year, it translates to real money staying in your organization.
To qualify for Stripe nonprofit fees, your organization typically needs to be a registered 501(c)(3) in the United States or an equivalent nonprofit status in your country.
ACH Bank transfers
If you are collecting larger donations, encouraging donors to pay via ACH bank transfer is a smart move. Stripe charges just 0.8% per ACH transaction, capped at $5.
This is significantly cheaper than card processing and is worth promoting for major donors.
International donations
If you accept donations from outside your country, an additional 1.5% currency conversion fee applies. Keep this in mind if your campaign targets a global audience.
What about the Stripe for nonprofits program?
Beyond the fee discount, Stripe for nonprofits also offers access to tools and resources through Stripe.org. This includes support for disaster relief organizations and social impact initiatives.
It is worth exploring even if you are a small charity stripe operation running on a shoestring budget.
A note on Paymattic and transaction fees
Paymattic itself does not add any extra platform fees on top of what Stripe charges. You pay Stripe’s processing fee, and that is it. Your Paymattic subscription covers the plugin, not a cut of your donations.
Wrapping up
Creating a Stripe donation form does not have to be a multi-day technical project. With Paymattic on WordPress, you can go from zero to a fully live Stripe donation page in a single sitting.
Whether you are setting up a donation form for a local food pantry, a religious organization, an animal rescue group, or a global humanitarian campaign, the process is the same: install, connect Stripe, build your form, and go live.
Join the thousands already enjoying Paymattic Pro!

Tipu Deb
Hey! Tipu here, working as a Marketing Strategist at WPManageNinja & Paymattic. A nature lover and a person who is addicted to exploring historical events. In my leisure, you’ll find me playing with different musical instruments.


Leave a Reply