

Stripe API Keys: Configure and Accept Your First Payment


Table of Content
Download Paymattic – it’s Free!

Subscribe To Get
WordPress Guides, Tips, and Tutorials
We will never spam you. We will only send you product updates and tips.
If you’re a WordPress developer or a small business owner, setting up payments is one of the most exciting (and sometimes nerve-wracking) steps for you while launching an online business.
To do this, the first payment gateway that comes to mind is Stripe. Stripe makes it easier than ever to accept credit cards, debit cards, subscriptions, and even global payments.
But before you can start accepting payments, you’ll need to configure Stripe on your website through the API keys.
The keys are the digital bridge between your website and Stripe.
Get them right, and your checkout runs smoothly. Get them wrong, and well… let’s just say customers don’t usually come back after a failed payment attempt.
In this guide, I’ll walk you through everything: what a Stripe API key actually is, the different types you’ll run into, where to find stripe api keys, how to generate new ones, and how to set them up so you can accept your first payment.
Key takeaways
- Stripe API keys are the credentials that connect your website to Stripe’s servers so you can process payments, manage customers, and handle transactions securely.
- Every Stripe account comes with four key types: publishable key, secret key, restricted key, and webhook signing secret, each with a different job and a different level of exposure risk.
- Your publishable key (
pk_) is safe to expose on the frontend. Your secret key (sk_) is not, and should only ever live on your server or in your plugin’s backend settings. - Test mode and live mode each have their own separate key pairs. A stripe test api key will never work in live mode, so always double check which one you’re pasting in.
- You’ll find all your keys in the Stripe dashboard under Developers > API keys, there’s no separate “generator” tool, and any third-party site claiming to be one should be treated as a red flag.
- If a key is ever exposed, roll it immediately from the same API keys page. Stripe deactivates the old one the second the new one is created.
- On WordPress, connecting Stripe takes just a few minutes with a plugin like Paymattic: paste your public and secret keys into the payment gateway settings, save, and you’re ready to accept your first payment.
What is an API key, and what are Stripe API keys?
Look, I know “API keys” sounds a bit technical and scary. When I first heard the term, I thought about some complex coding that would take weeks to figure out.
But the thing is, they’re basically just secret handshakes between your website and Stripe’s payment system.
So what is an API key, generally speaking? It’s a unique string of characters that identifies who’s making a request to a service and whether they’re allowed to do it. Almost every payment processor, email tool, or SaaS platform uses them the same way.
Stripe API keys are unique codes that allow your website or app connect with Stripe’s payment gateway.
They connect your website with Stripe’s servers, enabling you to process payments, manage customers, and handle transactions safely.
Think of them like your username and password for online banking. They tell Stripe that this payment request is legitimate and comes from an authorized source.
Now, why should you care about getting your Stripe api key set up properly?
First of all, without these keys, your website and Stripe can’t communicate at all.
The beauty of the API keys lies in their simplicity and security. They handle the heavy lifting of payment processing while keeping sensitive financial data away from your website’s servers.
According to Stripe’s own documentation, this is exactly what keeps you compliant with industry security standards without you having to build any of that infrastructure yourself.
If you set up the keys properly, you can accept credit card payments, Apple Pay, Google Pay, and pretty much any other payment method your customers want to use, without sending them to any external checkout pages.
Types of Stripe API keys
Stripe gives you a few different types of API keys, and most guides only tell you about two of them. There are actually four you should know about:
- Stripe Publishable Key
- Stripe Secret Key
- Stripe Restricted API Key
- Webhook Signing Secret
Stripe also runs two separate workspaces: “Test Mode” and “Live Mode.” Each one has its own full set of keys, so a Stripe test api key will never work in live mode, and vice versa.
For example, if you want to test your transactions before making the payment form live, you need the “Test Publishable Key” and ”Test Secret Key”. The same goes for live transactions as well.
Here’s a quick reference table before we get into each one:
| Key type | Prefix | Where it’s used | Safe to expose publicly? |
|---|---|---|---|
| Publishable key | pk_test_ / pk_live_ | Frontend (browser, checkout form) | Yes |
| Secret key | sk_test_ / sk_live_ | Backend / server only | No |
| Restricted key | rk_test_ / rk_live_ | Backend, scoped to specific tasks | No |
| Webhook signing secret | whsec_ | Verifying webhook events | No |
Stripe publishable key
The Stripe publishable key is the “public face” of your Stripe integration. As the name suggests, this key can be safely exposed to your website’s front end; it’s designed to be seen by browsers and users without compromising security.
The Stripe publishable key handles the initial part of payment processing, collecting the credit card info, and turning it into a secure token.
But it can’t actually charge anyone’s card, nor access sensitive account information or transaction history.
The publishable key always starts with “pk_” and then either “test” or “live,” depending on whether you’re still testing things out or ready to take real payments.
Subscribe Newsletter
Subscribe to our newsletter for updates, exclusive offers, and news you won’t miss!

Stripe secret key
Now this is the key you need to guard with your life. The Stripe secret key is like having the master key to your entire payment system.
This key must be kept private and should never be exposed in frontend code, browser scripts, or any publicly accessible location. Because it is the most sensitive Stripe credential.
If someone gets their hands on this, they could potentially mess with your account, issue refunds, or access customer data.
That’s exactly why so many people search for where to get a Stripe secret key safely rather than just grabbing it from anywhere they can find it. The only safe place to get it is your own Stripe dashboard, never a forum post, a GitHub repo, or a third-party “tool.”
So, the Stripe secret key should only live in secure places like your WordPress plugin settings or your server’s configuration files.
This key does all the heavy lifting; it processes actual payments, refunds, accesses customer and transaction data, creates subscriptions, basically anything that involves real money changing hands.
It starts with “sk_” and, like the publishable key, has either “test” or “live” in the name.
Stripe restricted API key
This is the one most tutorials skip, but it’s genuinely useful. A Stripe restricted api key lets you create a key that can only do specific things instead of having full access to your account.
Say you’re connecting a third-party tool that only needs to read customer data. Instead of handing it your full secret key, you create a restricted key with read-only access to customers, and nothing else. If that key ever leaks, the damage is contained.
You’ll find the option to create one right on the same API keys page in your dashboard, usually labeled “Create restricted key.”
Webhook signing secret
Not technically an “API key” in the traditional sense, but it shows up in the same conversation a lot, so it’s worth mentioning. This secret (starts with whsec_) lets your server verify that a webhook event actually came from Stripe and wasn’t faked by someone else.
If you’re setting up automated payment confirmations or subscription updates, you’ll run into this one too.
Where to find Stripe API keys for testing?
If you ask, where to find the Stripe test API keys, then it’s actually a pretty straightforward process once you know where to look.
First things first, log in to your Stripe account. If you don’t have one yet, just go to the Stripe dashboard and sign up for free. There is no charge until you start processing payments.
Once you log in, from the top left corner, click on your profile > Switch to sandbox > Test mode. This is your Stripe test mode dashboard where you’ll find the Stripe API key for testing.
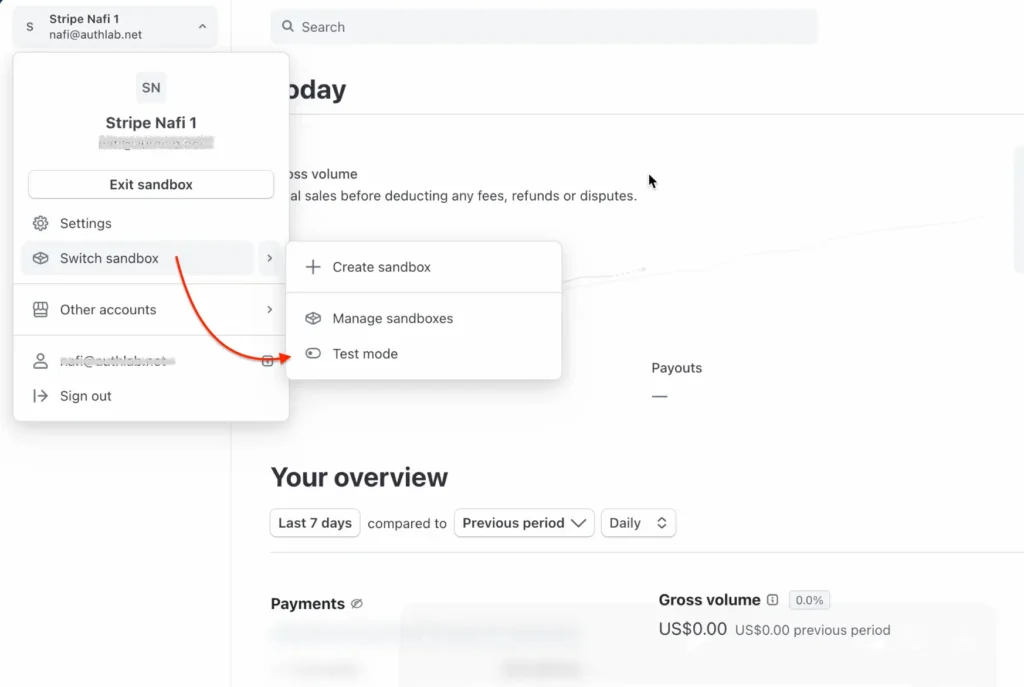
Another way to find the Stripe publishable key and secret key: look for “Developers” in the left sidebar. It’s usually near the bottom of the menu. Click on that, then click “API keys.”
This is your command center for all API-related things, and honestly, the fastest way to find stripe API key details whenever you need them again.
At the top of the API keys page, there’s a toggle switch that says “Test data” on one side and “Live data” on the other. Make sure you understand the difference:
- Test data gives you Stripe test keys that lets you simulate payments without processing real money
- Live data gives you the keys for processing actual customer payments
When you’re just getting started, it’s recommended to test the transactions with the Stripe test card numbers for every possible scenario in test mode first. Because you don’t want to accidentally charge your own credit card while you’re figuring things out.
In the API keys section, you’ll see your publishable key right there. The secret key, on the other hand, is partially hidden for security reasons. You’ll see something like “sk_test_…” with the rest of the key masked out.
Click “Reveal test key” to see the full thing.
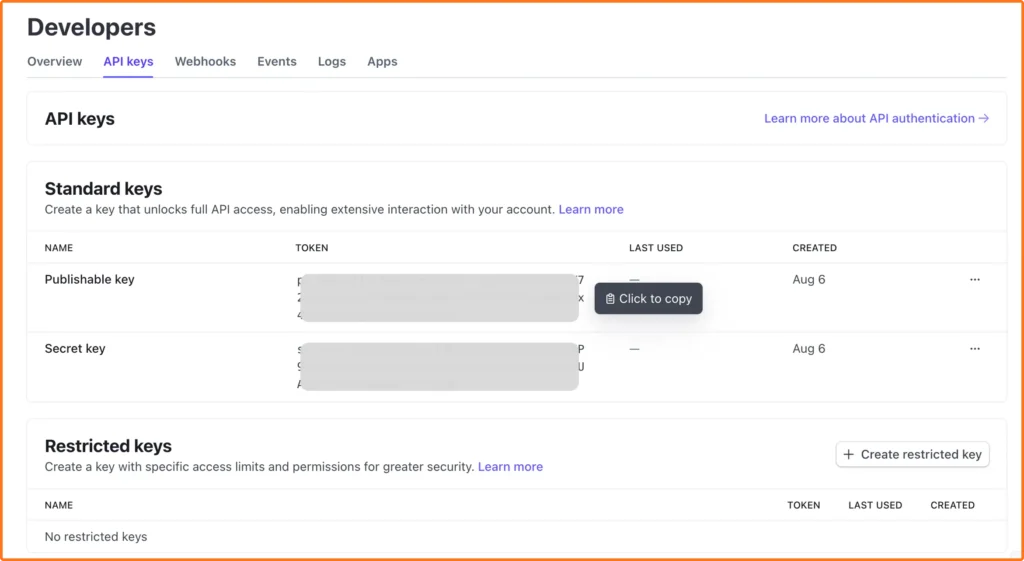
To access the live API keys, you just need to toggle the test mode to live mode to see the appropriate keys for real transactions.
Pro tip: When you’re ready to switch from test to live mode, you’ll need to provide some additional business information to Stripe. They need to verify your identity before they’ll let you process real payments. This usually takes a day or two, so plan accordingly.
Security reminder: Never share your secret keys in code repositories, email, or any public channels. Treat them like your bank account password, because in many ways, that’s exactly what they are.
Stripe test API key vs live API key
This is worth its own section because mixing these up is one of the most common (and most avoidable) mistakes.
Every Stripe account runs on two parallel sets of Stripe test keys and live keys:
| Test mode | Live mode | |
|---|---|---|
| Publishable key | pk_test_... | pk_live_... |
| Secret key | sk_test_... | sk_live_... |
| Real money involved? | No | Yes |
| Card numbers used | Stripe test card numbers | Real customer cards |
A Stripe testing API key lets you simulate the entire payment flow, successful charges, declined cards, disputes, refunds, without touching a single real dollar.
This is exactly where you should be building and testing your checkout form before it ever goes live.
Once you’ve confirmed everything works with your Stripe test API keys, you flip the switch to live mode, swap in your live keys, and you’re processing real transactions.
Stripe Payment Gateway: A Complete Beginner’s Guide
How to configure Stripe API keys into WordPress
If you’re running your store or donation site on WordPress, here’s the fastest way to get your Stripe API keys connecte,d and start accepting payments.
First, choose a WordPress payment plugin that supports a wide range of payment gateways, including Stripe, to accept online payments.
We’ll take Paymattic for this. It’s one of the best WordPress plugins to accept payments and donations globally. Another major reason for choosing Paymattic is that it provides a total of 14 payment gateways, and Stripe is completely free.
So go to your WordPress dashboard, install and activate the Paymattic plugin. After activation, follow the steps below to configure your Stripe account in the Paymattic dashboard.
- Navigate to Paymattic > Payment Gateways.
- You can find all the available payment gateways here.
- Choose Stripe.
- Paste the Public Key and Secret Key here.
- If you’re in the test mode, paste the “Test API Keys”. Use “Live API keys” for live mode.
- Hit Save Settings.
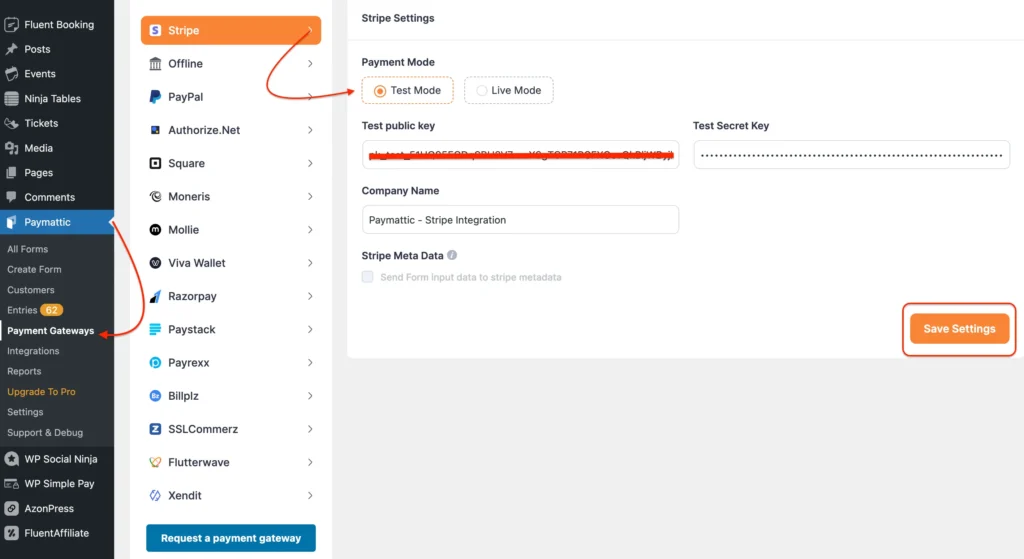
Once you save the settings, your Stripe account will get connected to your website. Now the only thing you need to do is to create a payment form, embed it on your website using the shortcode and start accepting online payments.
How to rotate a compromised Stripe API key
If you ever suspect a key has leaked, don’t wait around. Here’s what to do:
- Log in to your Stripe dashboard and go to Developers > API keys.
- Find the key you believe is compromised.
- Click the three-dot menu next to it and select “Roll key” (sometimes labeled “Delete” for older key types).
- Stripe generates a brand new key immediately. The old one stops working right away.
- Update the new key everywhere it’s used, your WordPress plugin settings, server environment variables, or any third-party integration, before customers start seeing failed payments.
It takes a few minutes, and it’s a lot less painful than dealing with unauthorized charges later.
Wrapping up
Setting up the keys might feel a little technical at first, but once you know how to generate Stripe API keys and how to set them up, it’s actually a simple process.
Doesn’t matter whether you’re running an online shop, selling courses, or collecting donations, Stripe ensures your transactions are smooth, secure, and hassle-free.
And with Paymattic, you don’t even need to be a tech wizard; just copy and paste, and you’re ready to accept payments.
At the end of the day, your customers care about paying quickly and safely. Get your Stripe keys configured properly, and you’ll not only earn their trust but also set the foundation for steady growth in your online business.
FAQs
Q. What is an API key?
An API key is a unique code that identifies and authenticates a request between two systems, in Stripe’s case, between your website and Stripe’s servers.
Q. Is it safe to expose my Stripe publishable key?
Yes. It’s designed to be visible in your website’s frontend code. It can’t move money or access sensitive data on its own.
Q. Do Stripe API keys expire?
No, they don’t expire automatically. They stay active until you manually roll or delete them.
Q. Can I use the same Stripe key for test mode and live mode?
No. Stripe test keys and live keys are completely separate, and Stripe keeps their data isolated from each other on purpose.
Q. What happens if my secret key gets exposed?
Roll it immediately from Developers > API keys in your Stripe dashboard. The old key stops working the moment you generate the new one.
Q. Is there a real “Stripe API key generator” tool?
No. Stripe automatically creates your keys when you sign up, and any additional restricted keys are created directly inside your Stripe dashboard. Be cautious of any third-party site claiming to generate them for you.
Join the thousands already enjoying Paymattic Pro!

Tipu Deb
Hey! Tipu here, working as a Marketing Strategist at WPManageNinja & Paymattic. A nature lover and a person who is addicted to exploring historical events. In my leisure, you’ll find me playing with different musical instruments.

Leave a Reply