

Stripe Payment Gateway: A Complete Beginner’s Guide


Table of Content
Download Paymattic – it’s Free!

Subscribe To Get
WordPress Guides, Tips, and Tutorials
We will never spam you. We will only send you product updates and tips.
You finally decide to start accepting Stripe payments on your WordPress site, and within ten minutes you’re staring at API keys, checkout modes, webhook URLs, and a fee calculator.
Here’s the thing nobody tells you upfront: Stripe isn’t actually complicated; it just gets explained badly. Most guides either drown you in developer documentation you’ll never touch as a WordPress user, or they skip the parts that actually matter and leave you guessing when something breaks.
This guide fixes that.
By the end, you’ll know exactly what the Stripe payment gateway is and how it works, how to get your API keys and test your setup properly before going live, what the transaction fees are, how to handle subscriptions and donations, and most importantly, which WordPress plugin fits your specific use case.
Just what you need to go from zero to confidently accepting real payments.
What are Stripe payments?
Stripe payments are transactions processed through Stripe, one of the most widely used payment gateways online. In simple terms, Stripe is the middleman that sits between your customer’s card and your bank account, handling the encryption, verification, and money movement so you don’t have to build any of that yourself.
So what is Stripe payment gateway exactly, in practical terms? It covers a few different flows depending on what you’re running:
- One-time card payments, like buying a product or making a single donation
- Recurring payments, for memberships, subscriptions, or monthly giving
- Bank-to-bank transfers through Stripe ACH payments, which some businesses prefer over cards because of lower fees on larger transactions
- Digital wallet payments like Apple Pay and Google Pay, which skip manual card entry entirely
Whether you’re running an online store, a SaaS product, or a nonprofit collecting donations, Stripe payments give you one consistent system to handle all of it.
How does Stripe work?
At a basic level, here’s what happens when someone pays through Stripe. Your customer enters their card details on your checkout form. Stripe encrypts that data instantly, so it never actually touches your server, which is a big deal for security (more on that later).
Stripe then communicates with the card networks and the customer’s bank to confirm the payment is valid. If it’s approved, the funds move into your Stripe balance and get paid out to your bank account on your set payout schedule.
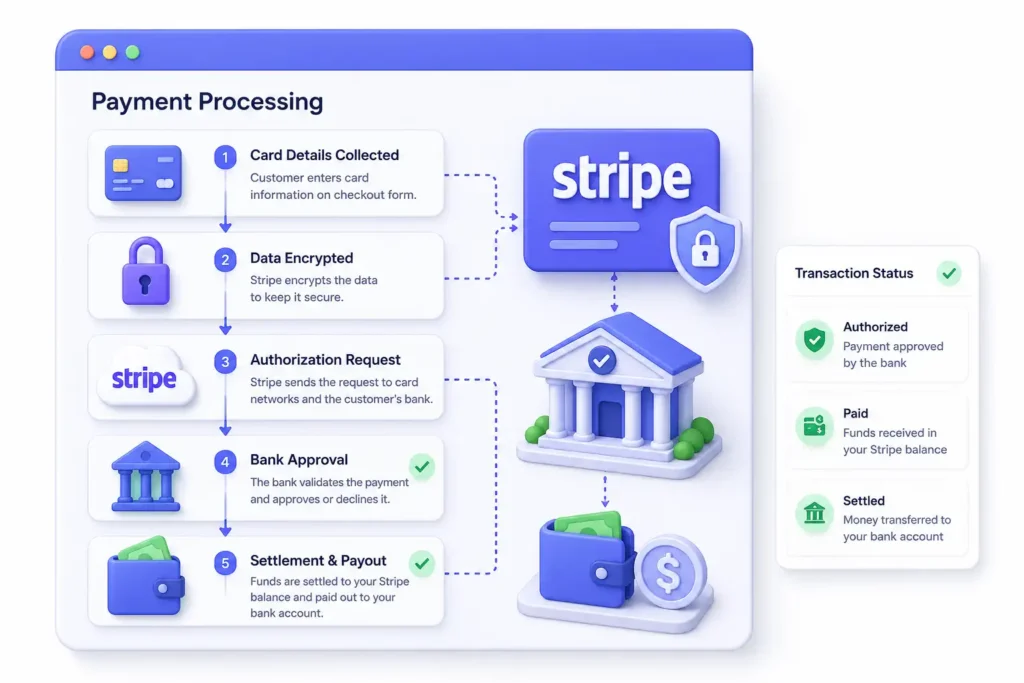
Here’s the actual sequence behind every Stripe transaction, broken into the steps that matter:
- Collection. Your customer enters their payment details on your checkout page, either a Stripe-hosted page or a form embedded directly on your site.
- Encryption. The gateway encrypts data collected from the customer’s browser, keeping transaction details confidential before they ever leave the browser.
- Authorization request. The payment gateway forwards the encrypted data to the business’s server via a secure connection, then sends a transaction request to the payment processor associated with the business’s acquiring bank.
- Approval or decline. The issuing bank checks the card is valid and has sufficient funds, then sends back an approval or a decline.
- Settlement. After authorization, the payment processor transfers the funds from the issuing bank to the merchant account, usually on a scheduled payout rather than instantly per transaction.
The whole thing happens in a second or two from the customer’s perspective, but knowing these five steps actually matters once you start troubleshooting, since most payment issues trace back to one specific step breaking down (a card getting declined at step 4, a webhook missing the update after step 5, and so on).
This is why so many businesses lean on Stripe for online payments instead of building their own payment processing from scratch. You get a battle-tested system without touching a line of security-critical code.
Types of payment gateways (and where Stripe fits)
Not all payment gateways work the same way, and understanding the categories helps explain why Stripe feels different from, say, an old-school offline payment gateway.
- Hosted gateways. Customers are redirected to the payment service provider’s platform to enter their payment details and complete the transaction, then sent back to your site. Simple to set up, less control over branding.
- Self-hosted gateways. These collect payment details directly on your site, giving you more control over the user experience and branding during checkout but requiring greater responsibility for data security and compliance.
- API-hosted gateways. These integrate directly with your website or app through APIs, letting customers complete transactions without leaving your site, giving you a fully branded experience with more customization.
- Local bank integration gateways. These connect directly to local banks and financial institutions, common in markets with strong domestic banking rails.
Stripe is unusual in that it can operate as more than one of these at once. You can use Stripe’s hosted checkout page for simplicity, or build a fully embedded, API-hosted experience if you want complete control over the look and feel.
That flexibility is a big part of why it’s become the default choice for so many WordPress site owners rather than a single-purpose gateway locked into one setup style.
What are Stripe-supported payment methods?
This is where a lot of beginner guides stop at “cards,” but Stripe supports a lot more than that, and choosing the right mix affects your conversion rate more than people expect.
Credit Cards or Debit Cards: These are default, and still the most universal option globally.
Digital wallets: Apple Pay, Google Pay, and Link let customers check out without manually typing card details. Digital wallets accounted for about half of global ecommerce transactions in 2024 (source), and that growth is expected to continue, so skipping wallets on a mobile-heavy site is leaving conversions on the table.
Bank transfers and ACH: For large transactions, Stripe makes it possible to accept credit payments or wires with automated reconciliation, which is where Stripe ACH payments come in. It’s useful for B2B invoices or larger one-off payments where card fees eat too much margin.
Buy now, pay later. Options like Klarna and Afterpay let customers split a purchase into installments. This one matters more for ecommerce than for donation-based sites, but it’s worth knowing it exists if you ever expand into product sales.
Local payment methods: If you ever sell outside the US, this becomes important fast. iDEAL, a local payment method that provides bank transfers for online payments, serves all Dutch consumer banks and accounts for 69% of digital purchases in the Netherlands, and similar region-specific methods dominate in other countries.
You don’t need to enable all of these on day one, but it’s good to know Stripe supports them if you ever expand internationally.
For a WordPress site just getting started, cards, wallets, and possibly Stripe ACH payments cover most needs. You can always add more payment methods later without rebuilding your checkout from scratch.
How Stripe fits into your WordPress payment stack
If you’re running a WordPress site, Stripe payments for WordPress setups are everywhere, and for good reason.
Whether you’re selling products, accepting donations, or running a subscription-based membership site, Stripe plugs into WordPress through plugins that connect your site to your Stripe account without requiring you to touch any backend code.
This matters for anyone running Stripe for business on WordPress specifically, since the ecosystem of plugins means you can go from “I want to accept payments” to a working checkout in an afternoon rather than a month of development.
We’ll get into which plugins actually do this well a bit further down.
Subscribe Newsletter
Subscribe to our newsletter for updates, exclusive offers, and news you won’t miss!

Understanding Stripe API keys and how they work
Before your site can talk to Stripe, it needs Stripe API keys, which act as the credentials that let your website and your Stripe account communicate securely. There are two main types.
- Publishable key (starts with pk_): It goes in your frontend code, is safe to expose publicly, and its only job is to initiate the connection to Stripe.
- Secret key (starts with sk_): It stays on your server, is never shown to the browser, handles the actual charge and any sensitive operations. If this one ever leaks, rotate it immediately.
You’ll also notice Stripe gives you two sets entirely: a Stripe test API key for testing mode and a live key for real transactions. Keeping these separate means you can build and break things in test mode without any risk of touching real money.
If you’re setting things up for the first time, generating a Stripe API key for testing is your very first step, well before you build anything customer-facing.
Since key mismanagement is one of the most common setup errors (mixing test and live keys, exposing a secret key in frontend code), it’s worth getting this part right before moving on.
Our guide to Stripe API keys walks through exactly where to find, generate, and rotate these keys if you ever need to.
Why you need Stripe test cards before accepting real payments
Once your Stripe test keys are in place, you’ll want to run through actual test transactions before flipping the switch to live mode.
This is where how to test Stripe payments comes in. Stripe gives you a set of Stripe test card numbers built to simulate different outcomes, so you can see how your site behaves when a payment succeeds, gets declined, or triggers extra verification.
A few of the most commonly used Stripe test credit card numbers:
- 4242 4242 4242 4242 – a standard successful payment
- 4000 0000 0000 0002 – a generic decline
- 4000 0000 0000 9995 – decline due to insufficient funds
- 4000 0027 6000 3184 – triggers 3D Secure authentication
Running Stripe test payments through each of these scenarios before launch saves you from finding out about a broken checkout flow the hard way, with an actual customer watching.
This matters more than people assume, since a checkout that silently fails on a declined card, instead of showing the customer a clear error, is one of the quieter reasons carts get abandoned.
For the complete list of Stripe test cards covering every scenario Stripe supports, including international cards and specific bank decline codes, check out our Stripe test card numbers guide.
Setting up Stripe checkout on your site
When it comes to actually building the payment form itself, you’ve got two main routes.
Stripe embedded checkout: It keeps the customer on your site the entire time, giving you more control over branding and the overall experience.
Stripe’s hosted checkout page: On the other hand, it redirects the customer to a Stripe-branded page for a moment, which is faster to set up but a little less seamless visually.
For WordPress Stripe checkout specifically, most plugins let you choose between the two depending on how much control you want over the look and feel.
A donation form for a nonprofit, for instance, usually benefits from staying embedded so the branding feels consistent with the rest of the site, while a quick one-off product sale might not need that level of polish.
If you’re still deciding which fits your site better, our latest guide on WordPress Stripe checkout breaks down the tradeoffs in more depth.
Read more: WordPress Stripe Checkout (A Complete Guide)
The fastest way to start accepting payments with the Stripe payment gateway
So how to accept payments with Stripe in practice?
The short version: connect your Stripe account to your WordPress plugin, build your payment or donation form, and switch from test mode to live mode once you’ve confirmed everything works.
This applies whether you’re figuring out how to accept credit card payments for the first time or you’re expanding an existing setup. Specifically, accepting credit card payments for small businesses used to mean expensive merchant account setups and long approval processes.
Stripe cut that down significantly, and pairing it with a WordPress plugin means accepting credit card payments becomes a form-builder task rather than a developer task.
Stripe also supports ACH payments if you want to offer bank transfers as an option alongside cards, which some customers prefer for larger transactions.
Here is the full step-by-step guide for you: How to accept credit card payments online on WordPress
What Stripe actually costs you per transaction
Nobody loves fee math, but you do need to know what you’re working with. Standard Stripe transaction fees sit at 2.9% plus 30 cents per successful card charge for most US-based accounts.
So a $50 payment costs you about $1.75 in Stripe processing fees, leaving you with roughly $48.25.
These Stripe payment processing fees can shift depending on your business type, currency, and whether the card is international; international cards and currency conversion typically add an extra percentage on top of the base rate.
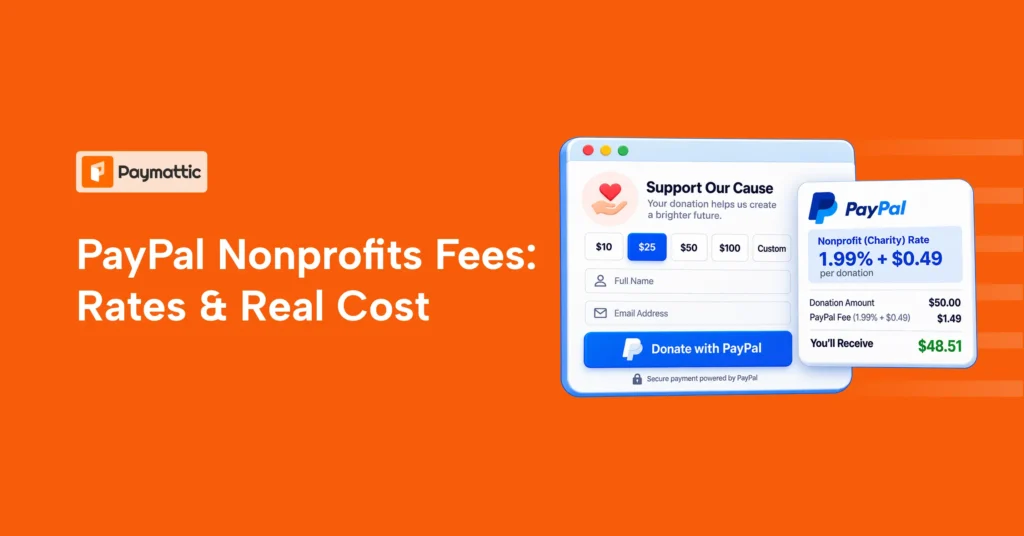
ACH and bank transfer fees tend to run lower than card fees, which is part of why larger transactions often make more sense to route through ACH instead. Nonprofits get a different rate structure entirely, which we’ll touch on shortly.
If you want the full breakdown with worked examples and the exact formula Stripe uses, our Stripe fees for nonprofits guide covers the math in detail, including how it compares for standard businesses too.
How Stripe subscriptions handle recurring payments
If you’re running anything membership-based, whether that’s a SaaS product, a content subscription, or recurring donations, Stripe recurring payments are what keep that revenue coming in automatically.
Stripe subscription payments work by charging a customer’s saved card on a set schedule you define- weekly, monthly, annually, whatever fits your model.
Behind the scenes, Stripe handles the retry logic too. If a card fails on a renewal date, Stripe will automatically retry the charge a few times before marking the subscription as past due, which saves you from manually chasing failed payments.
Stripe also handles proration automatically if a customer upgrades or downgrades mid-cycle, so you’re not writing custom logic to calculate partial charges yourself.
This is one of the more underrated reasons people choose Stripe for anything with recurring billing baked in, since building reliable retry and proration logic from scratch is genuinely hard to get right.
Read more: How to Accept Stripe Recurring Payments in WordPress
What Stripe webhooks do and why they matter
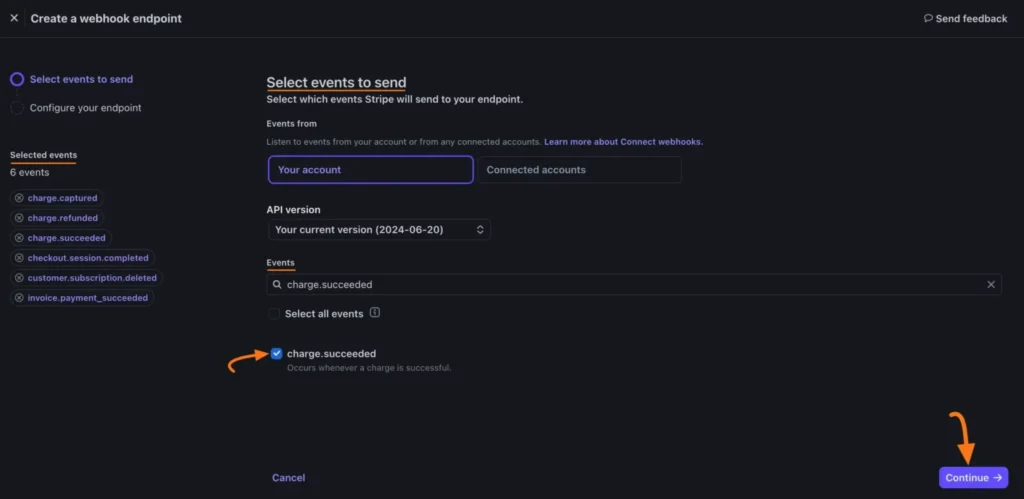
Here’s something that trips up a lot of beginners. Your checkout form can tell your site a payment went through, but Stripe webhooks are what keep everything else in sync after that, things like subscription renewals, refunds, or failed payments that happen outside the initial checkout moment.
Stripe payment webhooks are essentially notifications Stripe sends to your site whenever something changes on their end.
A few of the most common events you’ll run into are, payment_intent.succeeded, invoice.payment_failed, and customer.subscription.deleted.
Without them properly configured, your WordPress site might not know a subscription got cancelled, or a payment failed three days later, which can quietly cause a mismatch between what Stripe shows and what your site shows.
If your plugin handles webhook setup for you, great, but it’s worth knowing what’s happening under the hood so you can troubleshoot if something looks off, especially since a broken webhook is one of the least obvious things to diagnose since nothing appears to fail on the surface.
When you need more than one Stripe account
First things first, can you have multiple Stripe accounts? Yes, and Stripe actually makes this fairly straightforward.
Multiple Stripe accounts come into play more often than people expect. Maybe you’re running two separate brands, operating in different countries with different currencies, or managing payments for multiple clients as an agency.
Though managing which account connects to which part of your WordPress site takes a bit of setup, particularly if you’re running a multisite install or handling multiple client sites from one dashboard.
Our guide to setting up multiple Stripe accounts walks through exactly how to structure this without your payments getting crossed between brands.
Read more: How to Set Up Multiple Stripe Accounts? Unlock the Benefits
How nonprofits can use Stripe for donations
Stripe for nonprofits comes with a meaningfully different setup than a standard business account, both in terms of fee structure and the type of forms you’ll want to build.
Stripe for nonprofits fees are typically discounted compared to standard processing rates, assuming your organization qualifies and gets verified as a registered nonprofit.
Beyond the fees, nonprofits also tend to need donation-specific features, recurring giving, suggested donation amounts, tribute gifts that a standard payment plugin might not prioritize out of the box.
Our Stripe for nonprofits guide covers eligibility, setup, and how to build donation forms that actually convert.
Read more: Stripe for Nonprofits: Everything You Need to Know
How to create a Stripe donation form
Once your Stripe account is connected, building the actual donation form is where most of the setup time goes.
A good donation form needs a few things beyond just a card field: suggested donation amounts, an option for donors to cover the processing fee themselves, recurring giving as a toggle rather than a separate form, and a receipt that goes out automatically once the payment clears.
The process on WordPress generally looks like this: connect your Stripe account to your donation plugin, choose between a one-time or recurring donation type (or let the donor pick), set your suggested amounts, and decide whether you want an embedded form or Stripe’s hosted checkout for the donation page itself.
From there, it’s mostly styling to match your site’s branding and testing with a test card before going live.
Here is a full guide to creating a Stripe donation form with Paymattic.
Is Stripe payment safe?
Short answer: yes, and this is one of Stripe’s biggest selling points. Stripe is PCI DSS compliant at the highest level, meaning the sensitive card data never actually touches your server.
When a customer types their card number into a Stripe-powered form, that information goes straight to Stripe’s servers, encrypted the whole way.
This matters for two reasons.
First, it genuinely protects your customers. Second, it takes a massive compliance burden off your shoulders, since you’re not the one responsible for storing or securing card data.
Stripe payment gateway also runs machine-learning-based fraud detection in the background on every transaction, flagging suspicious activity before it becomes a chargeback problem for you.
That’s a big part of why is Stripe payment safe comes up so often as a search, and honestly, it’s one of the more reassuring “yes” answers in the payments world.
Related article: Credit Card Fraud: What It Is & How Businesses Can Stop It?
Stripe vs PayPal: which one should you choose
Stripe vs PayPal, this comparison comes up constantly, and there’s no universal right answer. Stripe vs PayPal fees are fairly close on paper; both sit around 2.9% plus a fixed fee per transaction, but where they differ is customization, developer flexibility, and how the checkout experience feels to your customer.
Stripe tends to win for businesses that want more control over their checkout design and a cleaner integration experience.
PayPal wins on brand recognition, since a lot of customers simply trust the PayPal name and already have an account saved, which can matter more than people expect for first-time buyers hesitant to enter card details on an unfamiliar site.
For the full side-by-side, including how each handles disputes, payouts, and international payments, check out our Stripe vs PayPal comparison.
The best WordPress plugins for Stripe payments
Picking the right Stripe payment plugins for WordPress makes a bigger difference than people expect, since the plugin determines how much setup work you’re doing versus how much just works out of the box.
Some WordPress Stripe payment plugins are built specifically for ecommerce, others lean more toward forms and donations, and a few try to do everything at once.
The right pick really depends on what you’re building; a simple donation form has very different needs than a full subscription-based membership site.
Paymattic – A lightweight, free-to-start plugin that covers Stripe payments, subscriptions, and donation forms without charging any additional platform fees. A feature-rich plugin that offers 13+ payment gateways, 150+ currencies, currency switcher, LMS integrations, complete donation features, and built-in forms, etc.
Good fit if you want payments, donations, and membership billing handled by one plugin instead of stitching several together.
Fluent Forms – A form builder plugin with Stripe integration built directly into its payment methods, letting you collect one-time payments, subscriptions, registrations, and service fees from the same form. A solid pick if you’re already building general-purpose forms and want payments as one feature among many, rather than a payments-only plugin.
WP Full Pay – Built specifically around Stripe, letting you create one-off payment forms, subscription forms, and donation forms, then embed them directly into any post or page. It supports a wide range of payment methods including major digital wallets and over 100 currencies.
Accept Stripe Payments – The simplest plugin lets you drop a “Buy Now” payment button anywhere via shortcode without building a full form. Good for a single product or service page rather than a full storefront.
For the full comparison, including pricing, use case, pros, and cons for each, check out our complete comparison post.
Read here: Best Stripe payment plugins for WordPress.
Stripe errors you’ll likely run into and how to fix them
Even with everything set up correctly, a few errors show up often enough that it’s worth knowing them ahead of time.
- “No such customer” – Usually means you’re mixing test and live mode data. Double-check which API keys are active.
- Card declined – Often just an issue on the customer’s end, but worth checking your fraud settings aren’t too aggressive.
- Webhook signature verification failed – Typically means your webhook secret key doesn’t match what’s configured on Stripe’s side.
- API key invalid – Almost always a copy-paste issue or a leftover test key in a live environment.
- “Your card was declined” on a valid card – Sometimes triggered by 3D Secure requirements not being handled properly in your checkout flow, worth testing against the 3D Secure test card mentioned earlier.
Most Stripe errors trace back to test and live mode getting mixed up somewhere, so that’s always the first thing worth checking before digging deeper.
Wrapping up
Stripe payment gateway covers a lot of ground, from a single test transaction all the way up to running multiple accounts across different brands and payment methods.
The good news is you don’t need to master everything at once. Install your plugin, start with your API keys, run a few test payments, get your checkout live, and layer in the more advanced pieces like webhooks, subscriptions, and additional payment methods as you actually need them.
If you’re setting this up on WordPress and want a plugin that handles the checkout, donation forms, and subscription logic without you touching a line of code, that’s exactly the gap Paymattic was built to fill.
Frequently asked questions about Stripe payment gateway
Q. Is Stripe free to use?
There’s no monthly fee to use Stripe, but you do pay per transaction through their processing fees.
Q. Do I need coding skills to use Stripe on WordPress?
No, WordPress plugins like Paymattic handle the integration for you, though understanding your API keys and webhook setup helps with troubleshooting.
Q. Can I use Stripe and PayPal at the same time?
Yes, plenty of sites offer both as payment options and let the customer choose.
Q. How long does it take to receive Stripe payouts?
This depends on your account and country, but most standard accounts see payouts within 2 to 7 business days.
Q. Is Stripe available for nonprofits outside the US?
Availability and discounted nonprofit rates vary by country, so it’s worth checking Stripe’s country-specific documentation before assuming eligibility.
Q. Does Stripe support recurring donations, not just recurring subscriptions?
Yes, Stripe’s subscription infrastructure works the same way for recurring donations as it does for SaaS billing; the logic underneath is identical.
Join the thousands already enjoying Paymattic Pro!

Tipu Deb
Hey! Tipu here, working as a Marketing Strategist at WPManageNinja & Paymattic. A nature lover and a person who is addicted to exploring historical events. In my leisure, you’ll find me playing with different musical instruments.

Leave a Reply