WordPress Payment Gateway Integration – Actionable Guide


Table of Content
Download Paymattic – it’s Free!

Subscribe To Get
WordPress Guides, Tips, and Tutorials
We will never spam you. We will only send you product updates and tips.
TL;DR: WordPress payment gateway integration
Setting up a payment gateway on my WordPress site was a nightmare. Too many options, total confusion. But I’ve cracked the code. This guide breaks down the easiest way to integrate 14 payment gateways using the Paymattic plugin. No coding needed. Just install Paymattic, pick your gateway (Stripe, PayPal, Square, etc.), and follow two simple steps to start accepting payments fast.
When I tried to set up the first payment gateway on my WordPress website, it was a mess. There are so many ways to set up WordPress payment gateway integration – I was lost.
It was urgent. Every day without proper payments is lost revenue. You are probably facing the same problem.
In this article, I’ll show you the easiest way to set up WordPress payment gateway integration. No coding is needed.
Whether you are new to WordPress or trying to find a better alternative to your current solution, you are welcome. You can jump to your chosen payment gateway from the table of contents.
I’ll also show you the easiest way to accept online payments on your WordPress website.
So, let’s dive right into it.
What is WordPress payment gateway integration?
WordPress payment gateway integration is the process of connecting a payment processing service (payment gateway) to your WordPress website.
The payment gateway works as a third-party service that connects your website, your bank account, and your customer’s bank account. It securely processes the transactions with necessary encryption.
It’s a very important procedure if you are a business owner. Or you have to accept payments on your WordPress website for some reason.
How does WordPress payment gateway integration work?
It’s a simple yet complex process. The best thing is, you don’t have to do complex stuff. You can just add the payment gateway, and it’ll manage the rest of the payment cycle.
Let’s see how it works in simple language:
- You integrate a payment gateway into your WordPress website.
- The customer enters payment details on your website.
- The payment gateway encrypts and securely transmits the data to the payment processor.
- The payment processor verifies the transaction with your customer’s bank.
- Once approved, the payment is completed, and funds are transferred to your account.
Read: 6 Go-To WordPress Recurring Payment Plugins (Easy To Use)
How to do WordPress payment gateway integration?
When I tried to add a payment gateway to my first WordPress website, I went for the toughest way possible. But there are simpler ways.
And I’ll show you the easiest way to WordPress payment gateway integration.
I’m going to use a WordPress payment gateway plugin called Paymattic. Paymattic integrates with more than 14 global payment gateways. It’s a free WordPress payment plugin with a pro version offering more advanced features.
I’ll talk about this later. But first things first, let’s integrate payment gateways to your WordPress website together. And we will do that in 2 steps:
Step 1: Install Paymattic on your WordPress website
Step 2: Integrate WordPress payment gateways with Paymattic
We’ll integrate a total of 14 payment gateways to your website. So let’s dive right into it.
Step 1: Install Paymattic on your WordPress website
Let’s install the Paymattic payment plugin on your WordPress website.
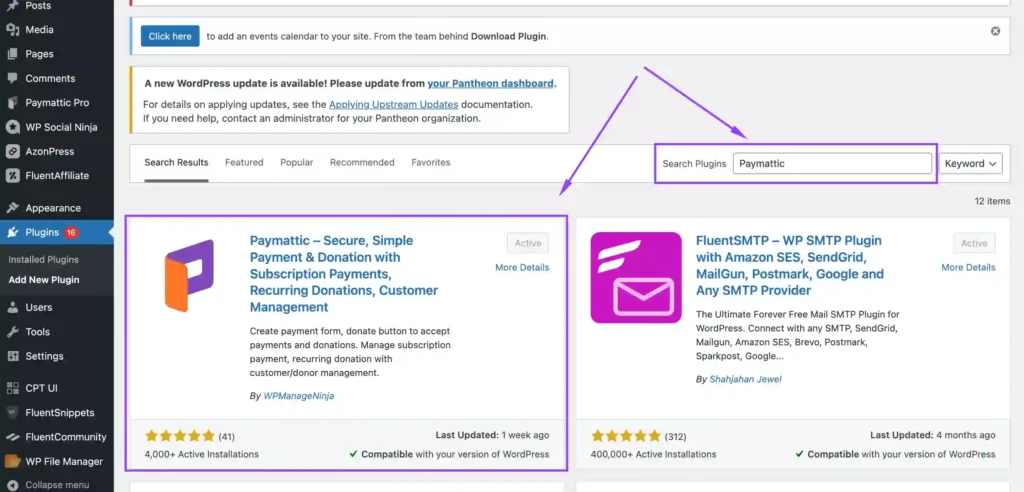
- Go to the Plugins menu of your WordPress website dashboard. And then click “Add New Plugin”
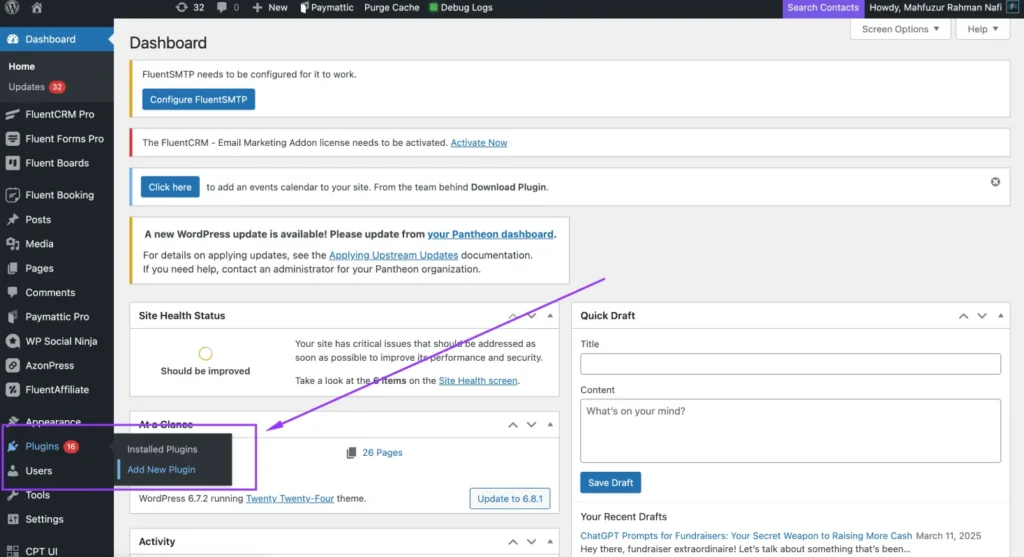
- Search for the Paymattic plugin. Install and activate it. Mine is already activated.
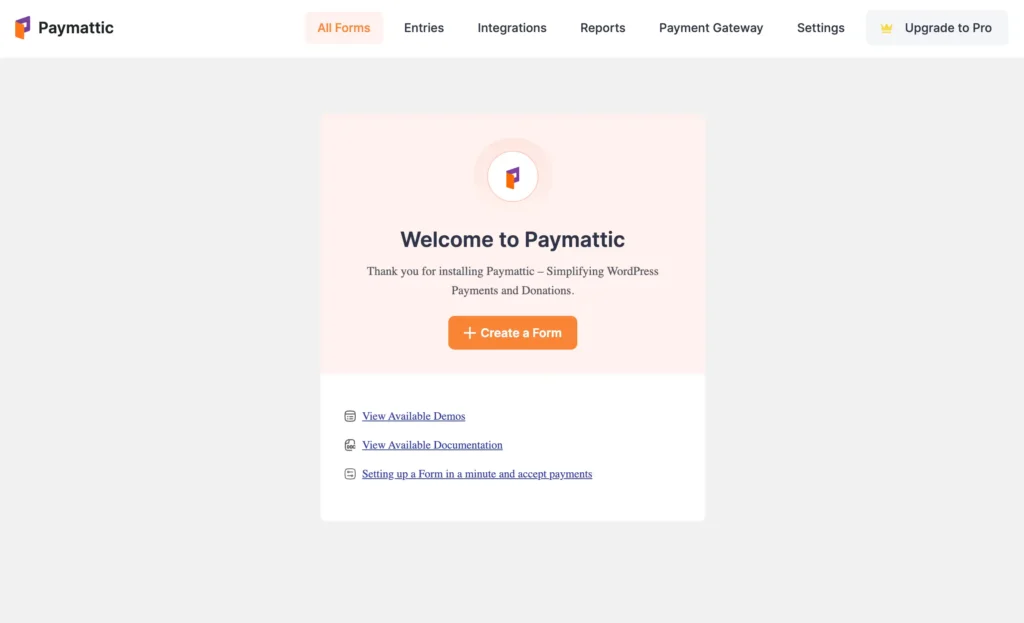
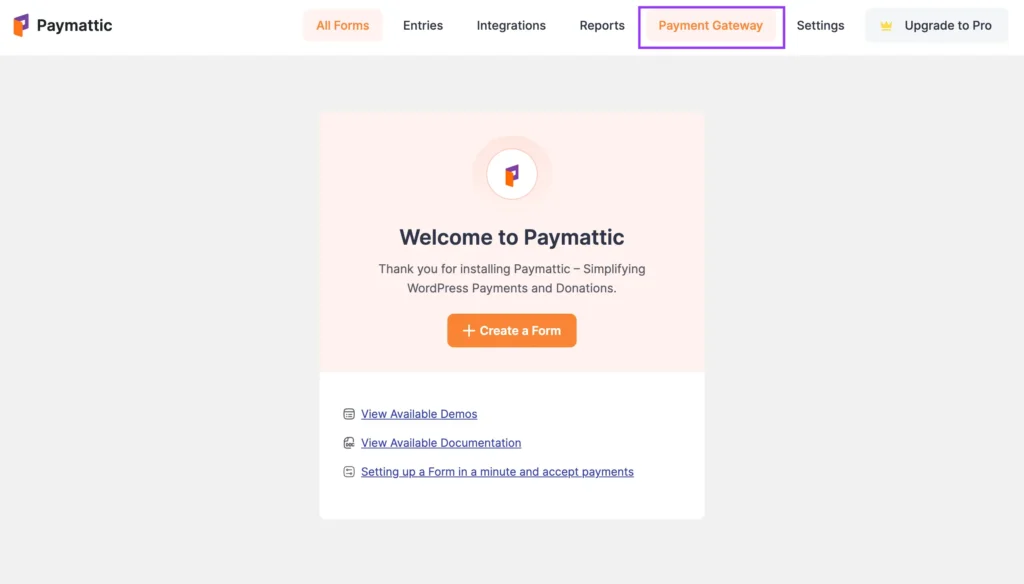
- After installing for the first time, you’ll get a setup wizard like this. You can explore the admin panel if you want. It’s super easy to navigate.
You can download the Free Paymattic plugin from here. You’ll get the installation guide in your email. 👇
Step 2: WordPress payment gateway integration with Paymattic
Now that we’ve got our payment plugin set up, we’ll integrate a total of 14 payment gateways with Paymattic.
1. Stripe payment gateway integration in WordPress
To integrate Stripe with Paymattic, you’ll need an active Stripe account. You can create one from the Stripe login page. After creating your Stripe account –
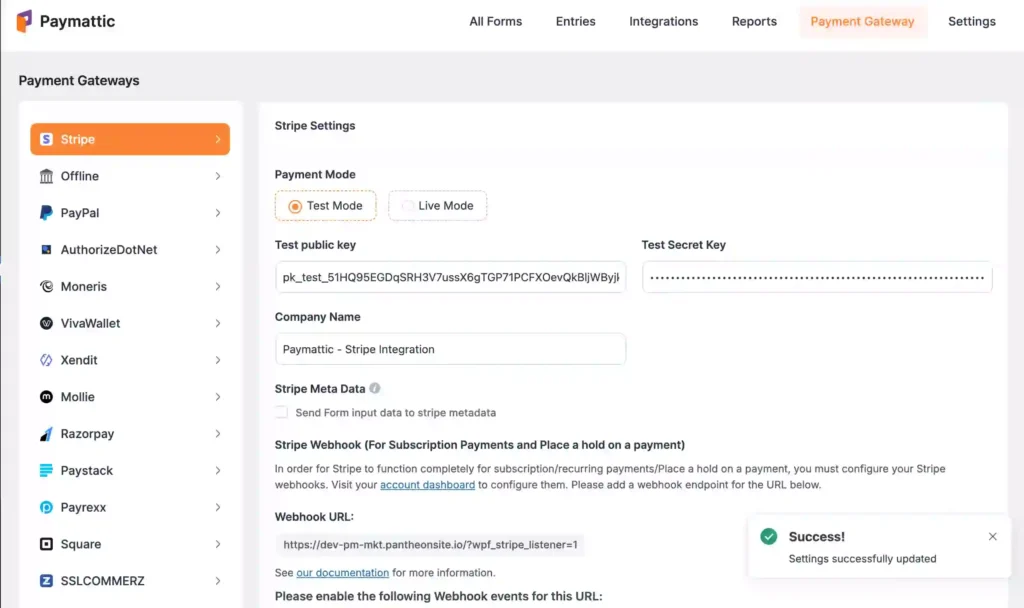
- Click on the “Payment Gateway” button of the Paymattic plugin.
- You’ll see all the payment gateways listed on the left side menu bar. And the Stripe payment gateway is preselected.
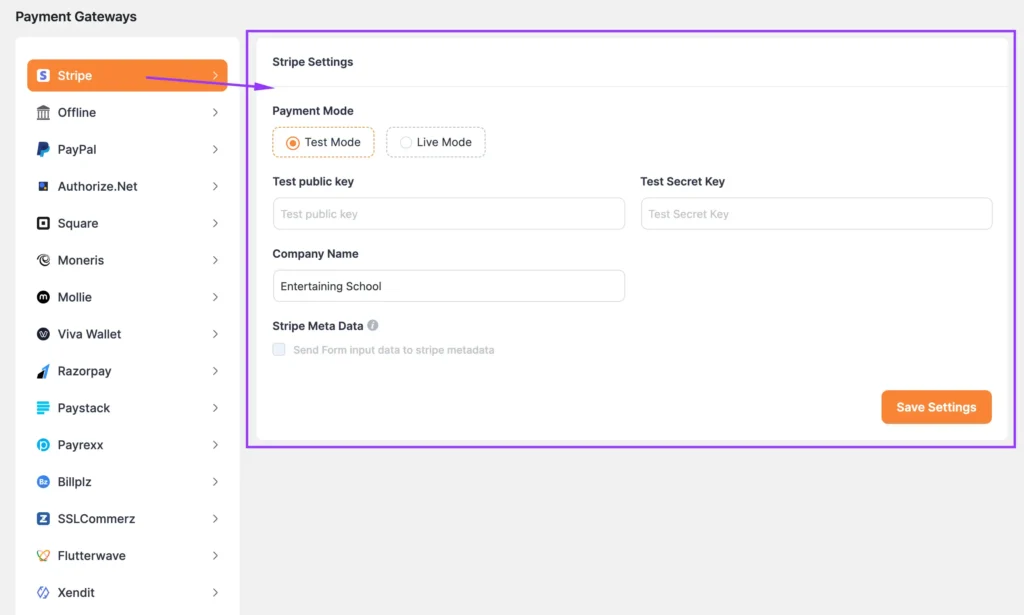
- If you want to set up a test mode, enter your test public key and test secret key. If you want to live it, enter your live keys. You’ll find your test and live keys from your Stripe dashboard.
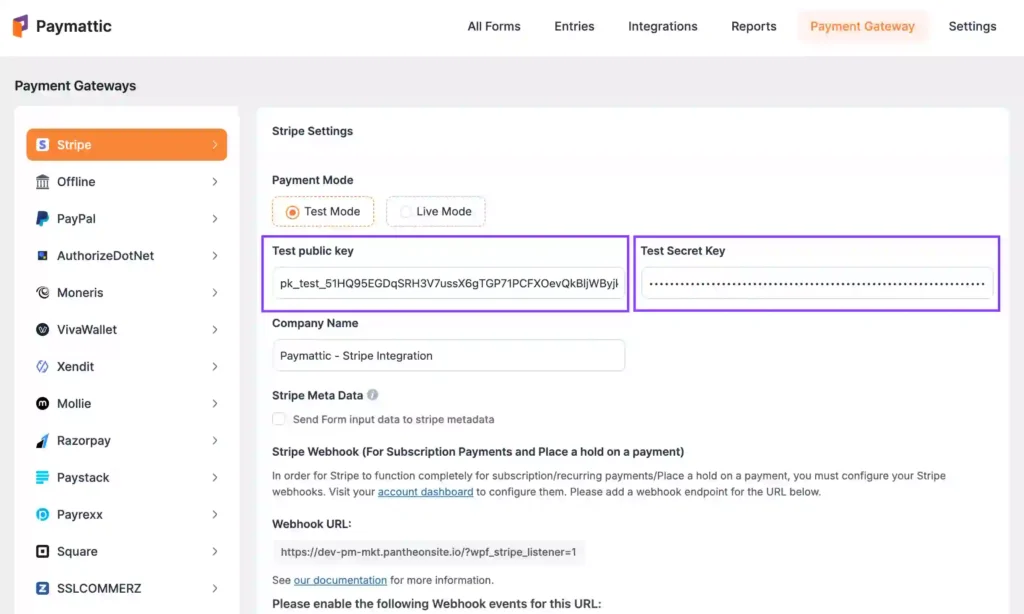
- After saving, you’ll get the success message. And your Stripe integration is done.
With the Paymattic plugin, you can use multiple WordPress Stripe checkout options. If you want to learn more, read the Paymattic Stripe integration documentation.
2. PayPal payment gateway integration in WordPress
Now I’ll show you how to add the PayPal payment gateway to your WordPress website with Paymattic.
To add the PayPal payment gateway, you need a PayPal account first. If you don’t have one, you can create one from the PayPal website.
After creating a PayPal account –
- Click on the PayPal button from Paymattic’s Payment Gateway page.
- Enter your PayPal email, upload your PayPal checkout logo, and choose your configuration.

- Click on “Save Settings” and you are good to go with your PayPal integrations.
You can choose either the Sandbox mode or the Live mode. I’d suggest you try it out first with the Sandbox. If you want more detailed instructions, read the Paymattic PayPal integration documentation.
3. Authorize.net payment gateway integration in WordPress
Let’s integrate the Authorize.net payment gateway into your WordPress website.
To get started, create your Authorize.net account. Or log in to your existing account.
With Paymattic, you can either setup it in test mode or live mode. To do that –
- Click on the Authorize.net button from the Payment Gateway page of Paymattic.
- Enter your API login ID, Client Key, Signature Key, Transaction Key, and click Save Settings. You’ll get all the necessary keys inside your Authorize.net account.
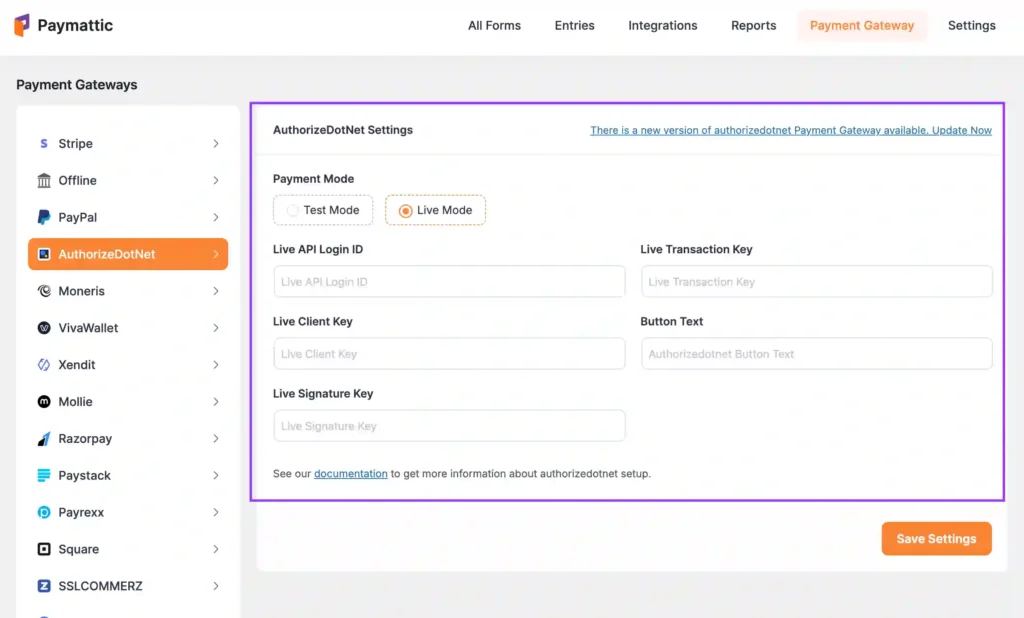
Authorize.Net WordPress payment gateway is now integrated into your WordPress website. If you want to learn more, read the Paymattic Authorize.net integration documentation.
4. Moneris payment gateway integration in WordPress
Let’s integrate Moneris into your WordPress website with Paymattic.
First, create a Moneris account. Or log in to your existing account. Then –
- Go to the Moneris menu from Paymattic’s Payment Gateway setup wizard page.
- Enter your Store ID, API Token, and Checkout ID, and save it.
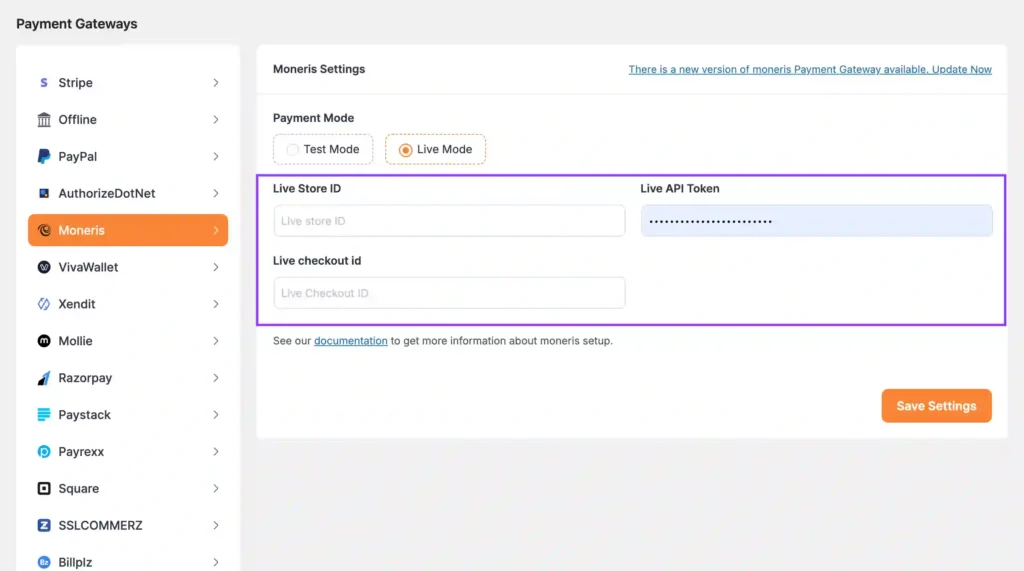
And your Moneris payment gateway integration is done. You are ready to take payments with Moneris. You can either use the test mode or the live mode.
If you want to learn more, read the Paymattic Moneris integration documentation.
5. VivaWallet payment gateway integration in WordPress
To integrate the Viva payment gateway, you need to create an account. Or have an existing account. Then –
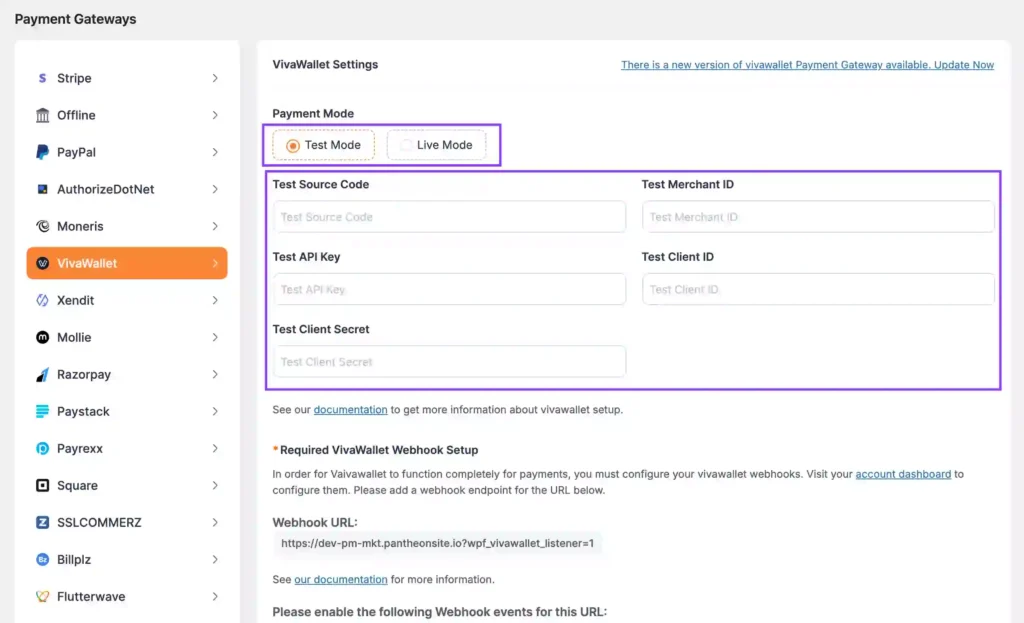
- Go to the VivaWallet menu from Paymattic’s “Payment Gateway” section.
- Enter your Source Code, API Key, Client Secret Code, Merchant ID, and Client ID. You’ll find all this information from your VivaWallet account.
You can try using the Test Mode or Live Mode if you want. I’d suggest trying the Test Mode first and then using the Live Mode.
If you want to learn more, read the Paymattic VivaWallet integration documentation.
6. Xendit payment gateway integration in WordPress
To integrate the Xendit payment gateway, you need to have an existing Xendit account. Or create an Xendit account.
After that –
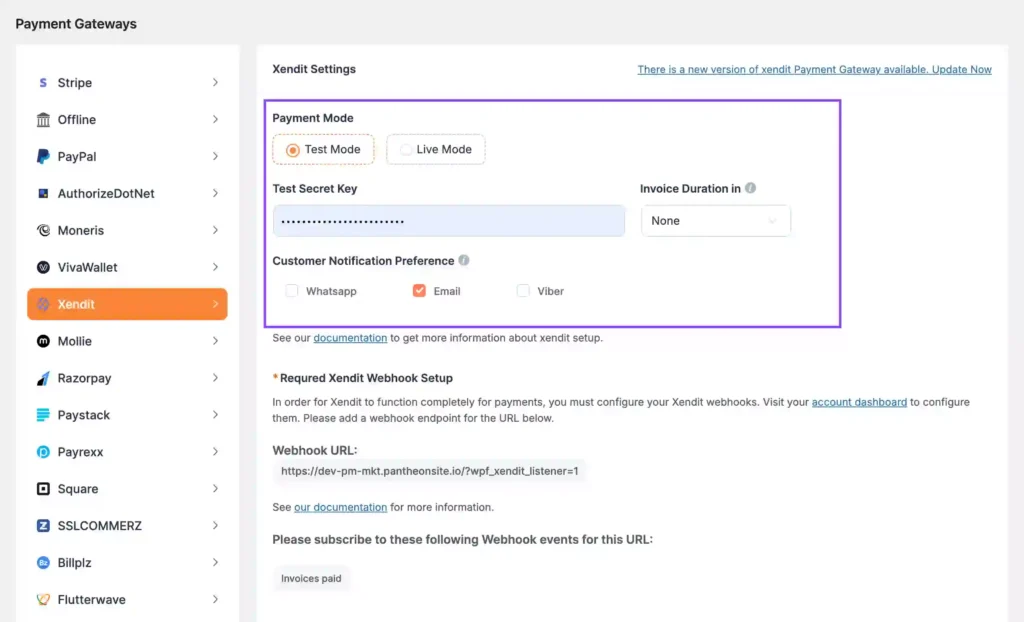
- Click on the Xendit button from the Payment Gateway page of Paymattic.
- Insert your Secret Key, Notification Preference, and Invoice Duration.
And now Xendit is integrated into your WordPress website. You can choose between Test Mode and Live Mode and start accepting payments with Xendit.
If you want to learn more, read the Paymattic Xendit integration documentation.
7. Mollie payment gateway integration in WordPress
To integrate the Mollie payment gateway, you need to have an existing Mollie account. Or create a Mollie account.
After creating a Mollie account –
- Click on the Mollie button from Paymattic’s Payment Gateway page.
- Enter your Publishable Key.
Done. Mollie is integrated into your WordPress website, and you are good to go with Mollie payments. It’s super easy.
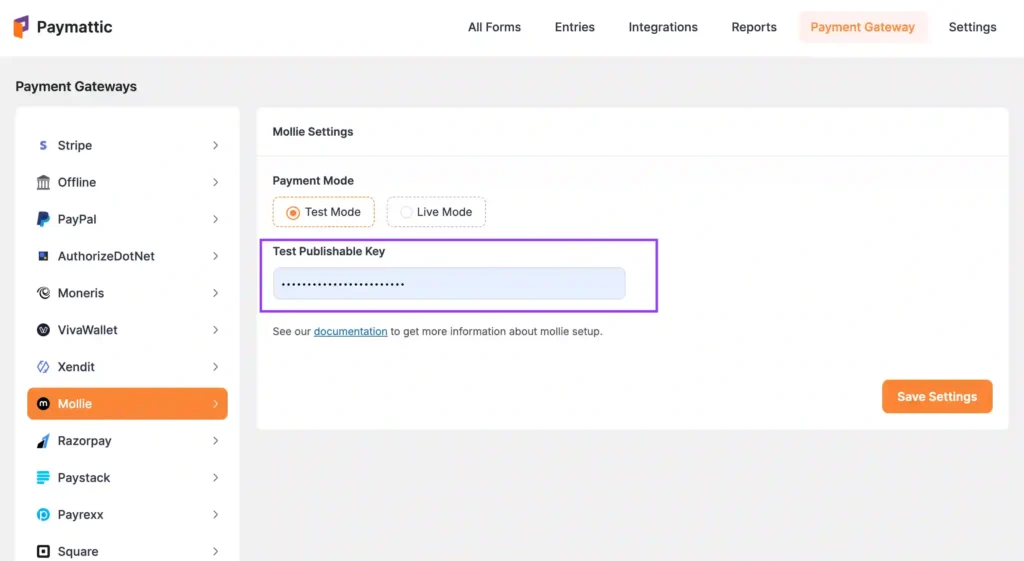
If you want to learn more, read the Paymattic Mollie integration documentation.
8. Razorpay payment gateway integration in WordPress
To integrate the Razorpay payment gateway, you need to have an existing Razorpay account. Or create a Razorpay account.
After that –
- Click on the Razorpay button from the Payment Gateway page of Paymattic.
- Insert your API Key and Secret Key.
And now Razorpay is integrated into your WordPress website. You can choose between Test Mode and Live Mode and start accepting payments with Razorpay.
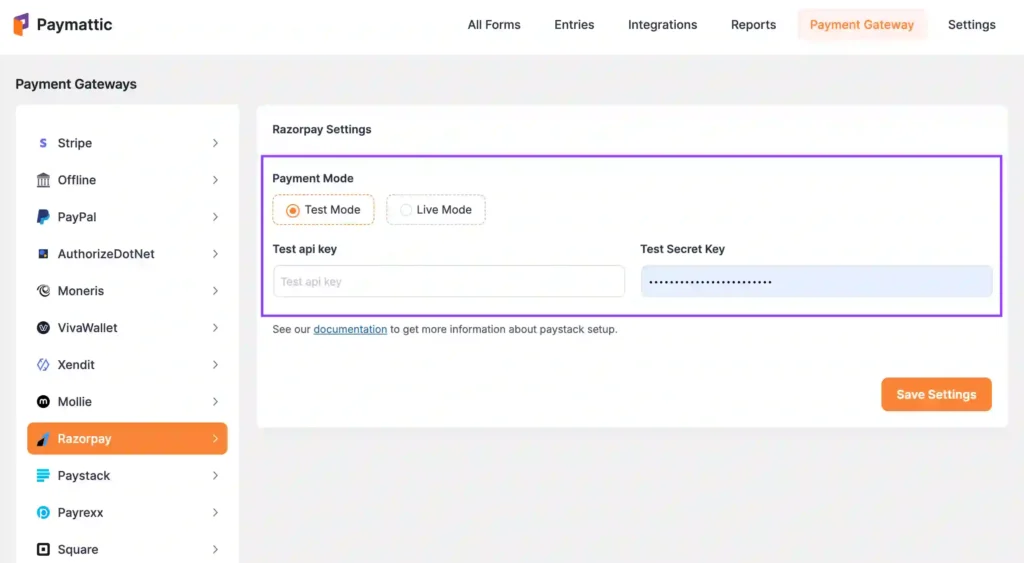
If you want to learn more, read the Paymattic Razorpay integration documentation.
9. Paystack payment gateway integration in WordPress
To integrate the Paystack payment gateway, you need to have an existing Paystack account. Or create a Paystack account.
After creating a Paystack account –
- Click on the Paystack button from Paymattic’s Payment Gateway page.
- Enter your API Key and Secret Key.
Done. Paystack is integrated into your WordPress website, and you are good to go with Paystack payments. It’s super easy.
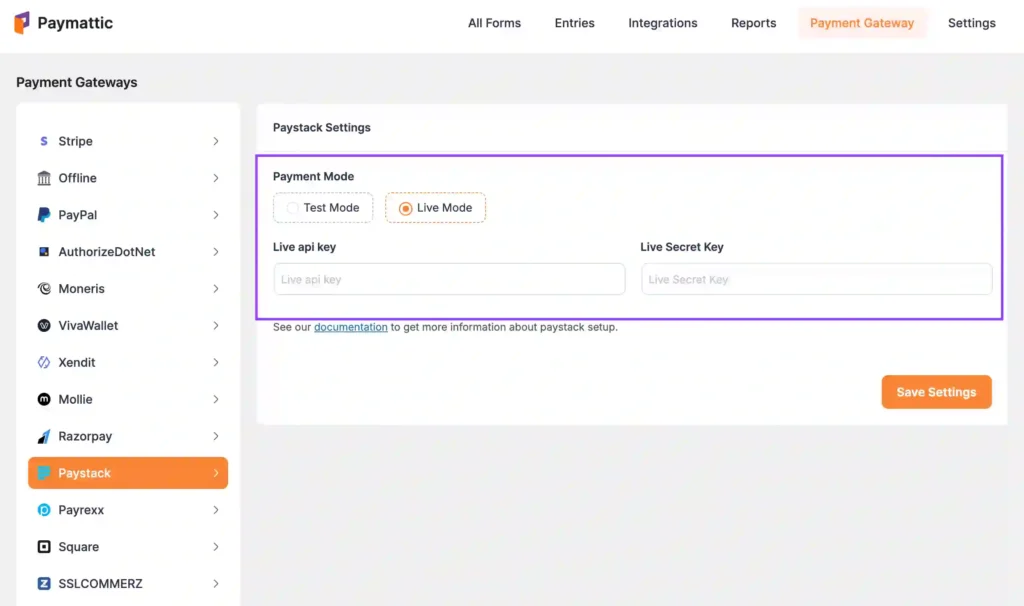
If you want to learn more, read the Paymattic Paystack integration documentation.
10. Payrexx payment gateway integration in WordPress
To integrate the Payrexx payment gateway, you need to have an existing Payrexx account. Or create a Payrexx account.
After that –
- Click on the Payrexx button from the Payment Gateway setup wizard of Paymattic.
- Choose between the Modal checkout style or the Hosted checkout style.
- Insert your API Key and Instance Name.
And now Payrexx is integrated into your WordPress website, and you are good to accept payments.
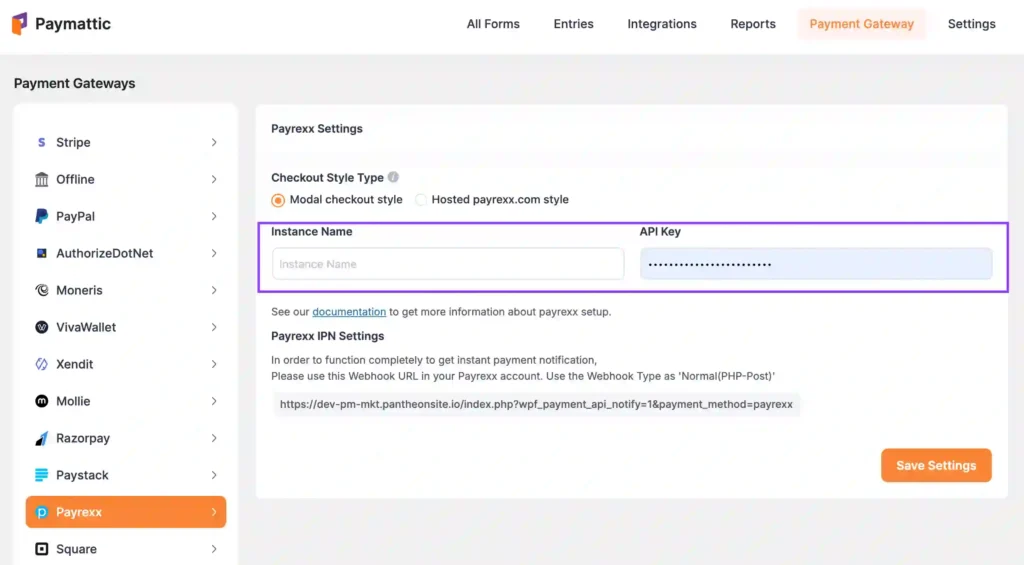
If you want to learn more, read the Paymattic Payrexx integration documentation.
11. Square payment gateway integration in WordPress
To integrate the Square payment gateway, you need to have an existing Square account. Or create a Square account.
After creating a Square account –
- Click on the Square button from Paymattic’s Payment Gateway page.
- Enter your Access Key and Location ID.
Done. Square is integrated into your WordPress website, and you are good to go with Square payments. It’s super easy.
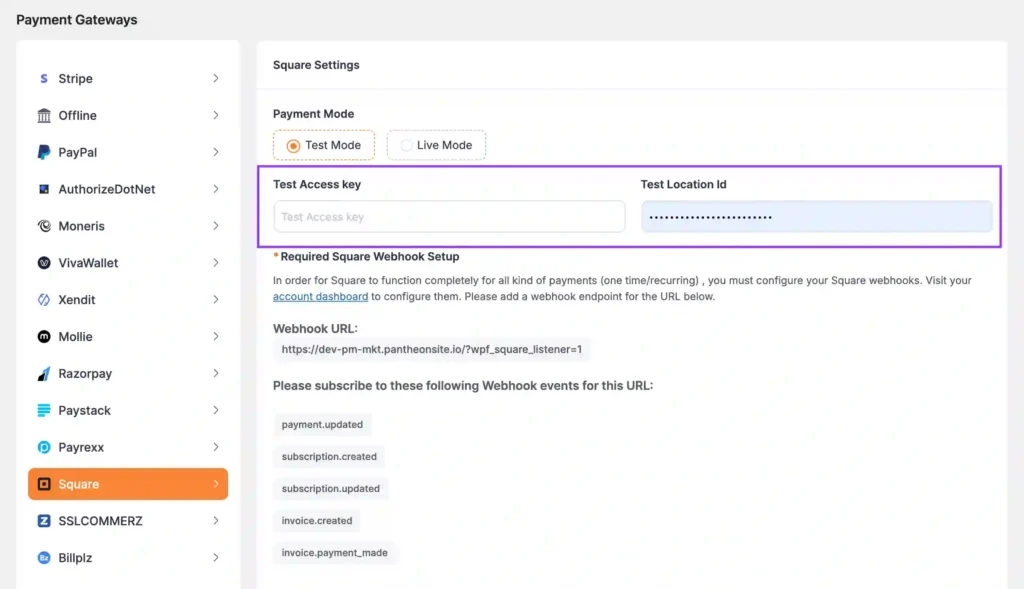
If you want to learn more, read the Paymattic Square integration documentation.
12. SSLCOMMERZ payment gateway integration in WordPress
To integrate the SSLCOMMERZ payment gateway, you need to have an existing SSLCOMMERZ account. Or create an SSLCOMMERZ account.
After that –
- Click on the SSLCOMMERZ button from the Payment Gateway page of Paymattic.
- Insert your Store ID and Secret Key.
And now SSLCOMMERZ is integrated into your WordPress website, and you are ready to accept payments.
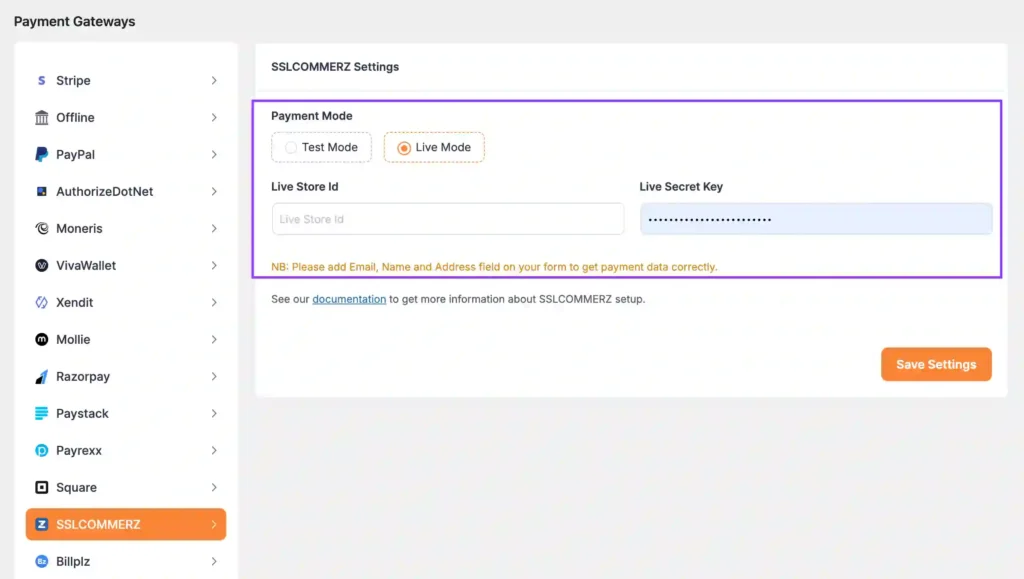
If you want to learn more, read the Paymattic SSLCOMMERZ integration documentation.
13. BillPlz payment gateway integration in WordPress
To integrate the BillPlz payment gateway, you need to have an existing BillPlz account. Or create a BillPlz account.
After creating a BillPlz account –
- Click on the BillPlz button from Paymattic’s Payment Gateway page.
- Enter your Collection ID and Secret Key.
Done. BillPlz is integrated into your WordPress website, and you are good to go with BillPlz payments. It’s super easy.
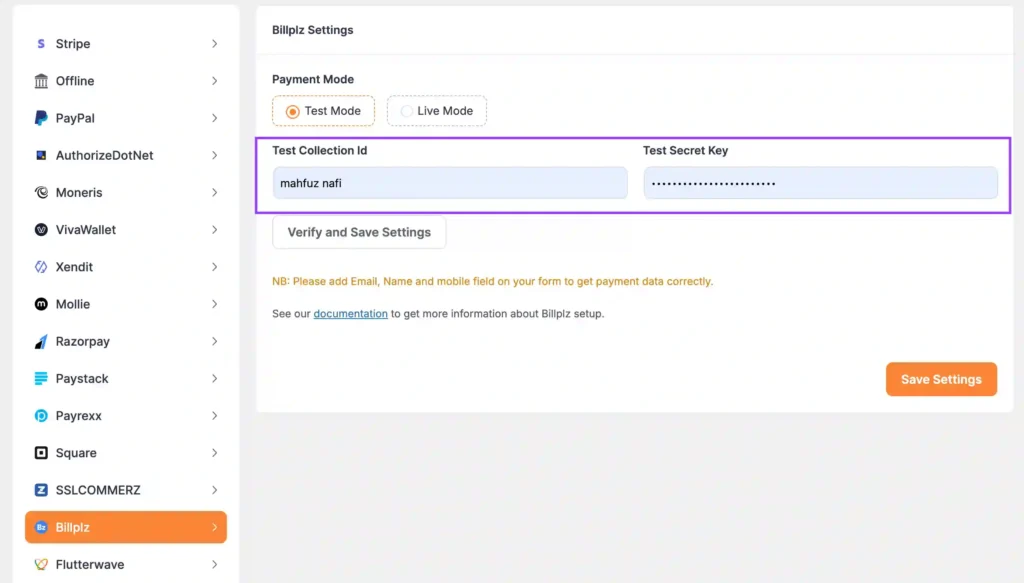
If you want to learn more, read the Paymattic BillPlz integration documentation.
14. Flutterwave payment gateway integration in WordPress
To integrate the Flutterwave payment gateway, you need to have an existing Flutterwave account. Or create a Flutterwave account.
After that –
- Click on the Flutterwave button from the Payment Gateway page of Paymattic.
- Insert your Public Key and Secret Key.
And now Flutterwave is integrated into your WordPress website, and you are ready to accept payments.

If you want to learn more, read the Paymattic Flutterwave integration documentation.
Popular payment gateways for WordPress
Now that you learned about WordPress payment gateway integration into your WordPress website, I’ll talk about some of the most popular payment gateways for WordPress.
These are the big players. And covers almost all the regions for WordPress payments. Let’s talk about them:
Stripe
Stripe works great with WooCommerce and WordPress payment plugins. Stripe payment gateway is developer-friendly and super flexible. It supports cards, wallets, and subscriptions. And this is ideal if you want more control over your checkout.
Covered regions:
As of 2025, Stripe is currently supported in 46 countries. You can check the global availability from the website.
PayPal
PayPal is a household name. Super simple for WordPress via WooCommerce or other WordPress payment plugins. PayPal accepts credit and debit cards, PayPal accounts, and even Venmo in some spots. PayPal’s Global reach is vast. It supports multi-currency. Customers trust it.
Covered regions:
PayPal is available in more than 200 countries. You can check your availability from the PayPal availability web page.
Square
Square is great if you run both online and offline stores. Square syncs inventory and accepts all major cards.
Square’s your guy for online payments and in-store sales. Square syncs with WooCommerce and all the major credit cards. Square can be contactless and digital wallets. Perfect for small business owners.
Covered regions:
Square payment gateway is currently available in the US, Canada, Australia, Japan, the United Kingdom, the Republic of Ireland, France, and Spain.
Authorize.Net
Authorize.Net’s is super powerful. It’s secure, customizable, and loves WooCommerce. Authorize.Net can handle debit or credit cards, e-checks, and recurring payments. Their fraud detection is super tight. Needs a bit more tech know-how, but it’s worth it.
Covered regions:
Authorize.Net is currently available in the United States, Canada, and Australia. If your business is outside of these regions, you can contact their support. And they’ll provide you with a workaround.
WooPayments
WooPayments is built by WooCommerce and works right inside your WordPress dashboard. It supports major cards, Apple Pay, and Google Pay. There are no setup fees, just transaction charges.
Covered regions:
WooPayments are available in multiple countries all around the globe. You can check the available countries on the WooPayment website.
Subscribe Newsletter
Subscribe to our newsletter for updates, exclusive offers, and news you won’t miss!

Tips for choosing the right WordPress payment gateway
When I tried to set up my payment gateways, it took almost one week to decide which one I should choose. Some customers loved Square. Some loved PayPal. And of course, there were transaction fees. Also, there were availability issues for various countries.
I’d say –
- Choose a payment gateway that covers your region. Not only the region you are located in, but also the region your customers live in.
- I’d say you pick the one with he lowest transaction fees. In my experience, transaction fees can cut a huge chunk of your revenue without you even noticing.
- Pick the one you are most comfortable with. Because they work differently, and there are technological issues you’ll have to solve. So, better pick the easiest one.
- Try multiple payment gateways. Because when you use only one payment gateway, there are opportunity costs. Your customers can come from multiple regions. It’s better to cover as many regions as you can.
Security measures for WordPress payment gateway integration
Well, security is the most important matter when it comes to online transactions. When you integrate a third-party WordPress payment gateway, you make your website, as well as your data, vulnerable to potential security breaches.
Security measure is one area where you can’t compromise. Always go for an additional layer of security.
- Always make sure the gateway you’re using is PCI compliant. Also, check for DSS compliance. It’s the standard for handling card information securely. If your chosen provider doesn’t meet that, it’s a red flag right away.
- All sensitive information, especially card details, should be encrypted during payment transmission. And no, SSL is not optional. It’s mandatory. Don’t use a payment gateway that doesn’t have an SSL certificate.
- Always update your plugins. Using poorly maintained or outdated payment gateway plugins can expose your site to malware, exploits, and major security threats.
- Always download payment plugins from the official WordPress repository or trusted vendors only.
- Weak admin credentials or no two-factor authentication (2FA) can open the door to unauthorized access and compromise sensitive data. Make sure your site’s security is as strong as it can be.
An amazing WordPress payment plugin – Paymttic
Earlier in this blog, I promised you to talk more about the Paymattic WordPress payment plugin.
So, what is Paymattic?
Paymattic is the simplest WordPress payment plugin that focuses on getting online WordPress payments fast and easy. With its user-friendly interface and advanced feature set, Paymattic supports multiple payment gateways, recurring payments, form builders, and analytics. With Paymattic, you can manage online transactions directly from your WordPress website.
The Paymattic Free plugin is available in the WordPress repository for you to download and use without any cost. The Stripe payment gateway is available in the free version. There’s also a Paymattic Pro version for you.
Essential features of Paymattic:
- 14+ global payment gateways covering the whole world.
- Supports 155+ currencies.
- Supports both one-time or recurring payments.
- Offers a detailed customer dashboard to manage subscriptions.
- Offers a detailed report dashboard.
- Integrates with major tools.
- Offers a built-in drag-and-drop form builder with 35+ custom input fields.
- PCI-DSS compliance and built with security best practices.
- Advanced fraud protection with Honeypot, ReCAPTCHA V2 and V3, and Cloudflare Turnstile.
- Offers hooks, filters, and extensive documentation for custom development.
Ready to get started?
Experience WordPress payment and donation like never before. Try Paymattic now!
Conclusion
So, this is the easiest WordPress payment gateway integration guide you’ll find on the internet.
If you’ve followed what I said, I’m sure you’ve already set up a payment gateway on your WordPress website. Also, don’t forget to consider the security measures I talked about.
Thank you for your patience. And godspeed with your WordPress business.
Read: How to Choose the Right Payment Plugin for Your Business?
Frequently asked questions
Here are answers to some frequently asked questions about WordPress payment gateway integration:
Can you integrate a payment gateway in WordPress?
Yes, you can integrate a payment gateway in WordPress. Use a payment plugin like Paymattic. Install, configure the payment gateways, and connect to your site. It’s super easy.
Which is the best payment gateway for WordPress?
Stripe is the top choice for WordPress due to its low fees, easy integration, and global support. The PayPal payment gateway is also reliable. You should choose based on your business needs and compare transaction fees.
How to integrate payment gateway in WordPress without WooCommerce?
Use a payment plugin like Paymattic. Install the plugin, configure your chosen gateway (e.g., Stripe, PayPal), create payment forms, and embed them on your site. No coding required.
How do I add a payment system to WordPress?
Install a WordPress payment plugin like Paymattic. Activate it, connect your payment gateway, configure payment forms, and add them to your pages. Ensure SSL security and test transactions before publishing.
Join the thousands already enjoying Paymattic Pro!

Mahfuzur Rahman Nafi
Mahfuzur Rahman Nafi is a Marketing Strategist at WPManageNinja. With 4 years of experience in Product Marketing, he has developed marketing strategies, launched products, written content, and published websites for WordPress products. In his free time, he loves to read geeky stuffs.


Leave a Reply