
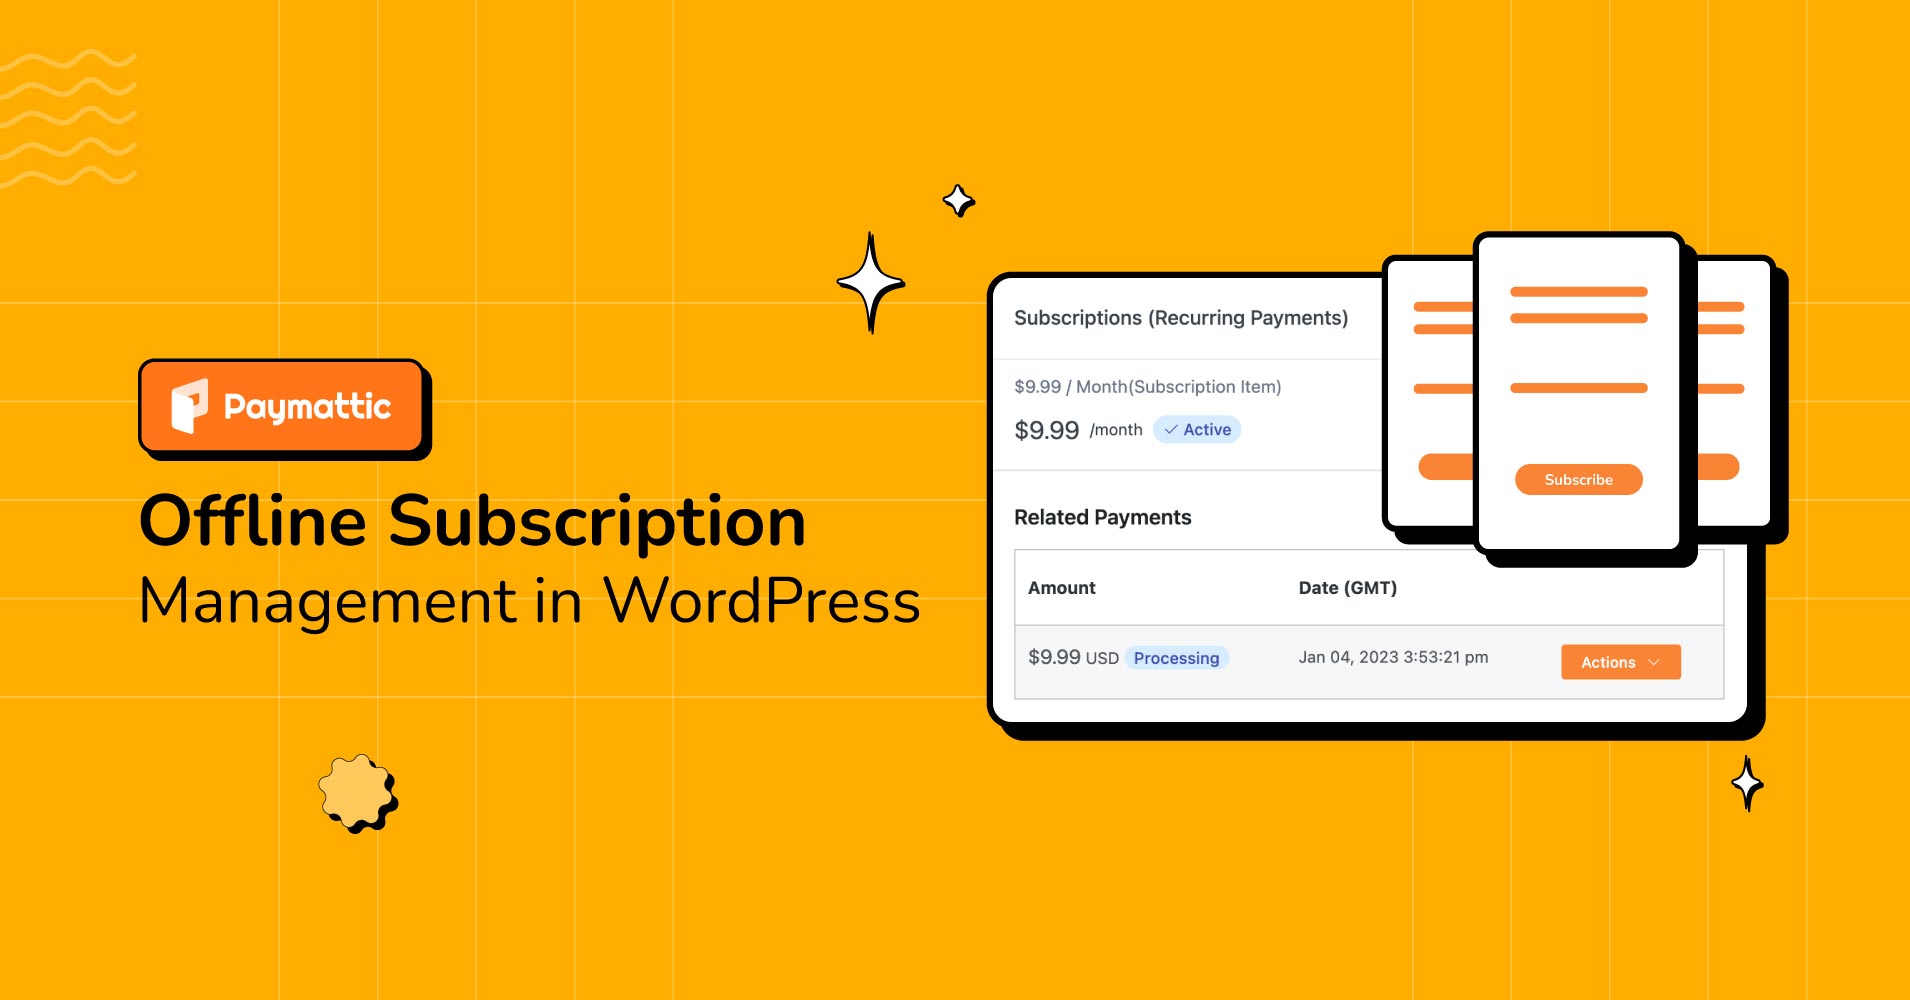
Offline Subscription Management in WordPress with Direct Bank Transfer


Table of Content
Download Paymattic – it’s Free!

Subscribe To Get
WordPress Guides, Tips, and Tutorials
We will never spam you. We will only send you product updates and tips.
Are you in a subscription model business and wondering how you can manage it if your customers pay offline?
Paymattic brings you a powerful feature where your users can activate subscriptions with offline payment methods. Usually, most of the websites that offer subscriptions accept payments through various online payment methods. But what about those customers who are not comfortable providing their card information?
For them, you have an offline subscription management feature in Paymattic. Now your users can subscribe to a plan on your website by selecting the direct bank transfer method. This blog guides you on how to manage subscriptions with direct bank transfers in WordPress.
What is subscription payment
Generally, a subscription payment is a recurring payment made by a customer to a business in exchange for access to a product or service. The customer pays a set amount on a regular basis, such as monthly or annually, and as long as the subscription is active, they will continue to have access to the product or service. Subscription payments are commonly used for things like insurance plan, magazine subscriptions, streaming services, donation payments and software products.
Enabling subscription payment is vital for your business to have a consistent revenue flow. Inconsistent money flow will impact your profitability. So, you need a tool that can accept and manage subscription payments. If you are using WordPress you must need a payment plugin to accept subscription payments.
Paymattic for offline subscription management
Paymattic is a payment plugin for WordPress that helps businesses easily manage and process subscription payments. It allows businesses to set up recurring payment plans, track customer payments, and automate billing processes.
Besides offline or cheque payment methods, Paymattic integrates with 13 payment gateways and can be customized to fit the needs of a business. It is a useful tool for any businesses that rely on subscription models for revenue and want to streamline their payment processes. Other than offline payment, Paymattic includes the following payment methods –
- Stripe (Free)
- PayPal
- Mollie
- Square
- Xendit
- Razorpay
- Billplz
- Payrexx
- Paystack
- SSLCOMMERZ
- Moneris
- Viva Wallet
- Flutterwave
Other than subscription payment you can create donation forms, contact forms, payment forms, registration forms and many more with the Paymattic WordPress payment and fundraising plugin. It seamlessly integrates with other platforms such as Zapier, Mailchimp, FluentCRM, Fluent Support, Google Sheets, Telegram, Slack, LearnDash and many more.
Below are some of the most robust features of Paymattic –
- Subscription payment
- 13 payment gateways
- 14 integrations
- 35 custom input fields
- Advanced editor
- Detailed reporting
- Payment & donation template
- 135 currency support
- World-class support
Ready to get started?
Experience payments and donations for WordPress like never before. Try Paymattic now!
How to manage subscriptions with direct bank transfer
You can’t imagine how simple it is to manage subscriptions with Paymattic. Let’s jump into the process and learn how to deal with offline subscription management in WordPress.
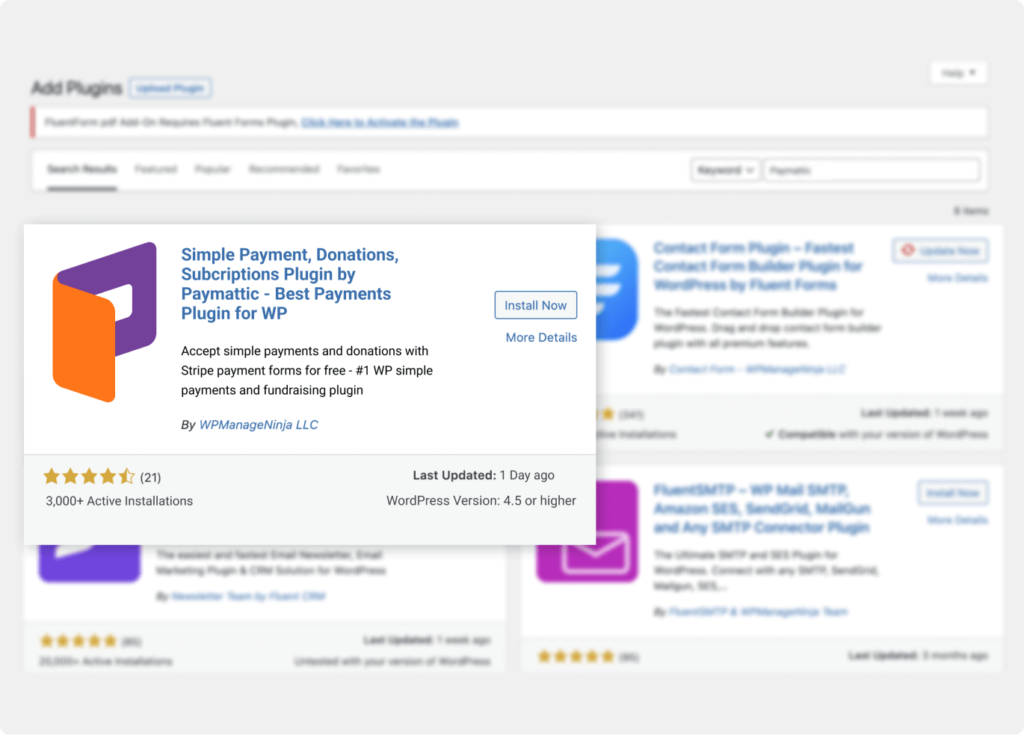
Install & activate Paymattic
Firstly, you need to install and activate the Paymattic plugin for WordPress payments. To install and activate the plugin, follow these steps:
- Log in to the WordPress dashboard of your site.
- In the left menu, click on the Plugins menu and then Add New.
- Search for Paymattic and install the plugin. Alternatively, you can click on the Upload Plugin button at the top of the page and select the plugin’s .zip file from your computer.
- Click the Install Now button. Click the Activate button to activate the plugin on your site. That’s all! Now you can begin with the Paymattic plugin.
[Offline subscription management is a premium feature of Paymattic. Upgrade to the pro version of Paymattic to use the feature.]
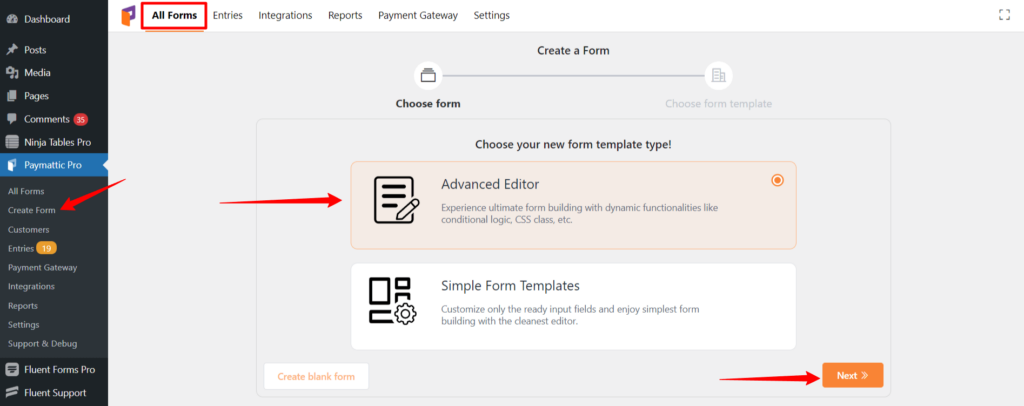
Create a payment form
Now you can create a subscription payment form with Paymattic. It’s so simple to create a subscription payment form in WordPress using Paymattic. To create a form –
- Click on the Paymattic Pro → Create Form menu from the left sidebar in your WordPress dashboard.
- Then, click on the Advanced Editor tab.
- You can customize a ready-to-use template or start with a fresh template.
- Click on the New Blank Form option to start creating from the beginning.
- Add necessary fields to the form such as Name, Email, Address etc.
- Configure the fields and click on the Update button.
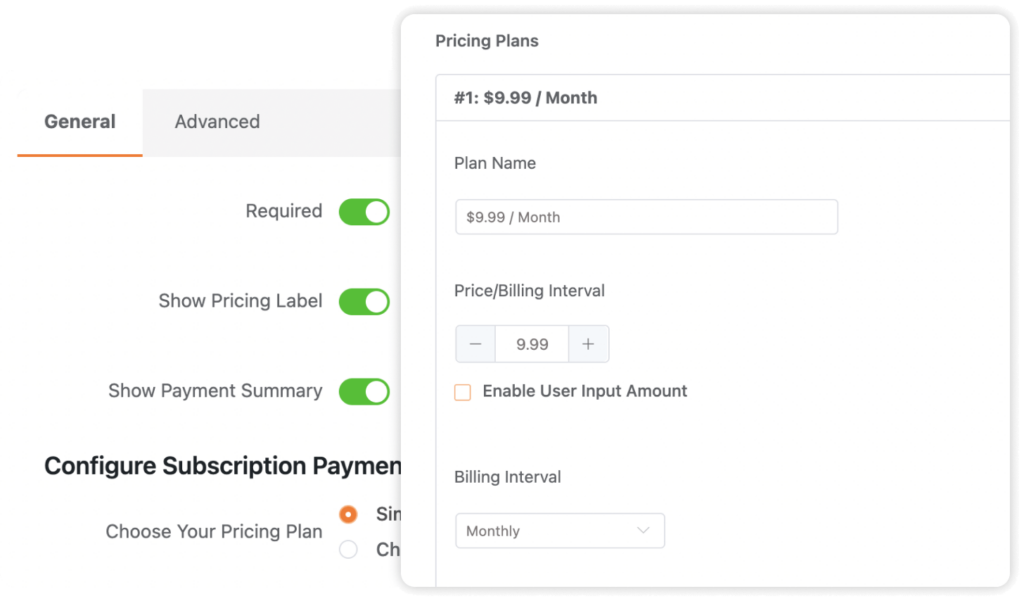
Add subscription payment
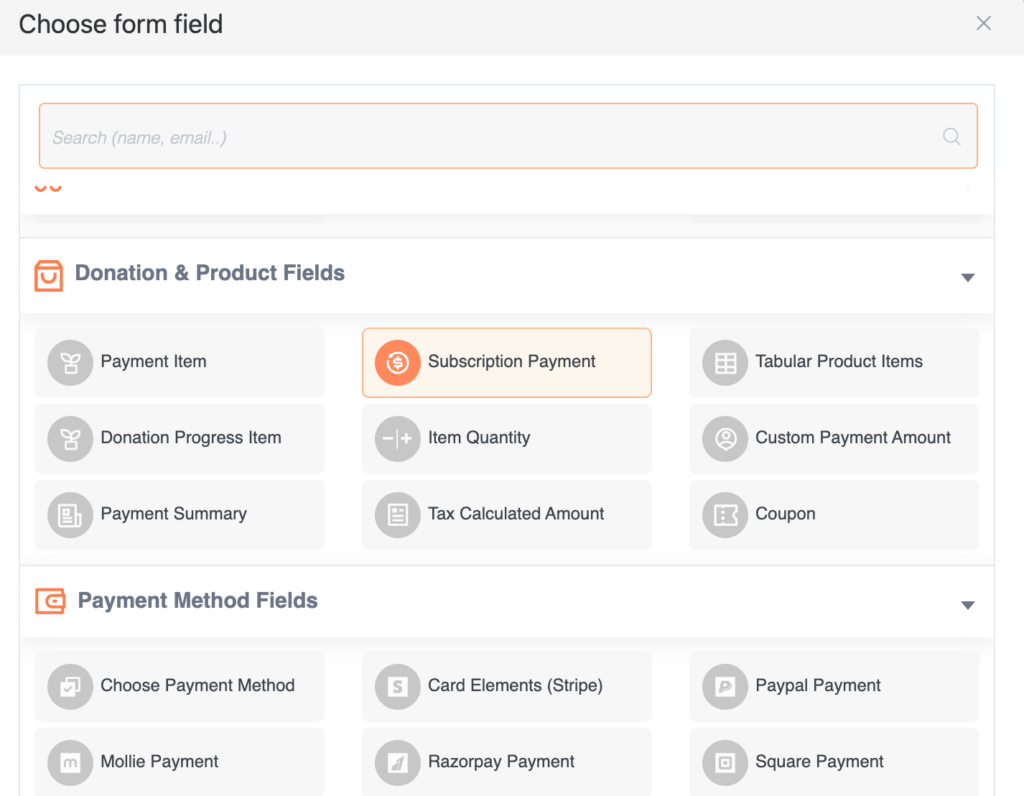
Add the subscription payment field from the Donation & Product Fields section. Click on the gear icon on the left side and you can see the following configuration options –
- Required button – Enable the required button if you want users to fill up the fields without skipping.
- Show pricing label – You can enable the button to display price information on the form.
- Show payment summary – Toggle on the switch if you want users to view what amount he has to pay.
- Choose your pricing plan – You can select a single subscription plan or multiple subscription plans in the same form using these options.
- Pricing plans – This section lets you set the plan name, price, billing interval and billing times etc.
Add payment methods
You can add both online and offline payment methods in Paymattic. If you want to give your users a chance to pay offline select the offline/cheque payment method.
As you select the offline payment method, you can set instructions for users on how to make payments through direct bank transfer. We suggest you to provide your banking information here which will be displayed on the payment form during checkout.
At last, click on the Save button to save the form.

Publish the form
Once you save your subscription form you can view it from Paymattic (Pro) → All Forms. Copy the shortcode of your form and paste it on your website page. Publish the form and now your users can submit entries in the subscription form.

Offline subscription management
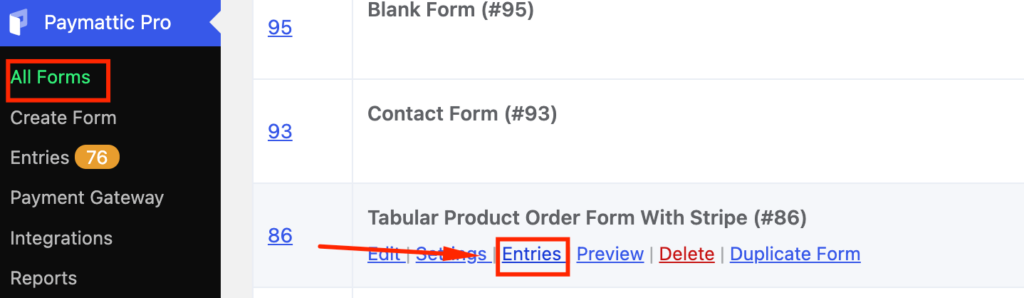
Excellent! You have published your subscription form and now you are able to manage your form. To manage your form –
- Go to Paymattic (Pro) → All Forms, then select your subscription form.
- Click on the Entries link and you can view all entries from your users.
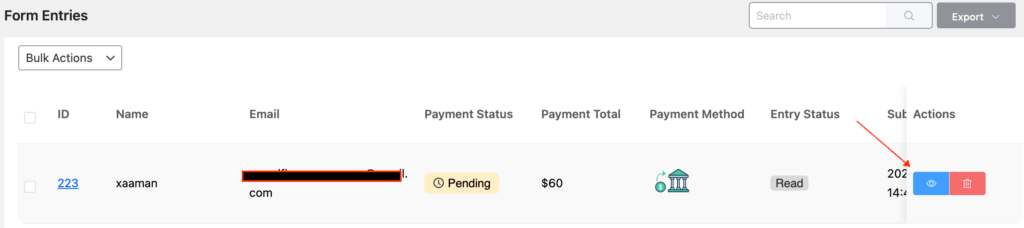
- Click on the view icon of an entry from the right side.
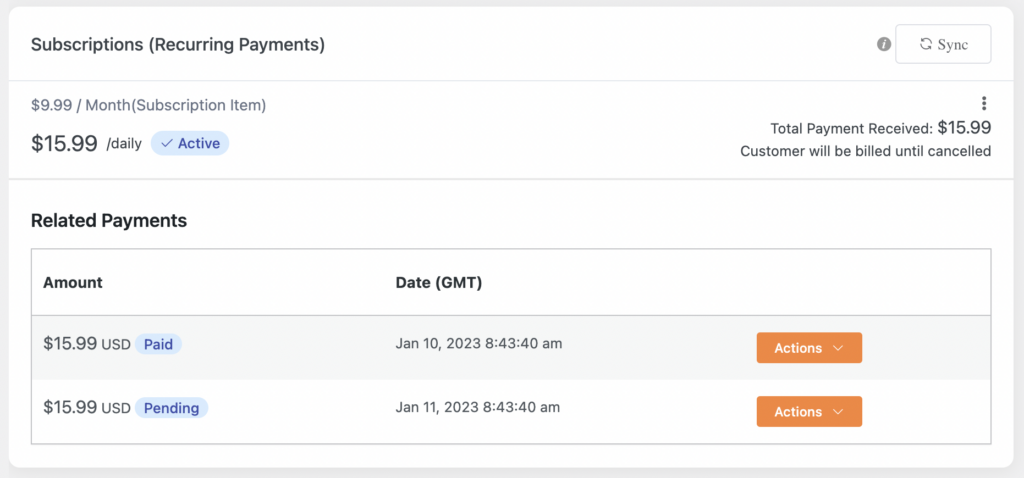
- Press the Sync button to refresh all subscription information.
- You can see the latest billing information in the Related Payments segment. For example – if a user subscribed 3 months ago and chooses a monthly billing plan, his billing details will appear here for individual months.
- Click the Action button so that you can change the payment status for individual subscription bills after the payment is made through direct bank transfer.
- Set any payment status such as – Paid, Pending, Processing, Failed or Refunded.
- Click the Confirm button to save the changes.
Final words
Offline subscription management is a breeze with Paymattic. Paymattic is an all-in-one plugin that can save you from the cost of using a payment plugin and a subscription plugin. Try Paymattic today with no doubt and manage your subscription business hassle-free.
Good Luck!
Join the thousands already enjoying Paymattic Pro!

Shuyeb Ahmed
Hi, This is Shuyeb. I am a digital marketing enthusiast, love to write about WordPress products and new updates. At the weekend, you will find me exploring nature & beautiful places.


Leave a Reply