Stripe is a globally recognized payment gateway that is completely free to integrate with Paymattic. It supports 135+ currencies! You can accept payment from any debit card and credit card using Stripe. This article will guide you through configuring Stripe in your WordPress Site with the Paymattic plugin.
Configuring Stripe Payment Method #
To learn how to configure the Stripe payment gateway through Paymattic, follow the steps with screenshots below –
First, go to Payment Gateway from the Paymattic Navbar, click the Stripe tab from the left sidebar, and the Stripe Settings page will open.
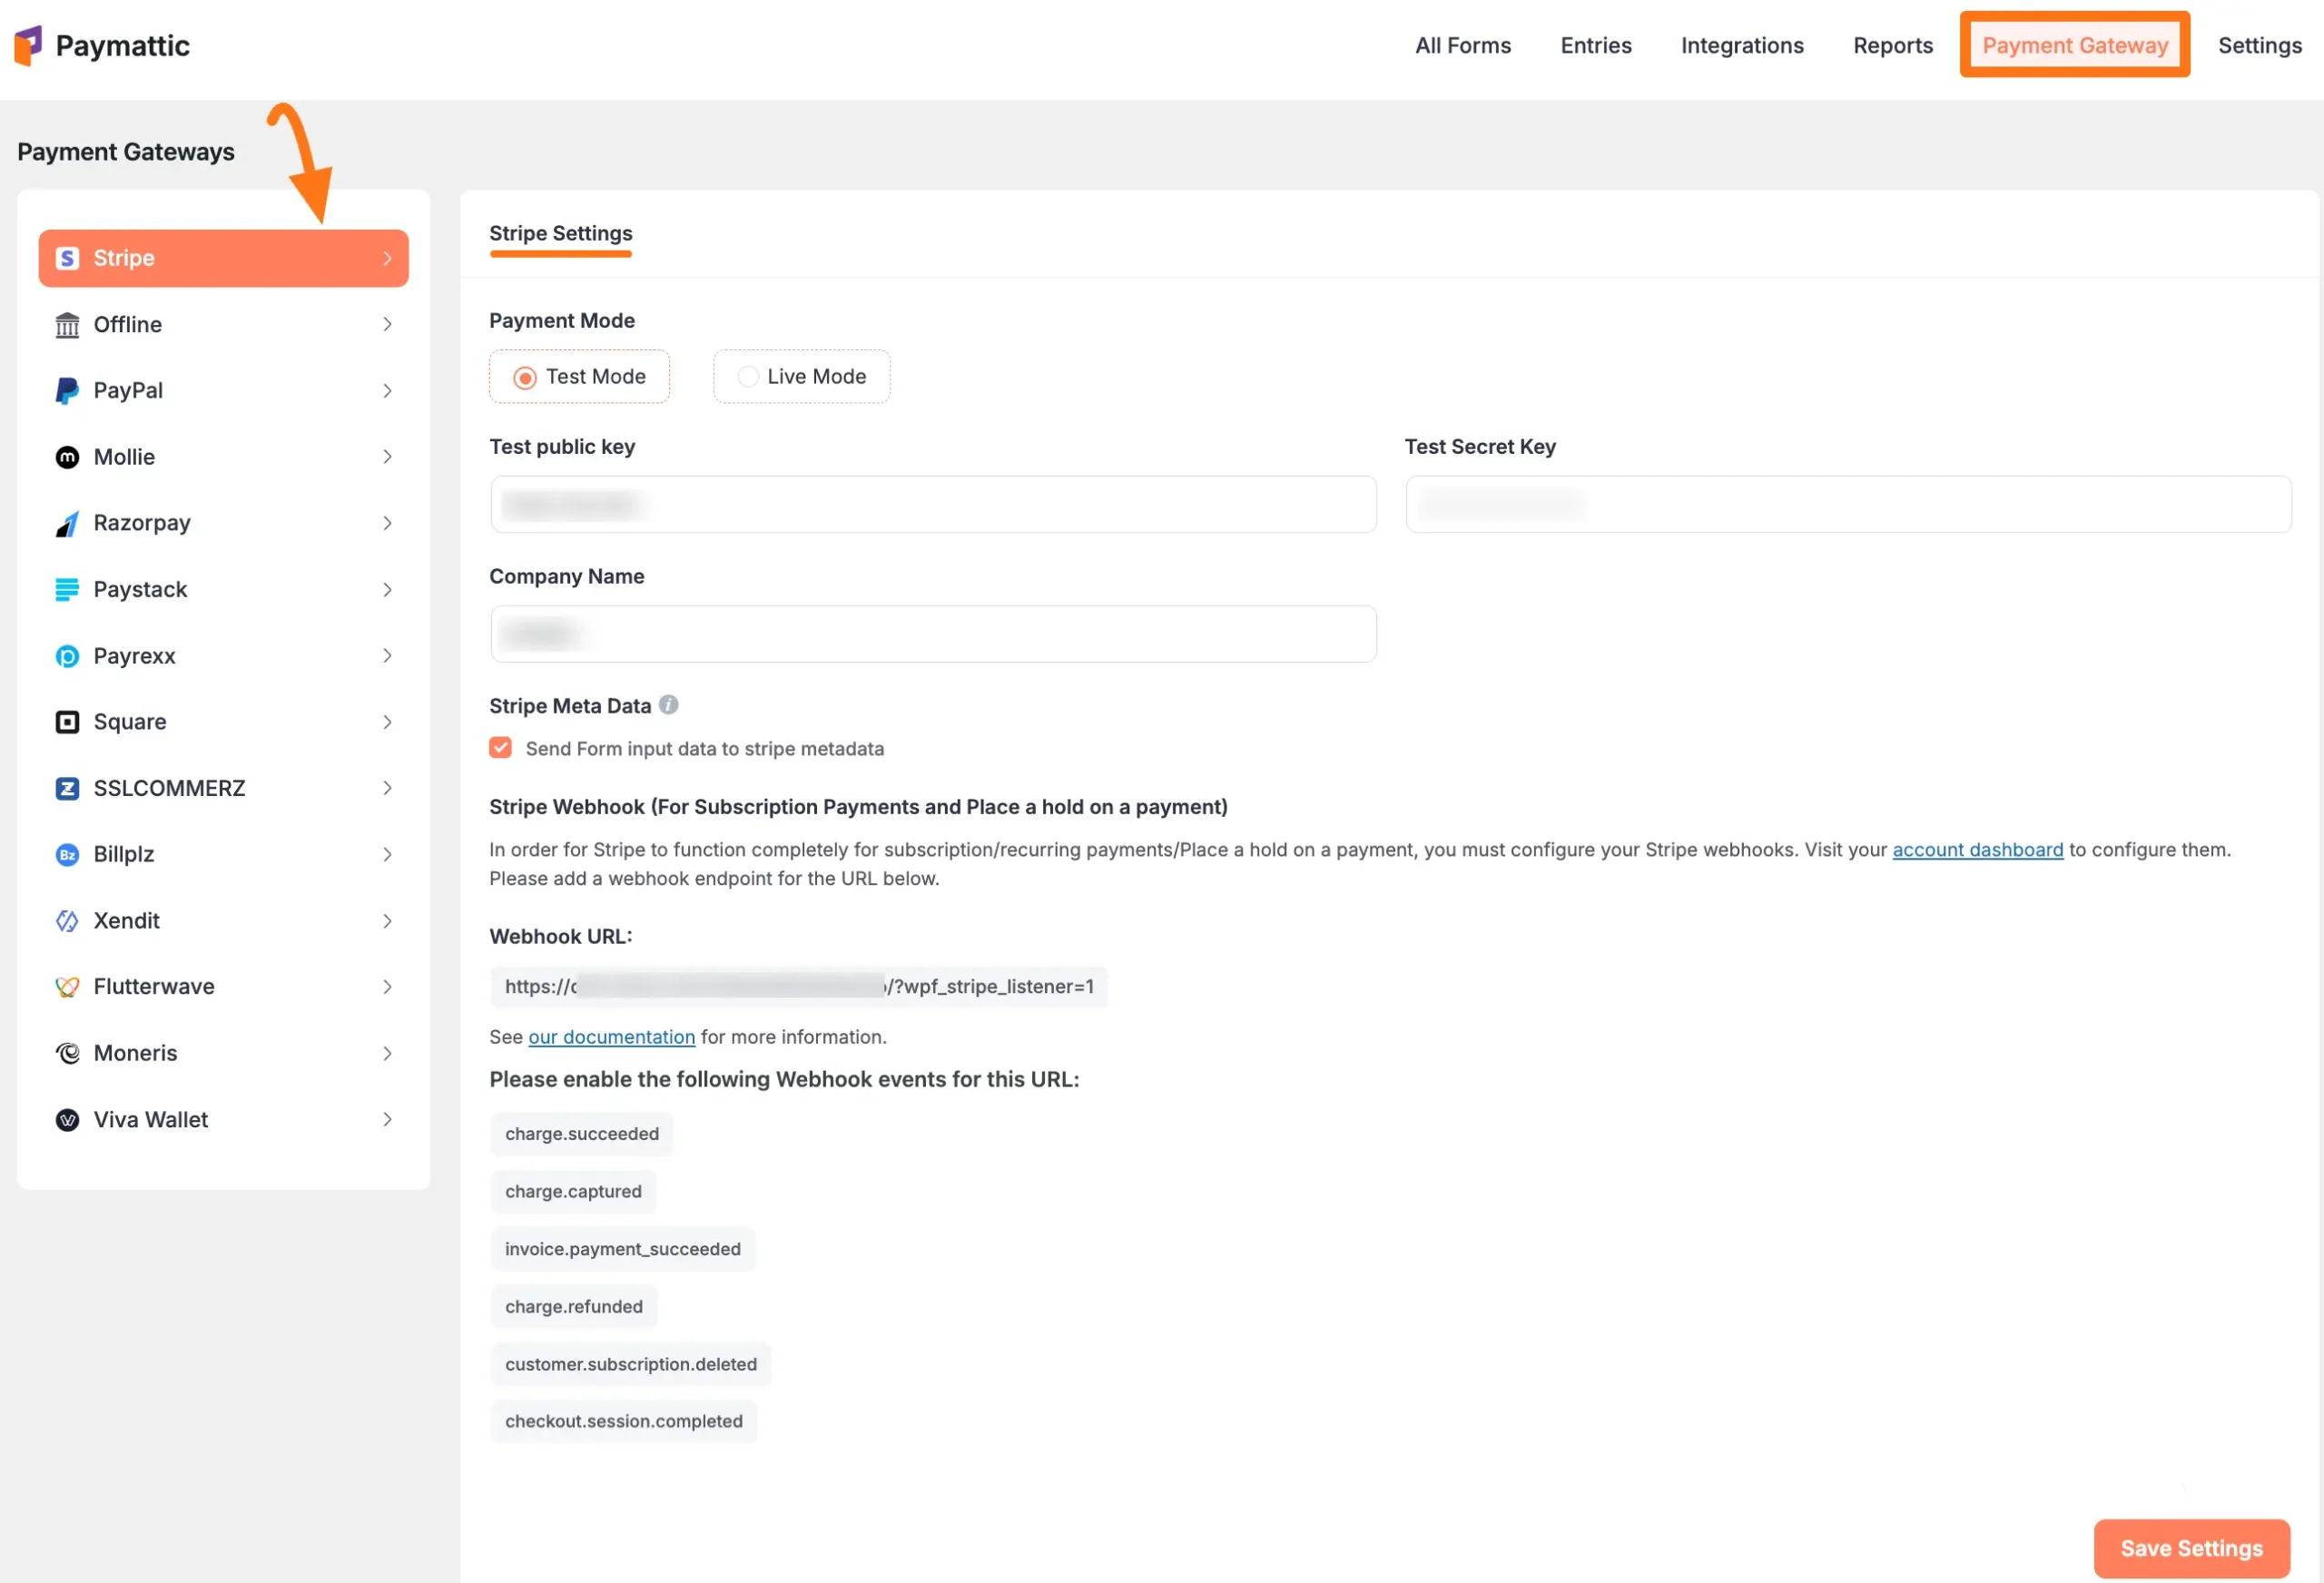
Select any Payment Mode between Test (for test payments) and Live (for real payments) as both options follow the same configuration process, e.g., I choose the Test Mode.
Then, you need to obtain the Public key and Secret key from your Stripe Account.

Get the Publishable Key and Secret Key from Stripe #
To learn how to get Publishable key and Secret Key from your Stripe, follow the steps with screenshots below –
First, log in to your Stripe account from here. If you do not have an account, sign up from here.
Once you log in to the Stripe Dashboard, go to the Developers section from the Navbar, and click the API keys tab.
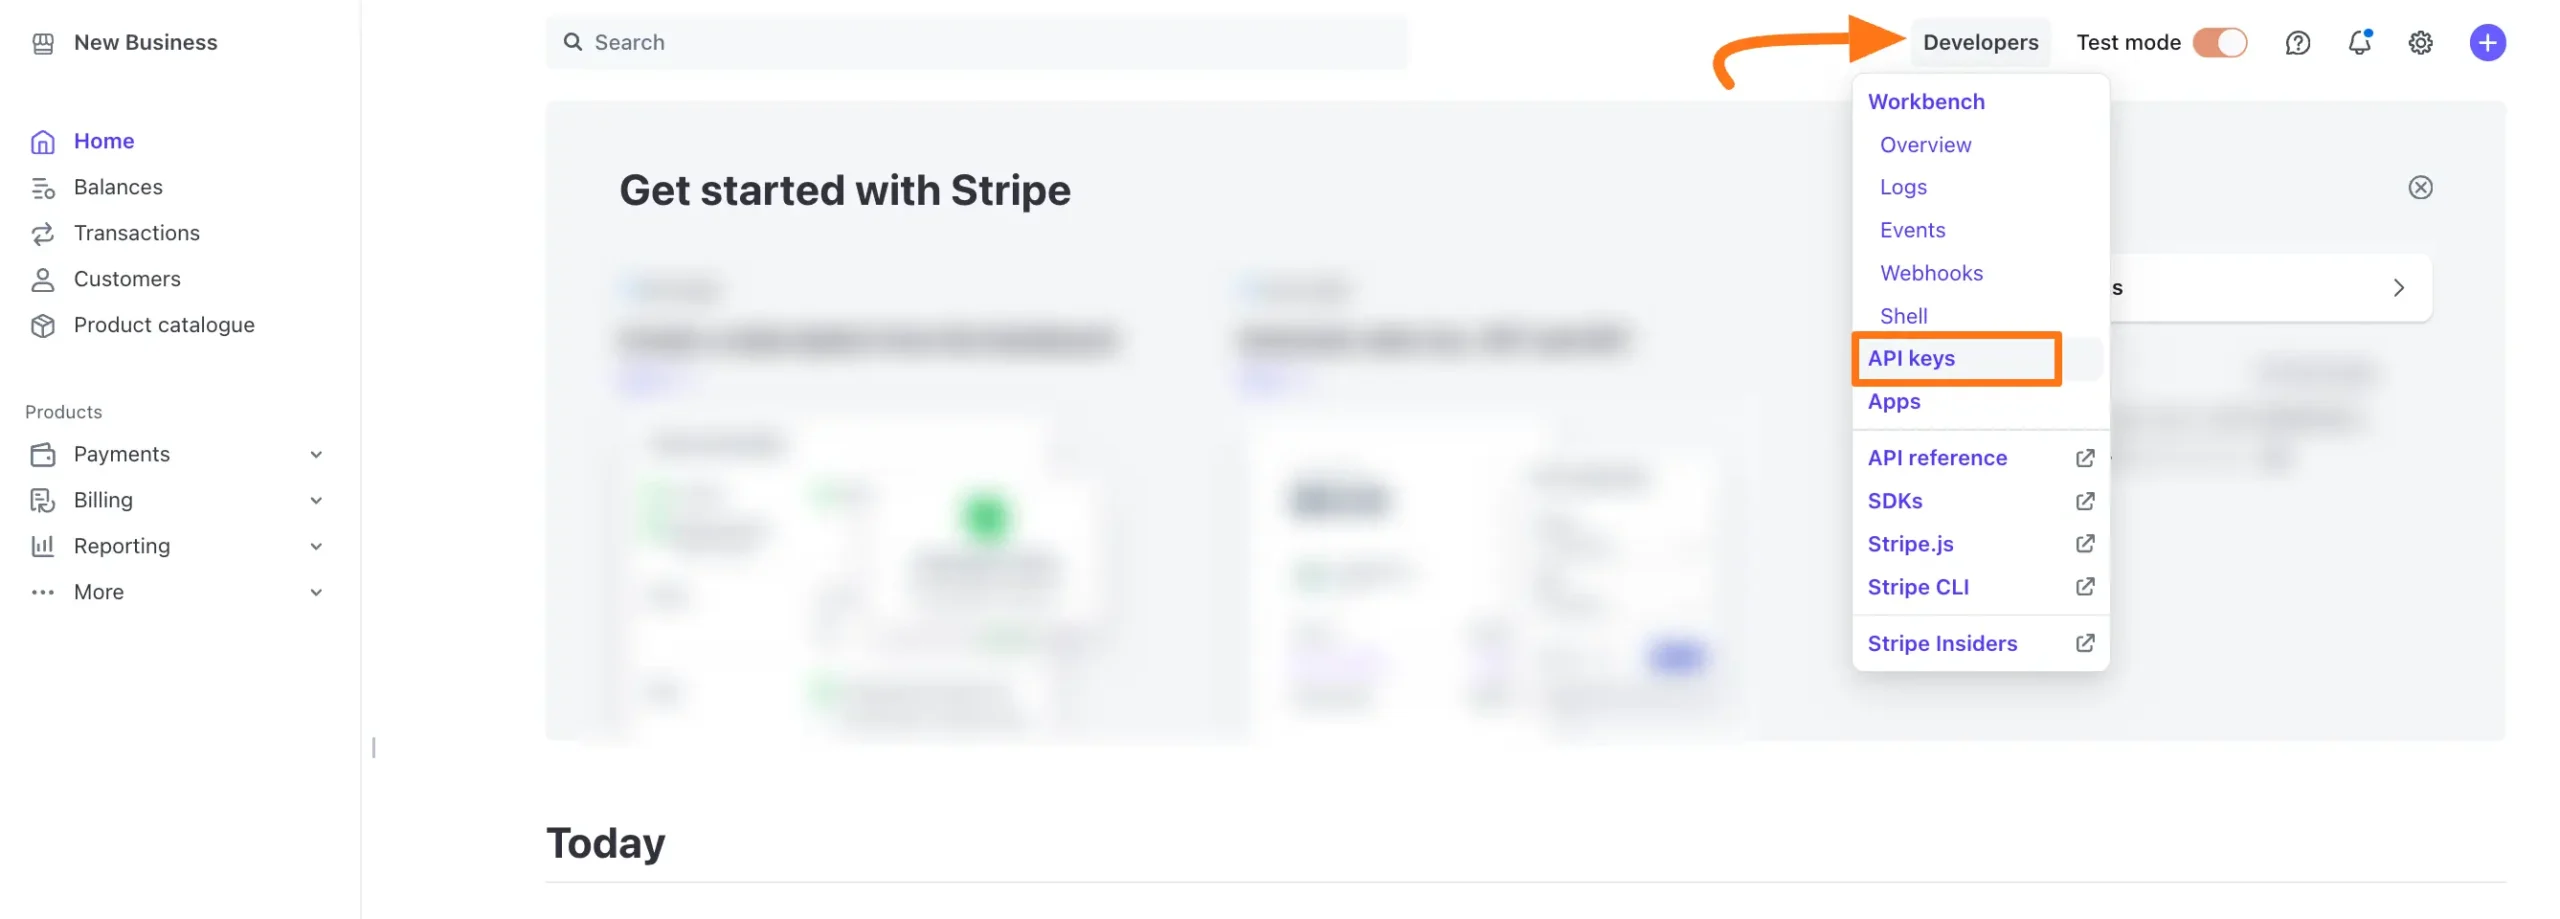
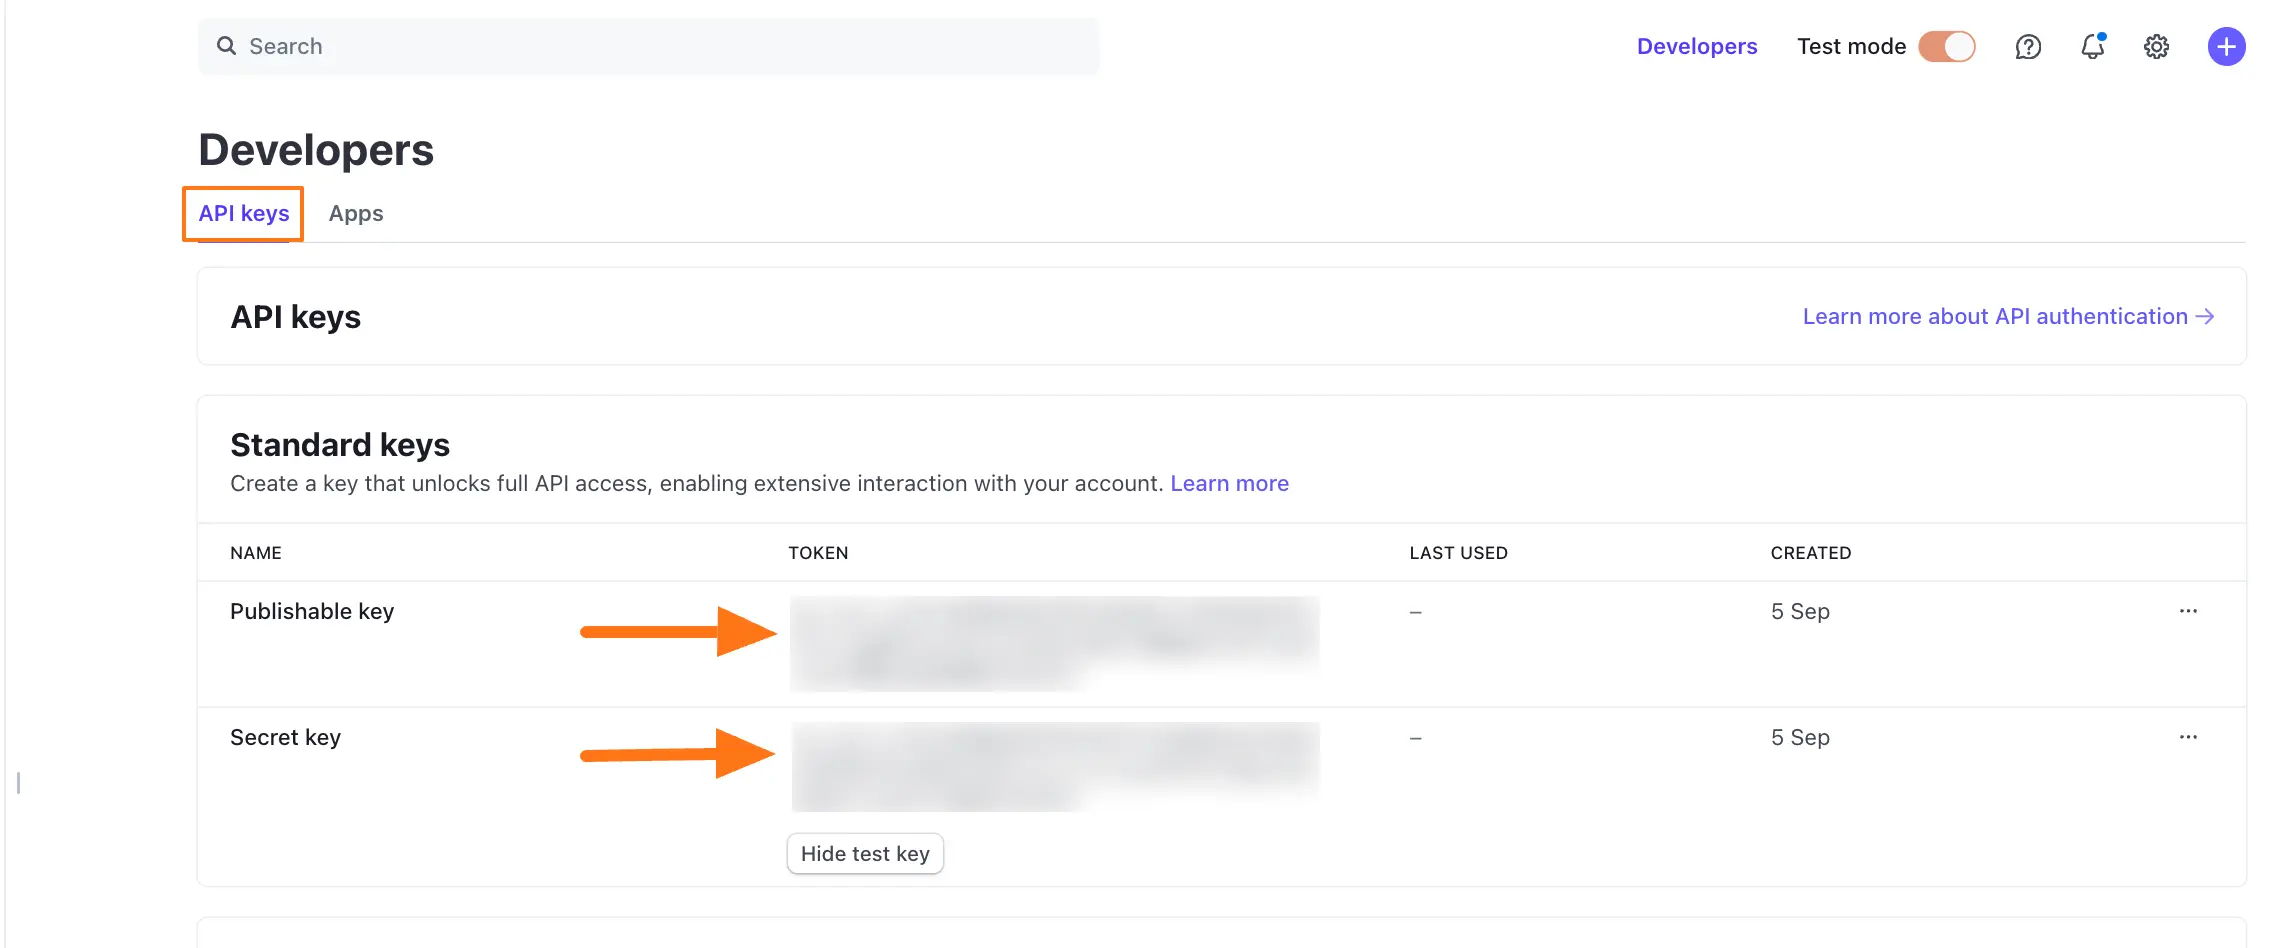
Here, you will get both your Publishable Key and Secret Key for configuration. Copy them.
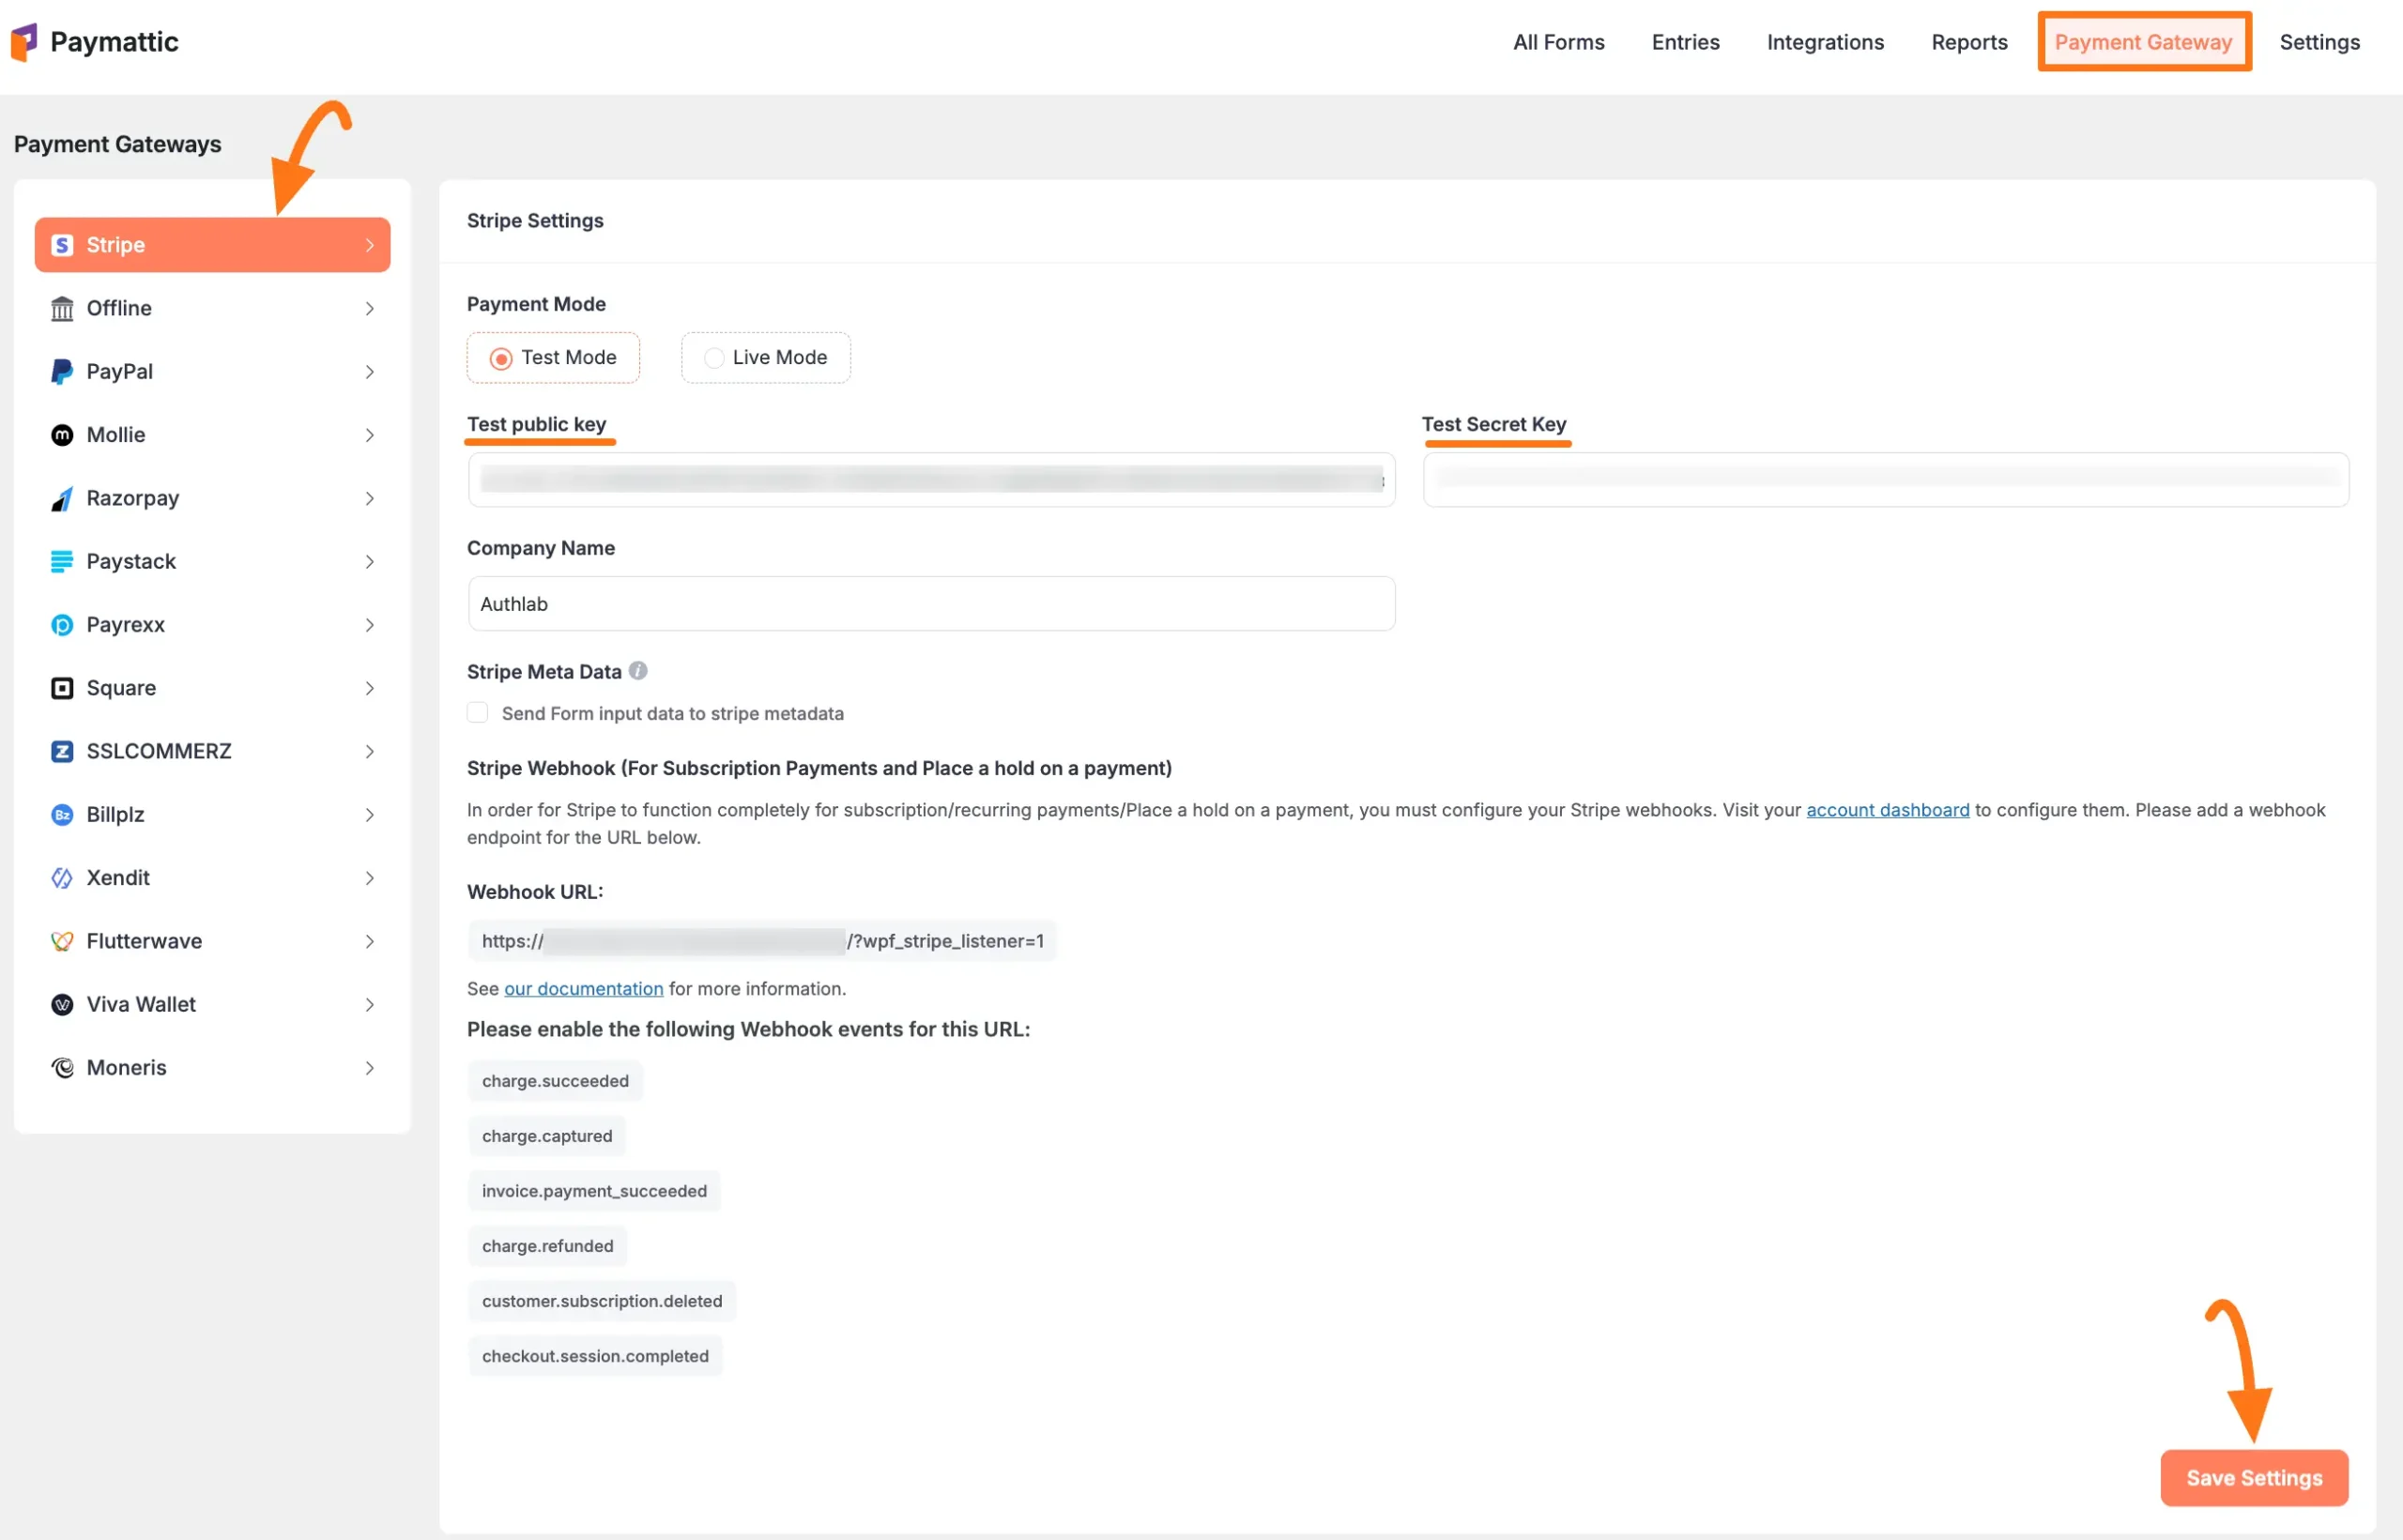
Go back to Payment Gateway from the Paymattic Navbar, click the Stripe tab, and paste the copied Publishable key and Secret key into the Public Key and Secret Key fields respectively.
Finally, press the Save Settings button and your Stripe account will be integrated with Paymattic for your WordPress Site.
Company Name and Stripe Meta Data #
Once you configure Stripe, you can set up the company name and stripe metadata if needed.
- Company Name: Enter the Business Name here that you want to be displayed in the payment form during checkout.
- Stripe Meta Data: Check this box if you want to send form input data to Stripe as metadata i.e., you can choose what you want to show after a successful payment or payment failures.
Remember, always press the Save Settings button to save the changes you made in your Stripe Settings page.

Add Stripe Webhooks #
To learn how to configure the Stripe Webhooks to your WordPress Site, follow the steps with the screenshots below –
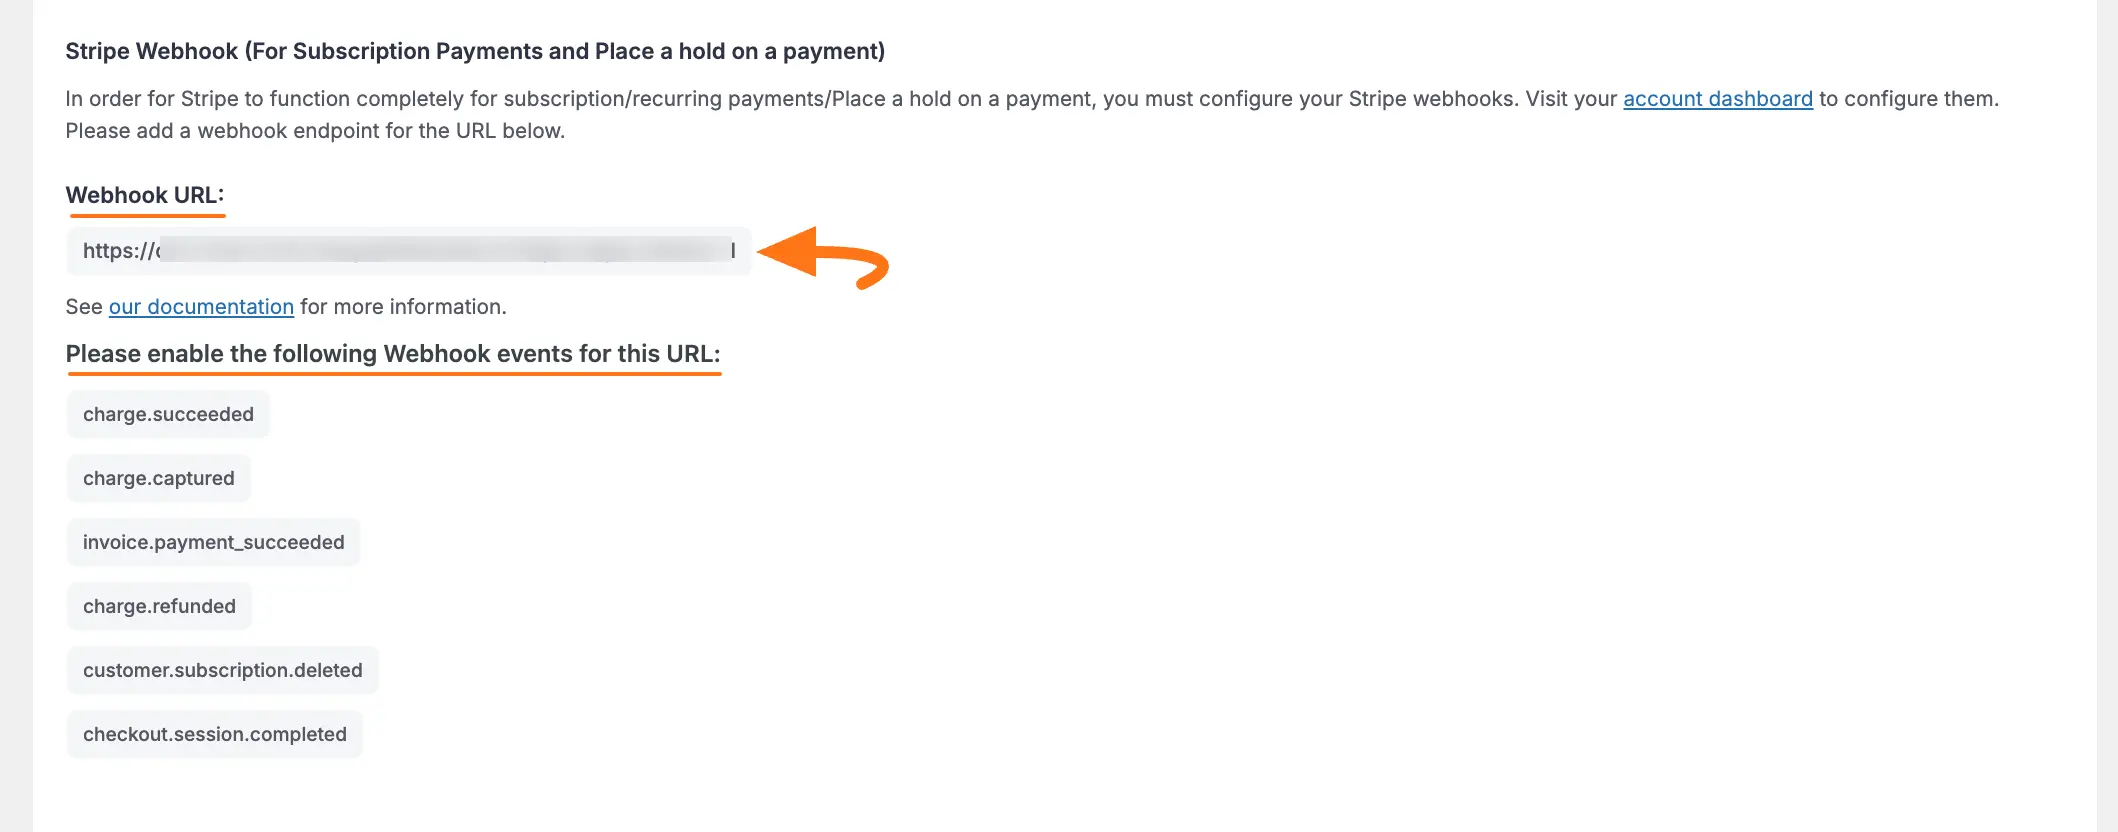
To ensure your Stripe dashboard and Paymattic dashboard are in sync, you must configure the Stripe Webhooks.
First, copy the Webhook URL and recommended Webhook Events for smooth transactions based on Stripe Data related to Subscription/Recurring/Hold payments.
You will need them later to configure Stripe Webhooks to your WordPress Site.
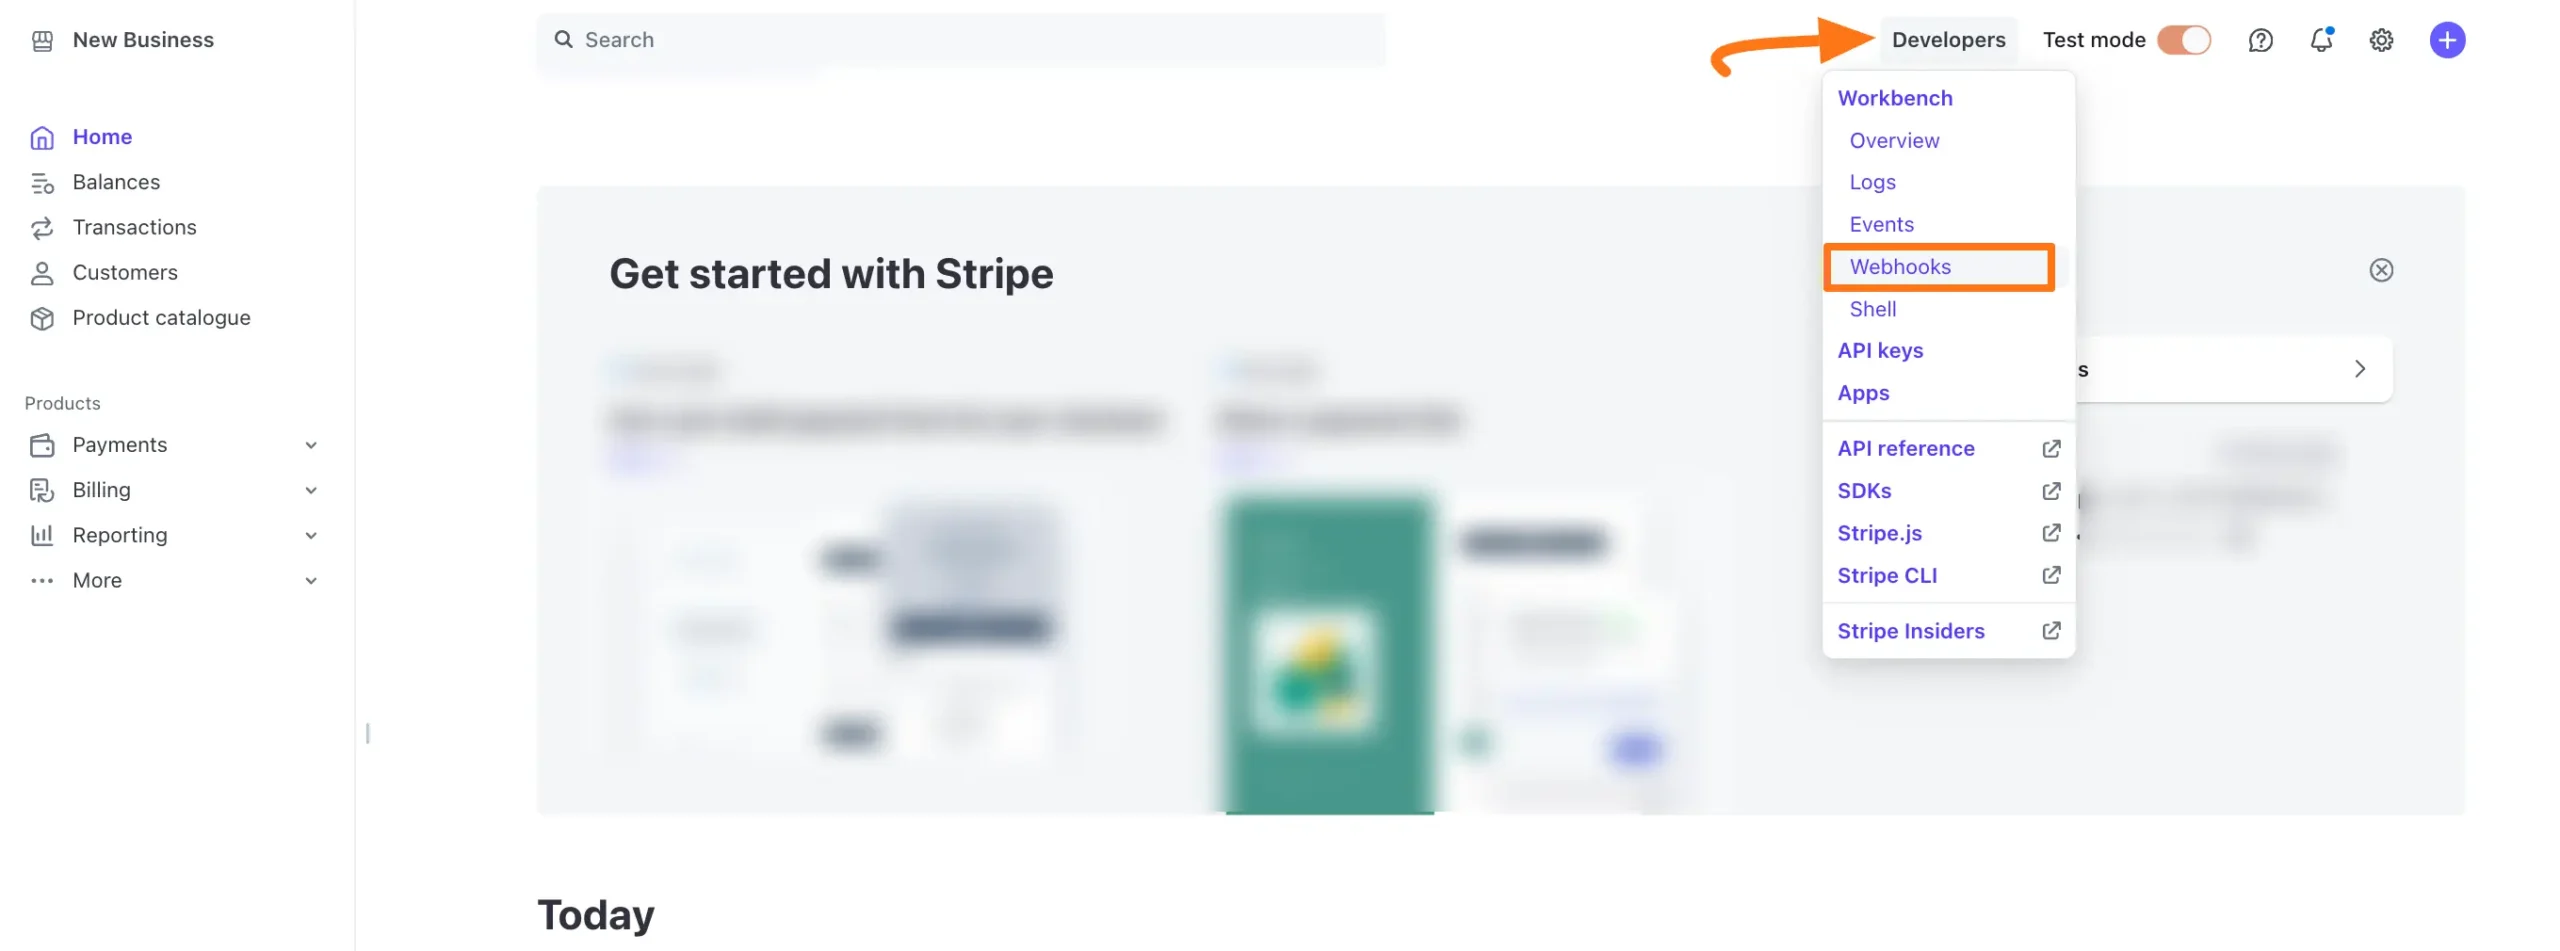
Now, visit your Stripe Dashboard, go to the Developers section from the Navbar, and click the Webhooks tab.
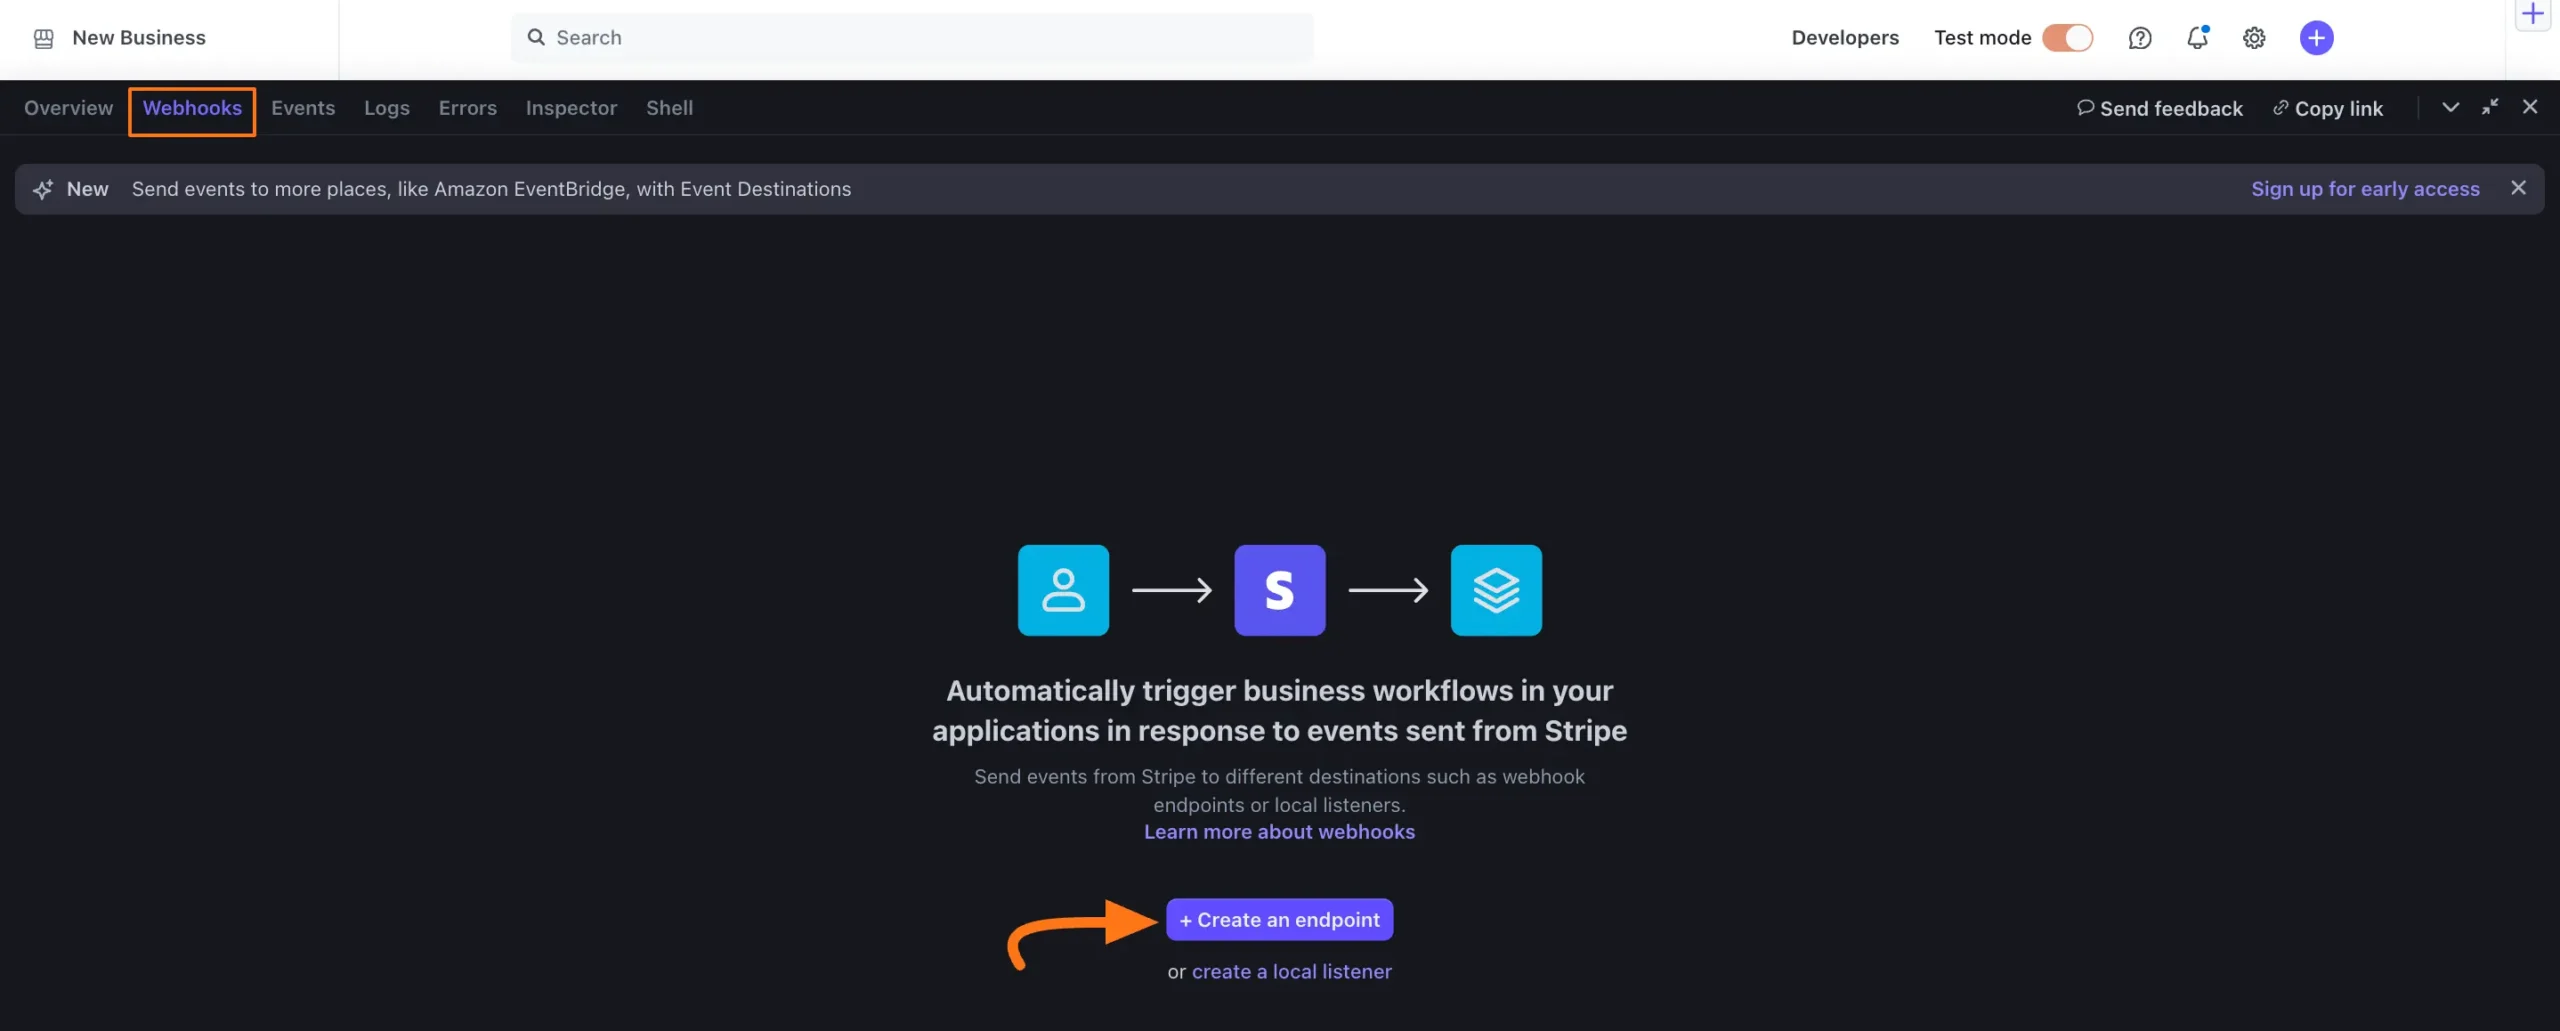
Click the +Create an endpoint button.
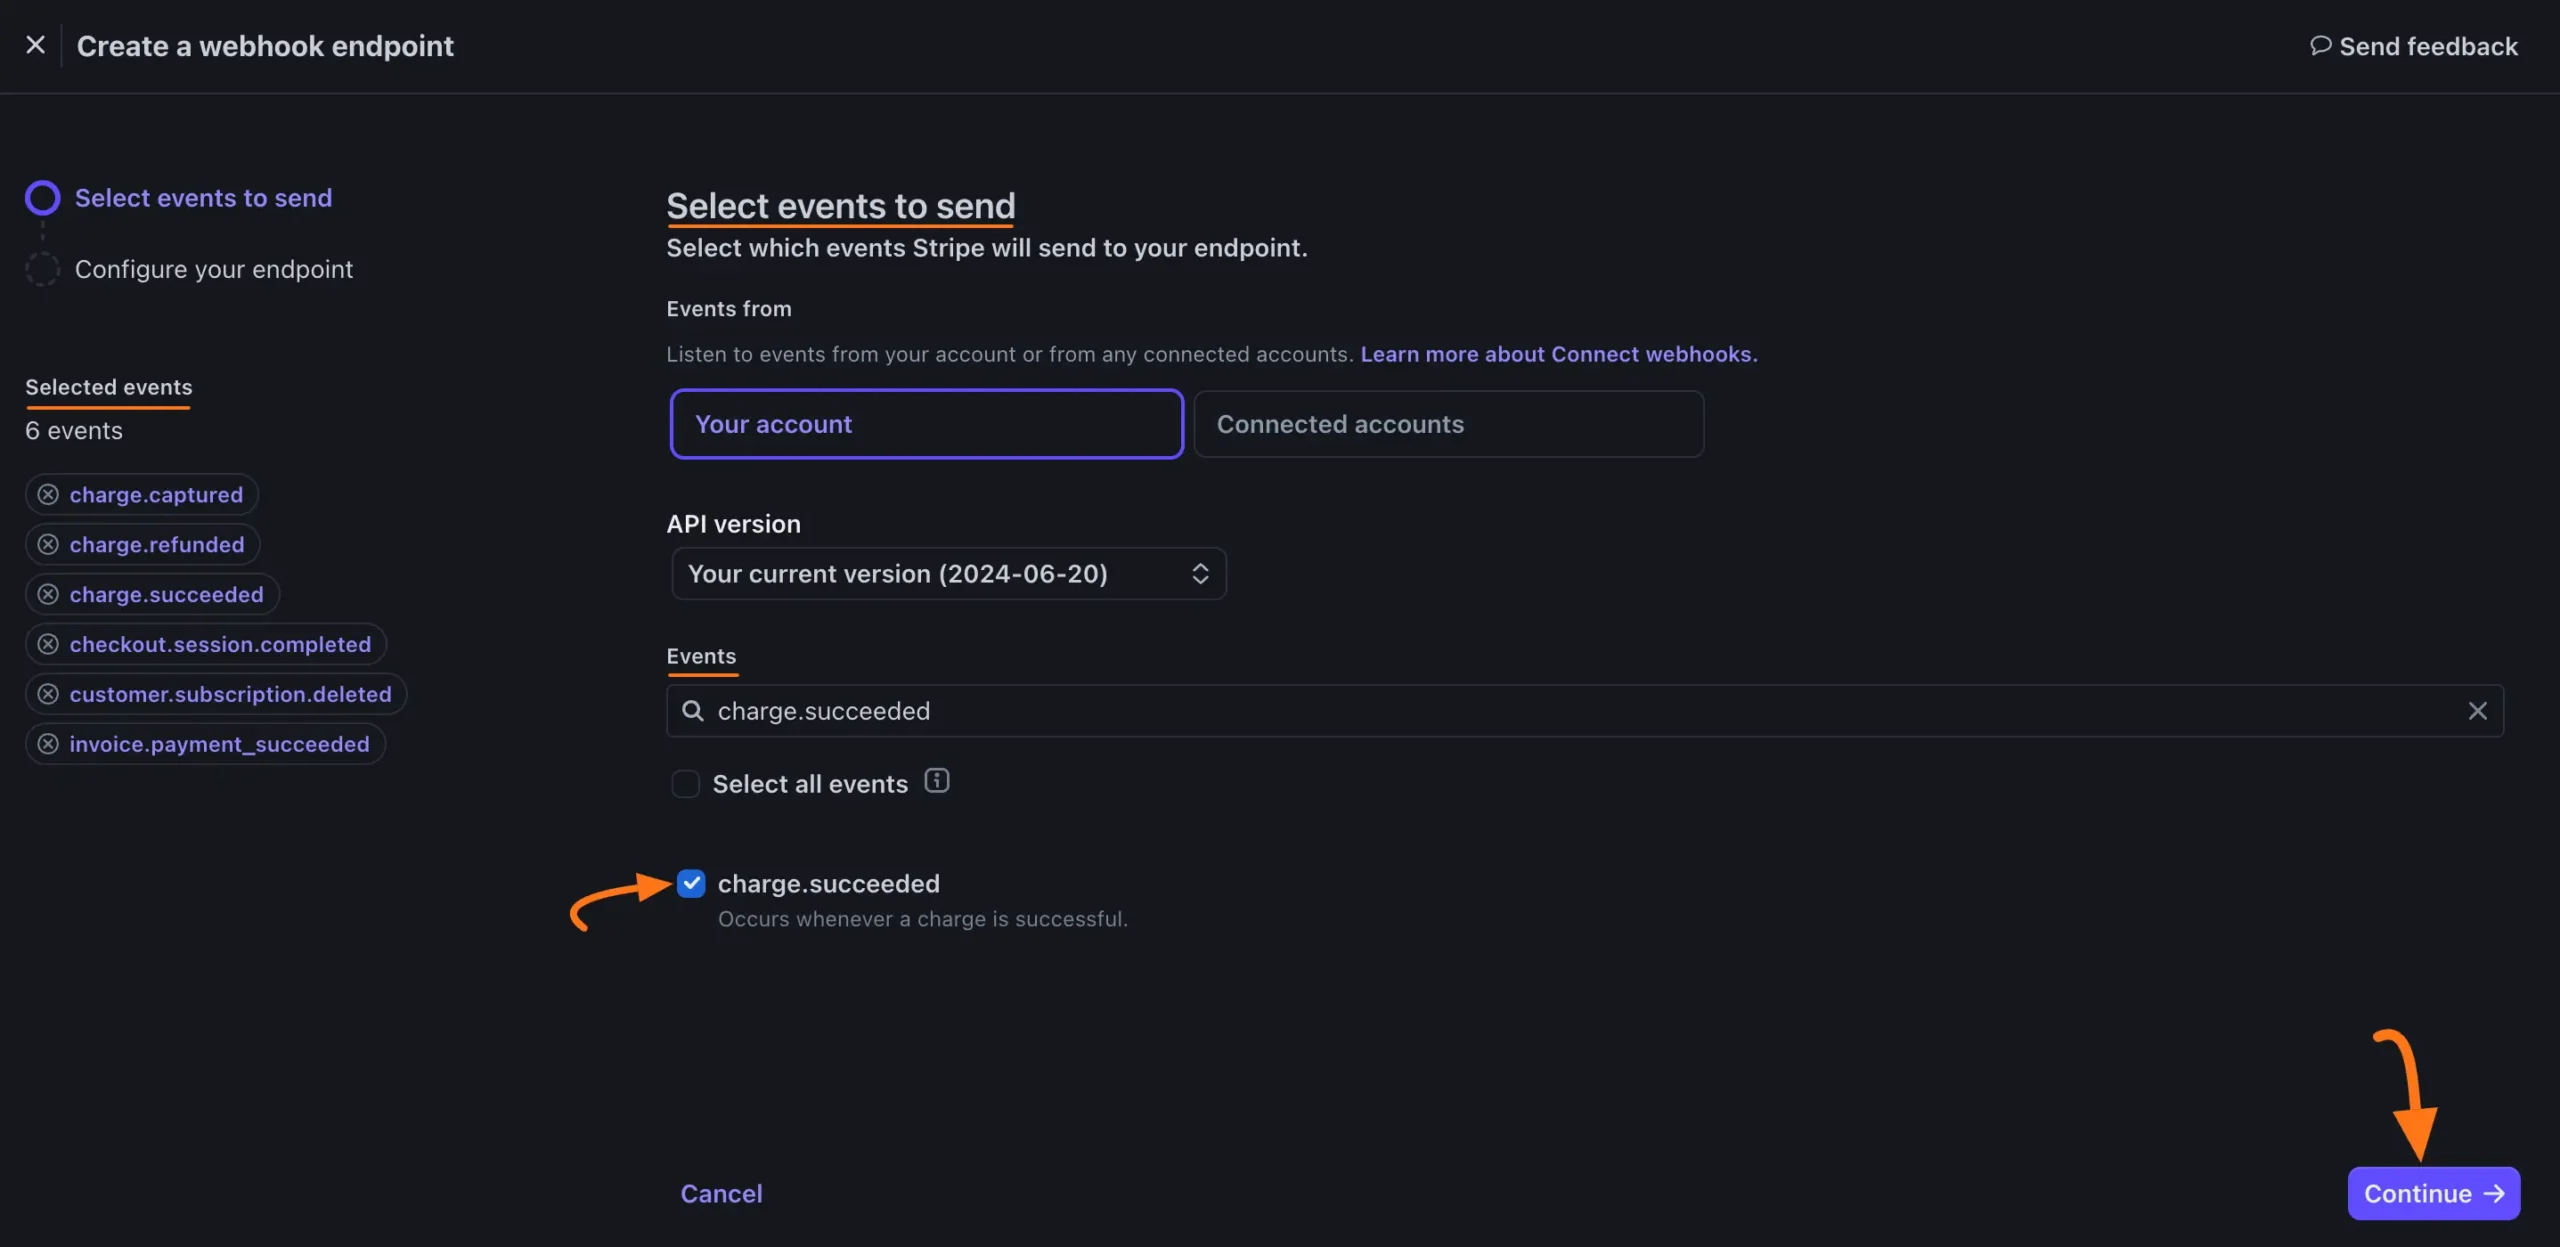
Now, choose the events recommended by Paymattic for Stripe to send to your endpoint.
You can find your desired events by entering their Name or Description into the Events fields and can select events by clicking the checkbox.
The Events recommended by Paymattic are briefly explained below:
- charge.succeeded: This triggers when a charge is successfully processed, basically this event occurs when a payment is completed on Stripe.
- charge.captured: This triggers when a previously authorized charge is successfully captured. You must use this for Hold payments.
- invoice.payment_succeeded: This triggers when a payment for an invoice is successful. This is often used for Subscription payments.
- charge.refunded: This triggers when a charge is refunded. This event helps track refund activity that happened on Stripe.
- customer.subscription.deleted: This triggers when a customer’s subscription is canceled or ends. This could be due to customer action, automatic cancellation, or a failed payment after retries.
- Checkout.session.completed: This triggers when a checkout session is successfully completed. This event confirms that the customer successfully paid for the session.
Once you select all the suggested Webhook Events, Click the Continue button.
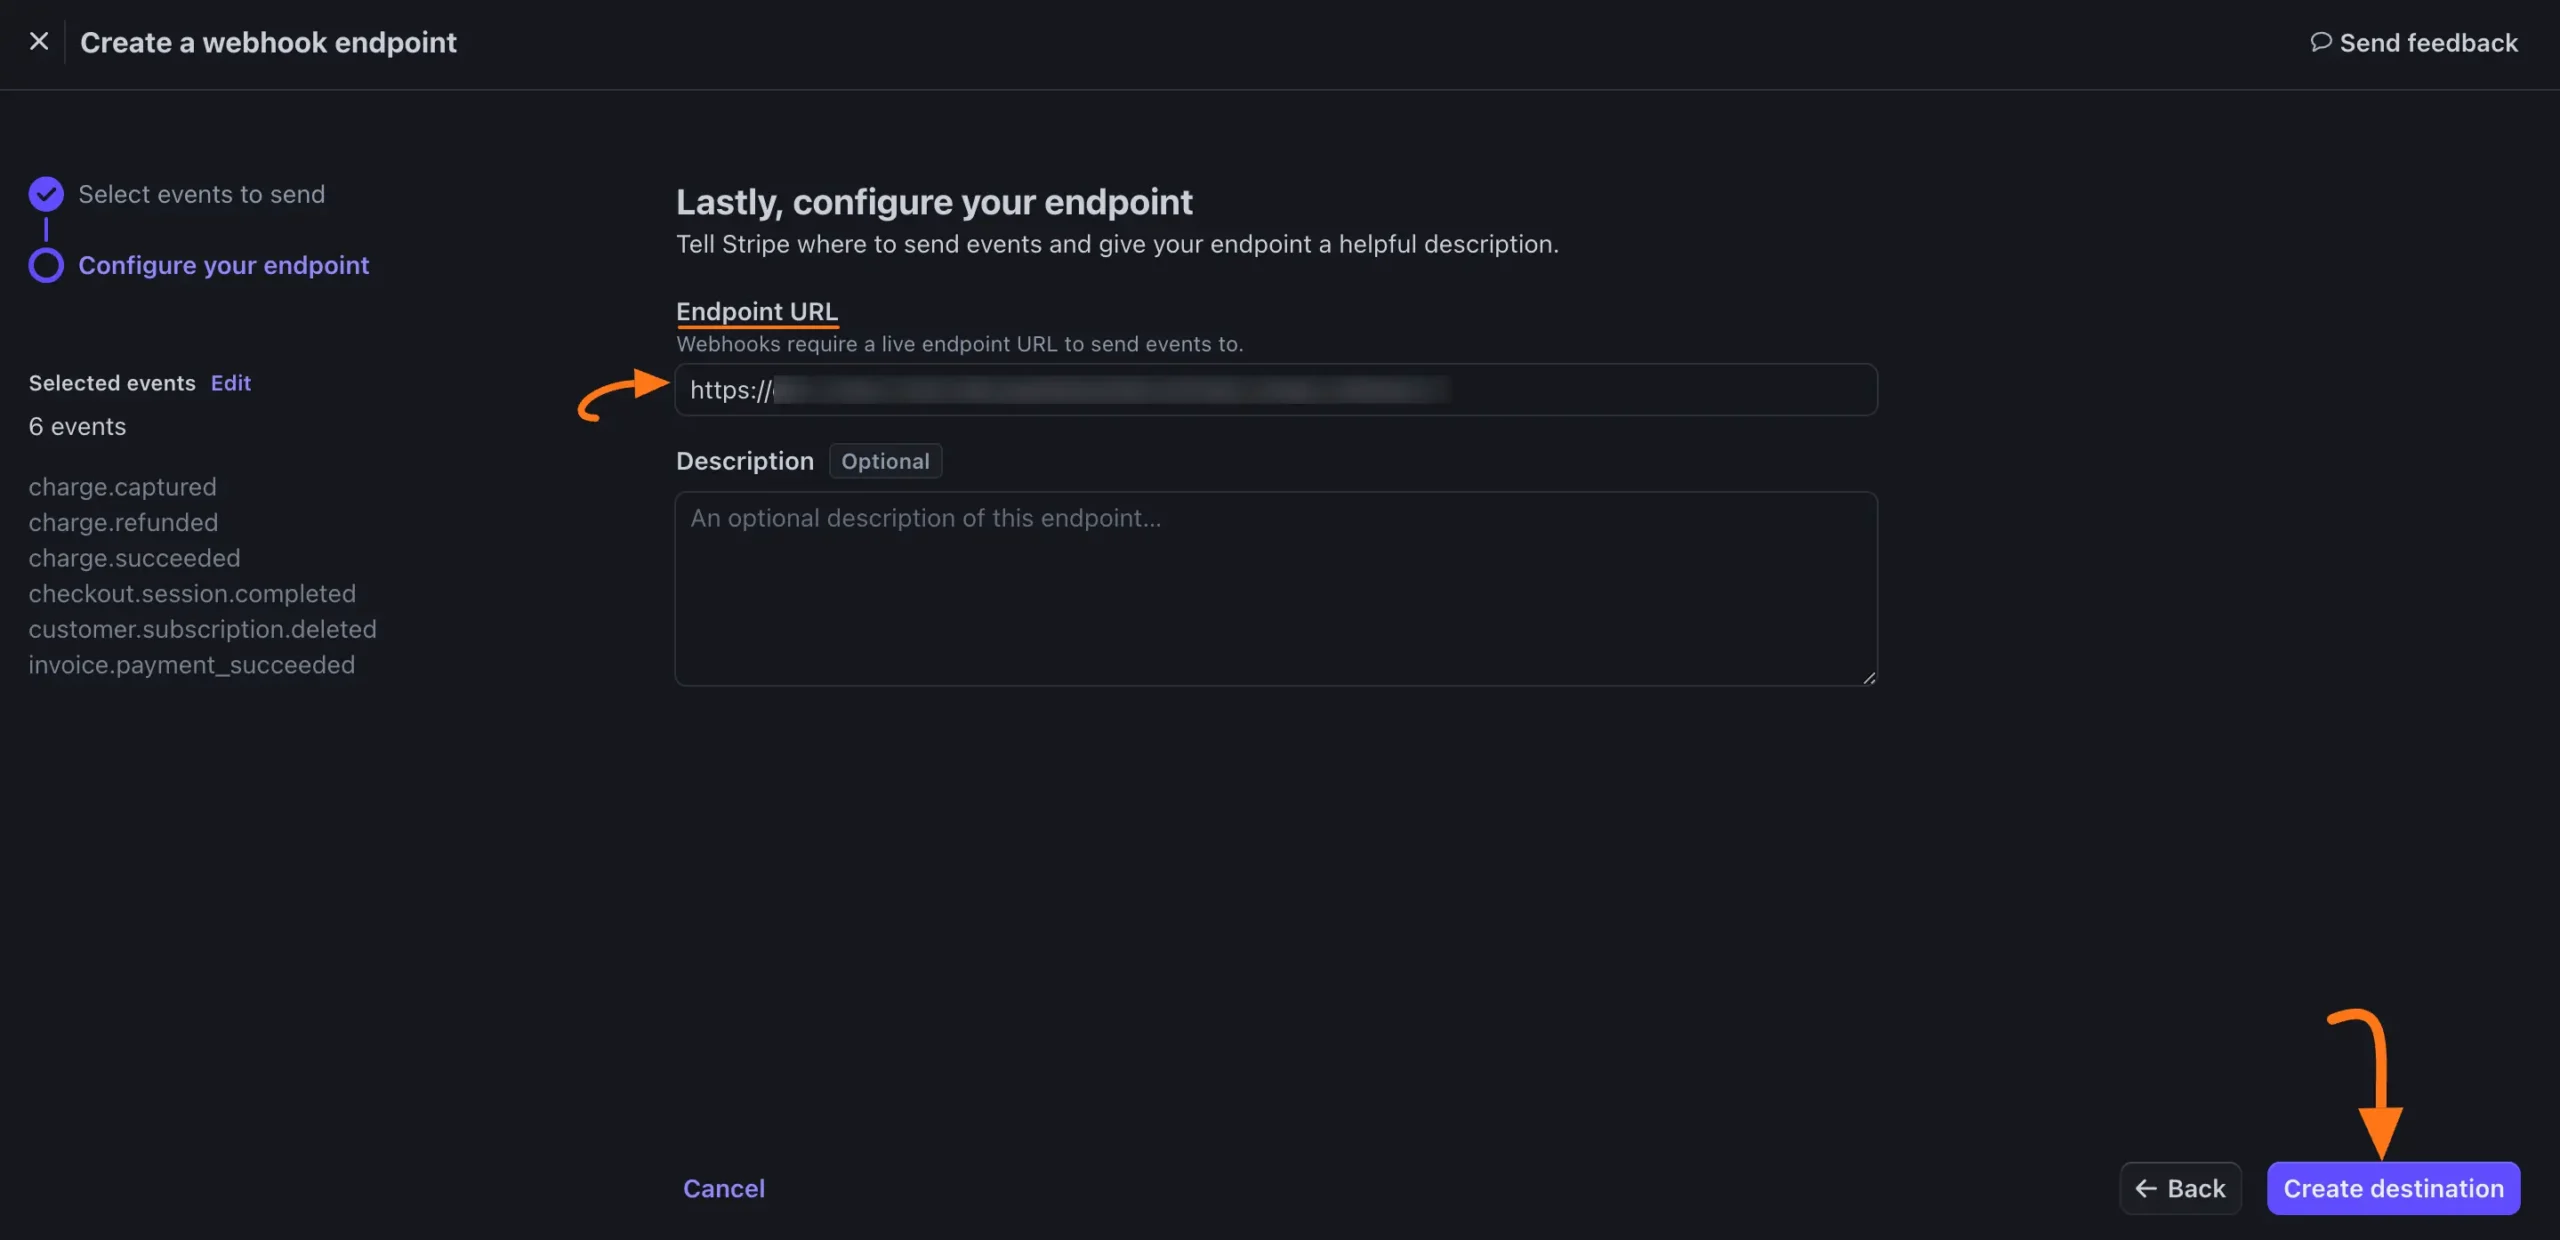
Finally, paste the Webhook URL you copied from the Stripe Settings page into the Endpoint URL field and click the Create destination button.
And, the Stripe Webhooks will be configured with your WordPress Site!
Add Stripe in Forms #
Once you finish setting up your Stripe payment gateway, you can easily add this payment method to any of your existing Payment Form.
If you do not have any existing forms, read this Create a Form from Scratch or Create a Form using Templates documentation to create one.
To learn the detailed process of adding a payment method to an existing form, read this Documentation.
But, remember, the added Stripe payment method in your Form will not function unless you complete the configuration process properly.
Form Specific Stripe Settings #
To learn how to customize the Settings of Stripe payment method for a specific form, refer to the article below –
Form Specific Payment Settings
If you have any further questions, concerns, or suggestions, please do not hesitate to contact our @support team. Thank you.


