Skip to content

special discount image regular

Grab Discount
Paymattic
  • FeaturesExpand
    • All Features
    • Paymattic for Small Business
    • Paymattic for Non Profit
    • Paymattic for e-Learning
    • Paymattic for Membership
  • Pricing
  • Integrations
  • ResourcesExpand
    • Blogs
    • Demo
    • Documentation
    • Support
    • REST API Doc
    • Account Login
Get Paymattic

special discount image regular

Grab Discount
Paymattic

How can we help you?

Popular Search subscriptionstriperecurringuserconditional

Getting Started with Paymattic

  • Paymattic Introduction 
  • How to Install and Activate Paymattic in WordPress

Form Editor

  • Add Multiple Column Containers in Forms
  • Create a Form from Scratch with Paymattic
  • How to Create a Step Form with Paymattic
  • How to Create Your First Payment Form in a Minute and Accept Payments with Paymattic?
  • How to Create WordPress Donation Form with Simple Form Templates?
  • How to Edit, Duplicate, or Delete Paymattic Forms
  • How to Use Conditional Logic in Form Fields with Paymattic?
  • How to Create PDF Feed for Form Submissions?

General Input Fields

  • How to Use the Donation & Product Fields 
  • How to Use the Payment Method Fields
  • How to Use the General Fields

Donation and Product Fields

  • Dynamic Payment Item Field 
  • Add Payment Summary Field in Forms 
  • How to Add Currency Switcher in WordPress Form?
  • How to Add Payment Item Fields in WordPress with Paymattic?
  • How to Add Subscription Payment Item Fields in Paymattic?
  • How to Add Tabular Product Item Fields in WordPress with Paymattic?
  • Add Donation Progress Item in Paymattic
  • How to Add Item Quantity Field in WordPress with Paymattic? 
  • How to Add Custom Payment Amount Field in WordPress with Paymattic?
  • How to Add Tax Calculated Amount Field in WordPress with Paymattic?
  • How to Add Coupon Field in WordPress with Paymattic
  • Donation Leaderboard in Paymattic 

Payment Method Fields

  • Configure Authorize.net in WordPress through Paymattic
  • How to Add Flutterwave Payment Gateway in Paymattic?
  • How to Integrate Xendit Payment Gateway in WordPress with Paymattic?
  • How to Integrate Square with Paymattic in WordPress?
  • How to Configure Billplz in WordPress with Paymattic?
  • How to Configure Stripe Payment Gateway in WordPress with Paymattic?
  • How to Configure PayPal in WordPress with Paymattic?
  • How to Set PayPal IPN in WordPress with Paymattic?
  • How to Integrate Mollie in WordPress with Paymattic?
  • How to Integrate Razorpay with Paymattic in WordPress
  • How to Integrate Paystack in WordPress with Paymattic?
  • How to Integrate Payrexx in WordPress with Paymattic
  • How to Integrate SSLCOMMERZ with Paymattic in WordPress?
  • How to Collect Offline Payment in WordPress with Paymattic
  • How to integrate Moneris Payment Gateway in Paymattic
  • How to Integrate Viva Wallet With Paymattic?

Global Settings

  • How to Add User Dashboard Module in Paymattic?
  • How to Configure Cloudflare Turnstile Security with Paymattic?
  • How to Configure reCAPTCHA in WordPress with Paymattic
  • How to Change Currency Settings in WordPress with Paymattic
  • How to Manage User Roles in WordPress with Paymattic?

Integrations

  • How to Integrate FluentCommunity in WordPress with Paymattic 
  • How to Integrate Google Sheets in WordPress with Paymattic?
  • How to Integrate Fluent Support with Paymattic in WordPress?
  • How to Integrate Webhook in WordPress with Paymattic?
  • How to Integrate Zapier with Paymattic in WordPress?
  • How to Integrate Slack in WordPress with Paymattic?
  • How to Integrate Telegram with Paymattic in WordPress?
  • How to Integrate Twilio with Paymattic in WordPress?
  • How to Integrate ActiveCampaign in WordPress with Paymattic?
  • How to Integrate Mailchimp in WordPress with Paymattic?
  • How to Integrate FluentCRM in WordPress with Paymattic
  • How to Create a User Registration Form with Paymattic in WordPress?

Learning Management System (LMS) Integrations

  • How to Integrate LifterLMS in WordPress with Paymattic?
  • How to Integrate LearnDash in WordPress with Paymattic?
  • How to Integrate Tutor LMS in WordPress with Paymattic?

Form Settings

  • Customize Form-Specific Payment Settings
  • How to Create Custom CSS/JS in WordPress with Paymattic? 
  • How to Set Form Scheduling and Restriction Settings in WordPress?
  • How to Customize Form Design Settings in WordPress with Paymattic?
  • How to Configure Confirmation Settings in WordPress?

Email Notification Settings

  • How to Setup Email Notifications in Paymattic WordPress Plugin?

Manage Form Entries

  • Manually Cancel Any Subscription
  • How to Manage Subscriptions in WordPress with Paymattic
  • How to Disable IP Address Logging in WordPress with Paymattic?
  • How to View Single Submission Data and Manage Payments in Paymattic
  • How to View and Manage All Form Entries in WordPress with Paymattic
  • How to Enable Stripe Payment Hold in Paymattic 

Reports & Analytics

  • How to View the Reports and Payment Analytics in WordPress?

FAQ

  • Add First & Last Name Fields Separately
  • Date Formats Customization
  • How to Fix Not Sending Email Confirmations Issue in WordPress?

Customer Profile

  • How to View Customer Profile in WordPress with Paymattic?

Import - Export

  • How to Import-Export Forms with Paymattic
  • How to Export Form Entry/Entries with Paymattic  

Change Log

  • Change Log
View Categories
  • Home
  • Docs
  • Form Settings
  • Customize Form-Specific Payment Settings

Customize Form-Specific Payment Settings

Paymattic allows you to customize the settings of your Stripe and PayPal payment methods for each form individually. For instance, if you have already set up the Stripe/PayPal payment method for transactions, you can use Payment settings to customize the settings or add different Stripe/PayPal accounts to specific forms. 

This article will guide you through the process of using the Payment (Stripe and PayPal) settings for particular forms.

Remember, this Payment settings in a form is a Pro Feature and you need Paymattic Pro Plugin to use this feature.

Payment Settings in a Specific Form #

First, go to the All Forms section from the Pymattic Navbar, and open a Payment Form by clicking the Pencil icon that has Stripe and PayPal payment methods added.

If you do not have any existing Payment form, read this Documentation to learn how to Create a Payment Form.

Additionally, read this Documentation to learn how you can add your desired Payment method/s to your form.

For example, I choose an existing payment form where Stripe and PayPal both are added as payment methods to show the whole process.

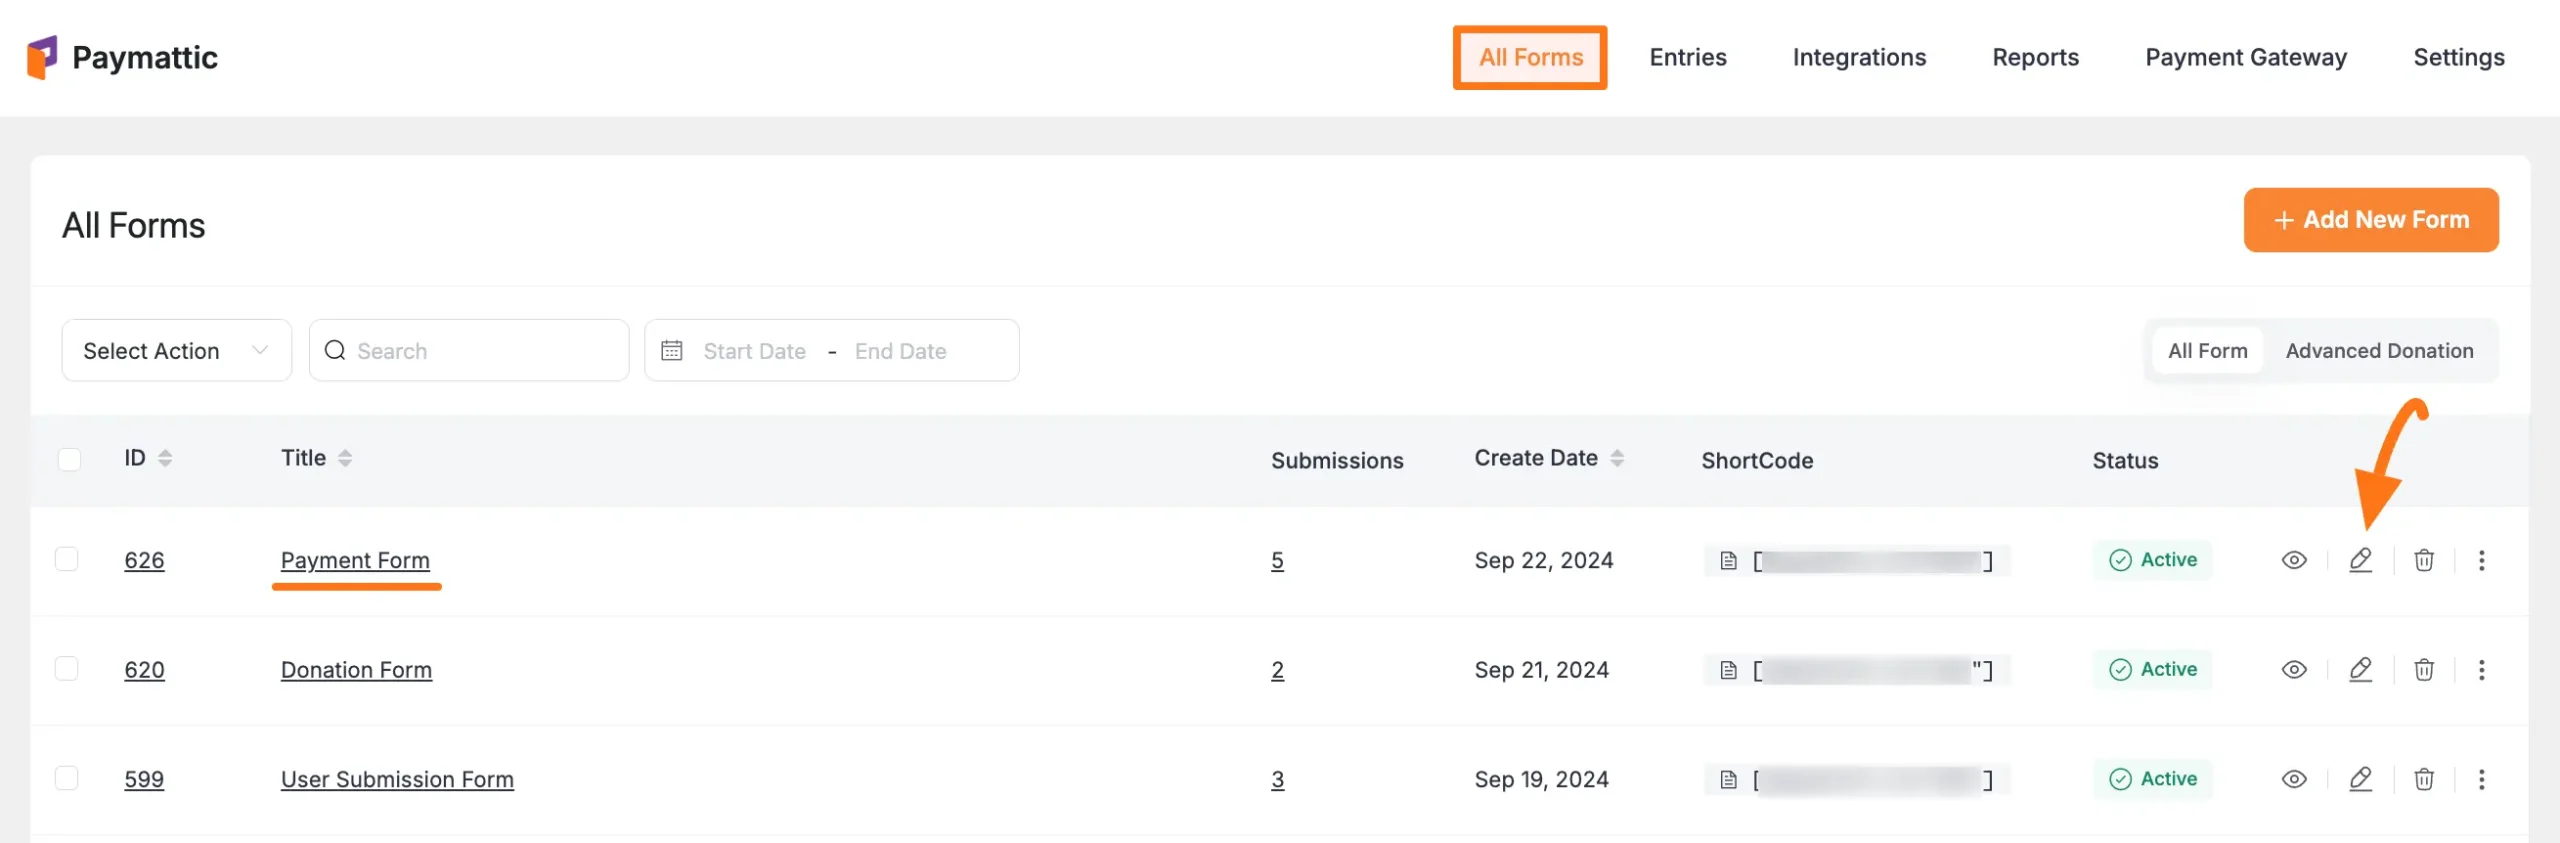
Or, you can directly open the desired form’s Settings tab by clicking the Three-Dot Icon and then pressing the Settings option from the dropdown list.

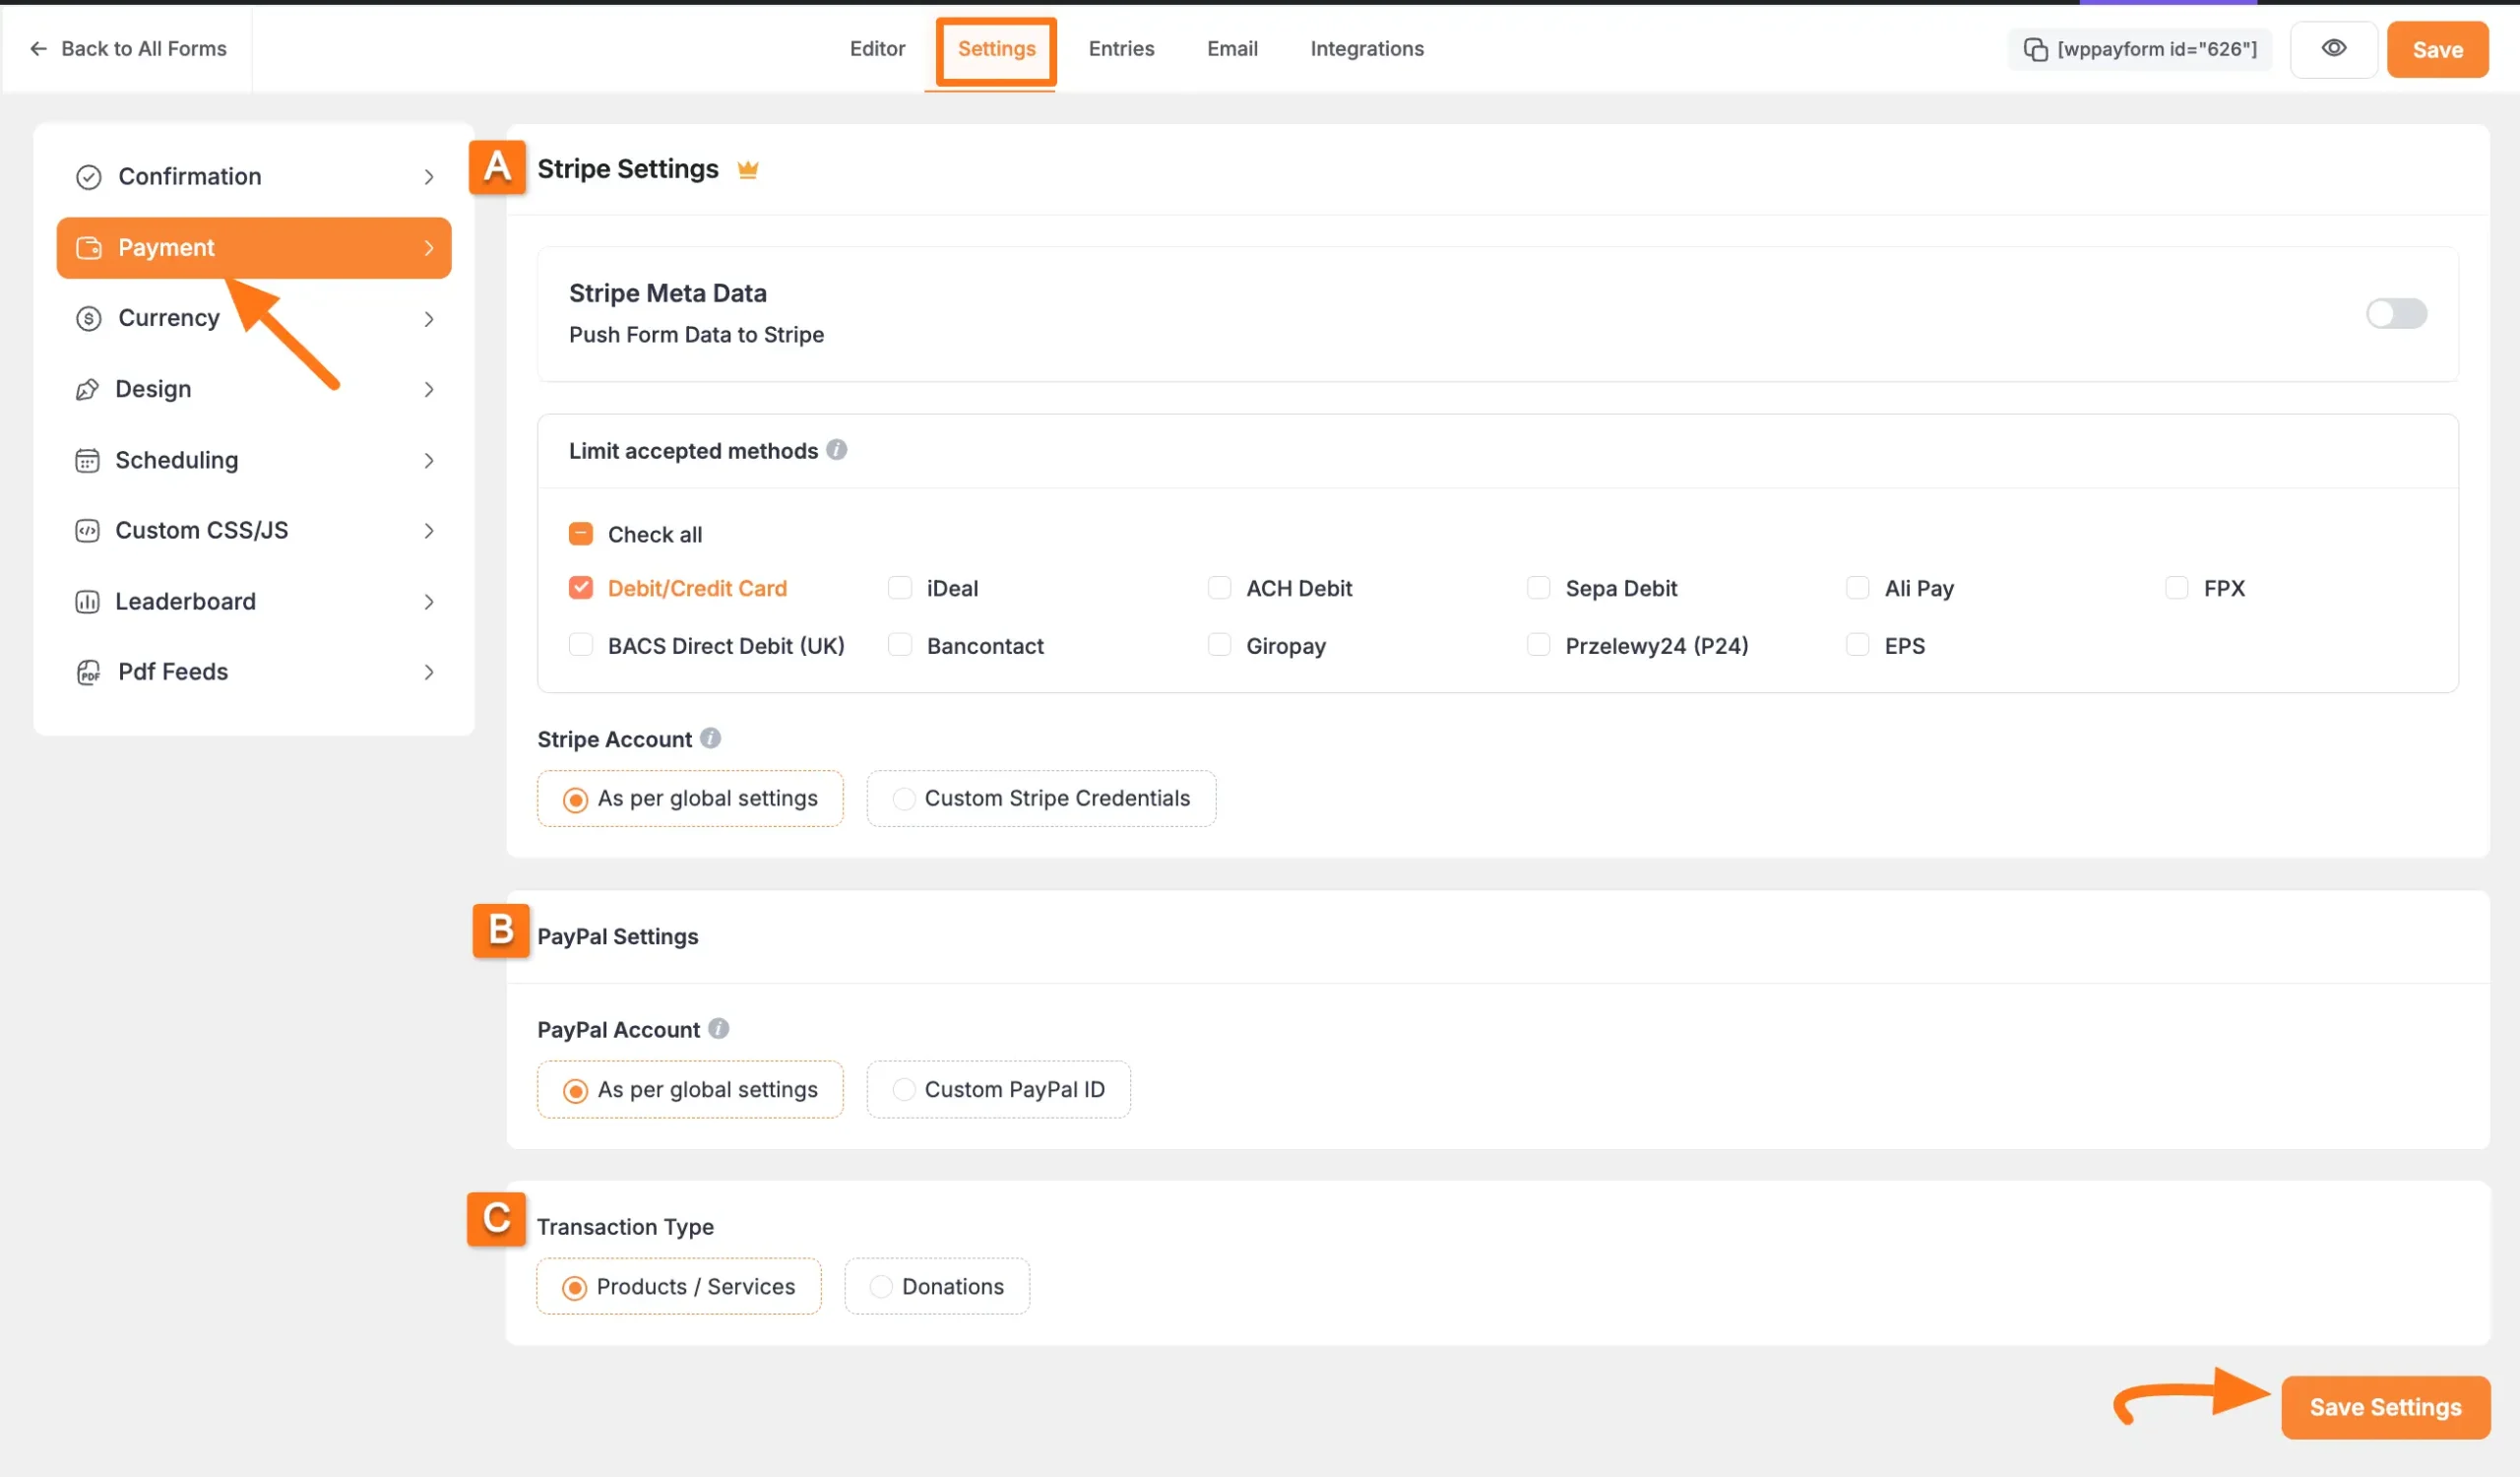
Once you open the Editor page, go to the Settings tab, click the Payment option, and you will get the following Payment Settings options.

  1. Stripe Settings
  2. PayPal Settings
  3. Transaction Type

After completing the setup, must click the Save Settings button to save your changes.

The two Payment Settings mentioned above are explained below – 

A. Form Specific Stripe Settings  #

To change your Stripe Payment Settings for a specific form, follow the steps with the screenshots below – 

The three settings options mentioned above are briefly explained below:
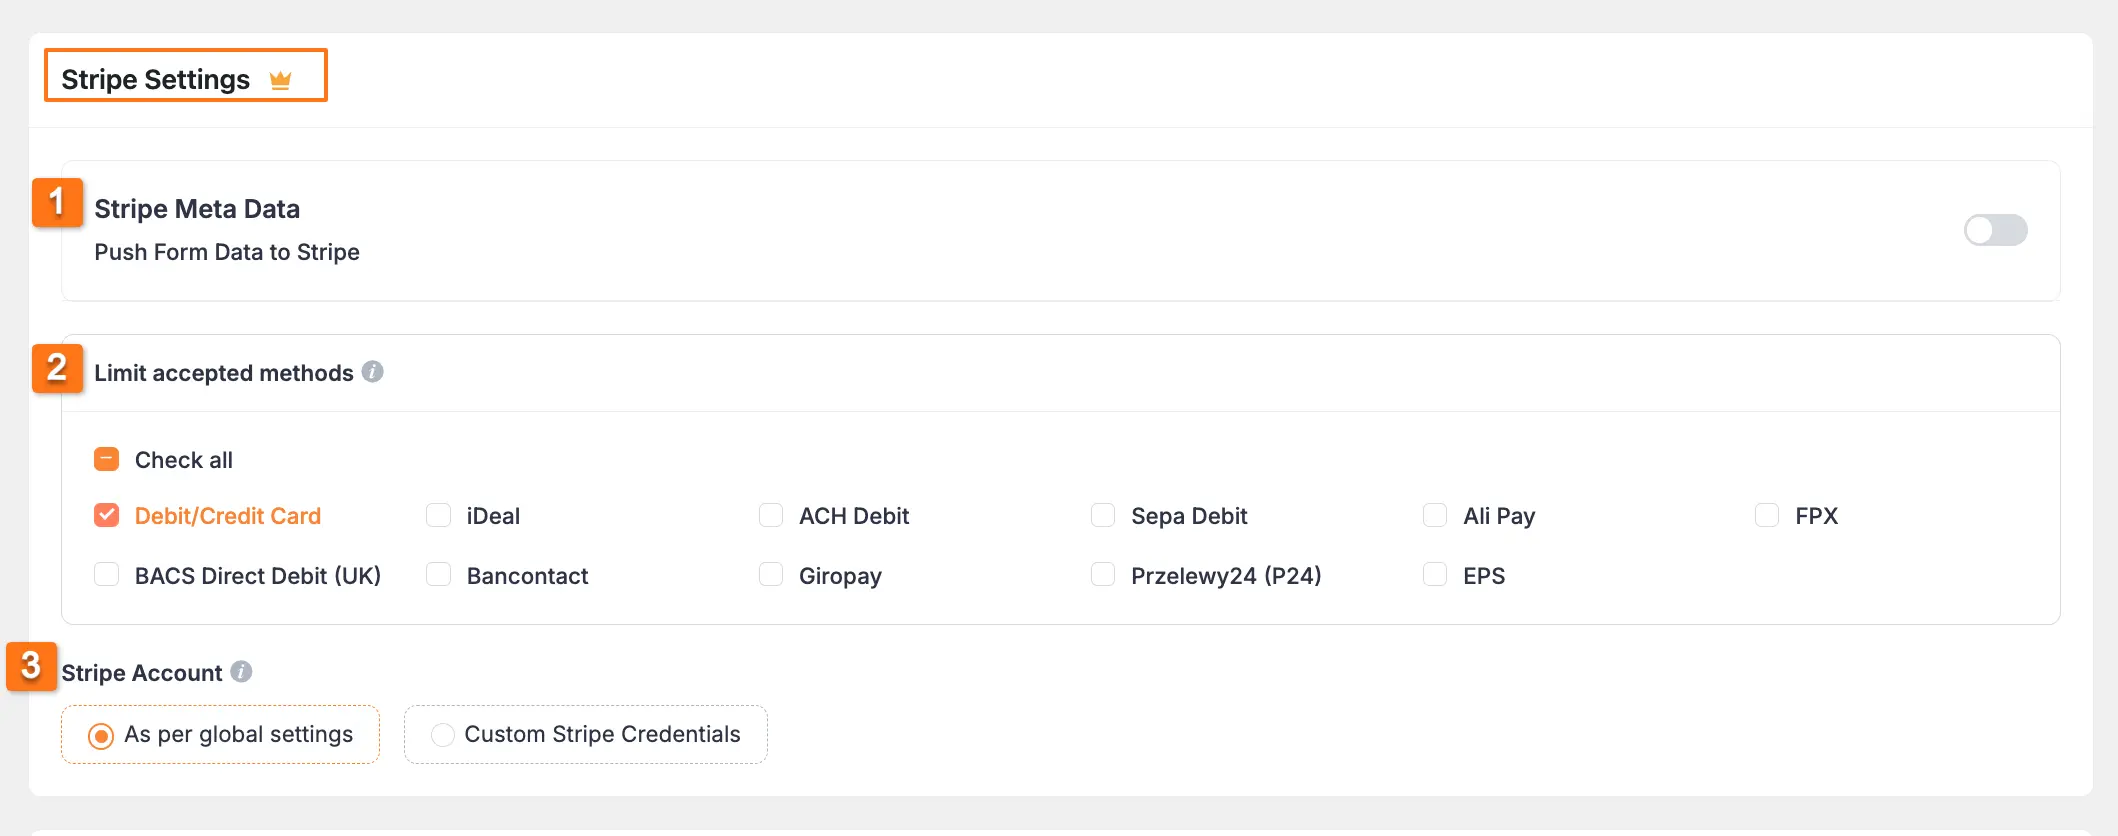
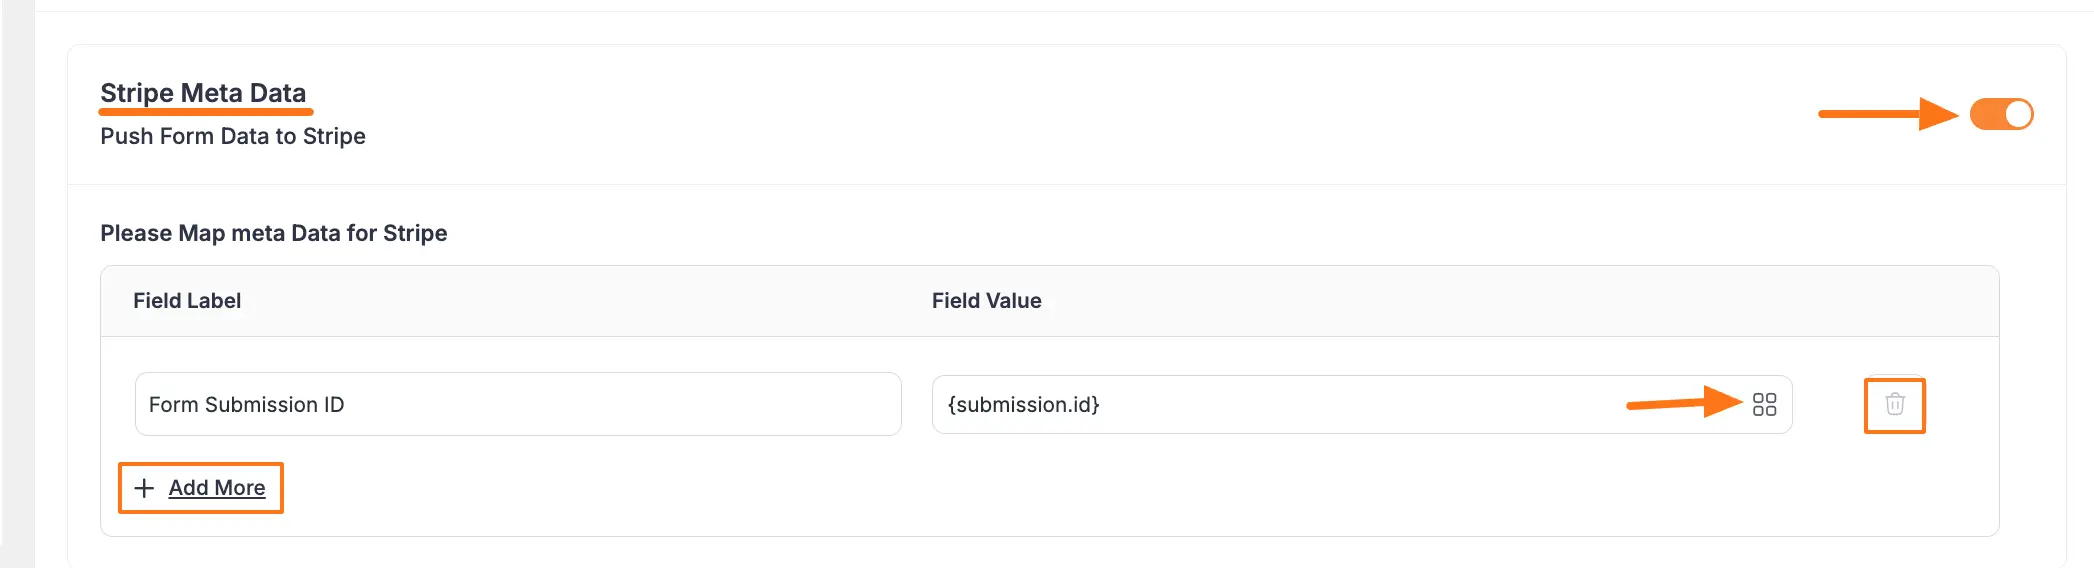
1. Stripe Meta Data #

Enable this option by clicking the Toggle button if you want to send the collected submission data to your Stripe Dashboard through the Paymattic Form.

You can use the Shortcode button to set the value for sending necessary submission data automatically. To send more data click the +Add More button and delete any of the fields click the Trash icon.

For example, here, I chose to send the Form Submission ID from Paymattic to Stripe Dashboard.

2. Limit accepted methods #

Here, you can choose the accepted payment methods for Stripe transactions to display on your checkout page by checking the boxes individually. 

Or, you can select all at once by clicking the Check all checkbox.
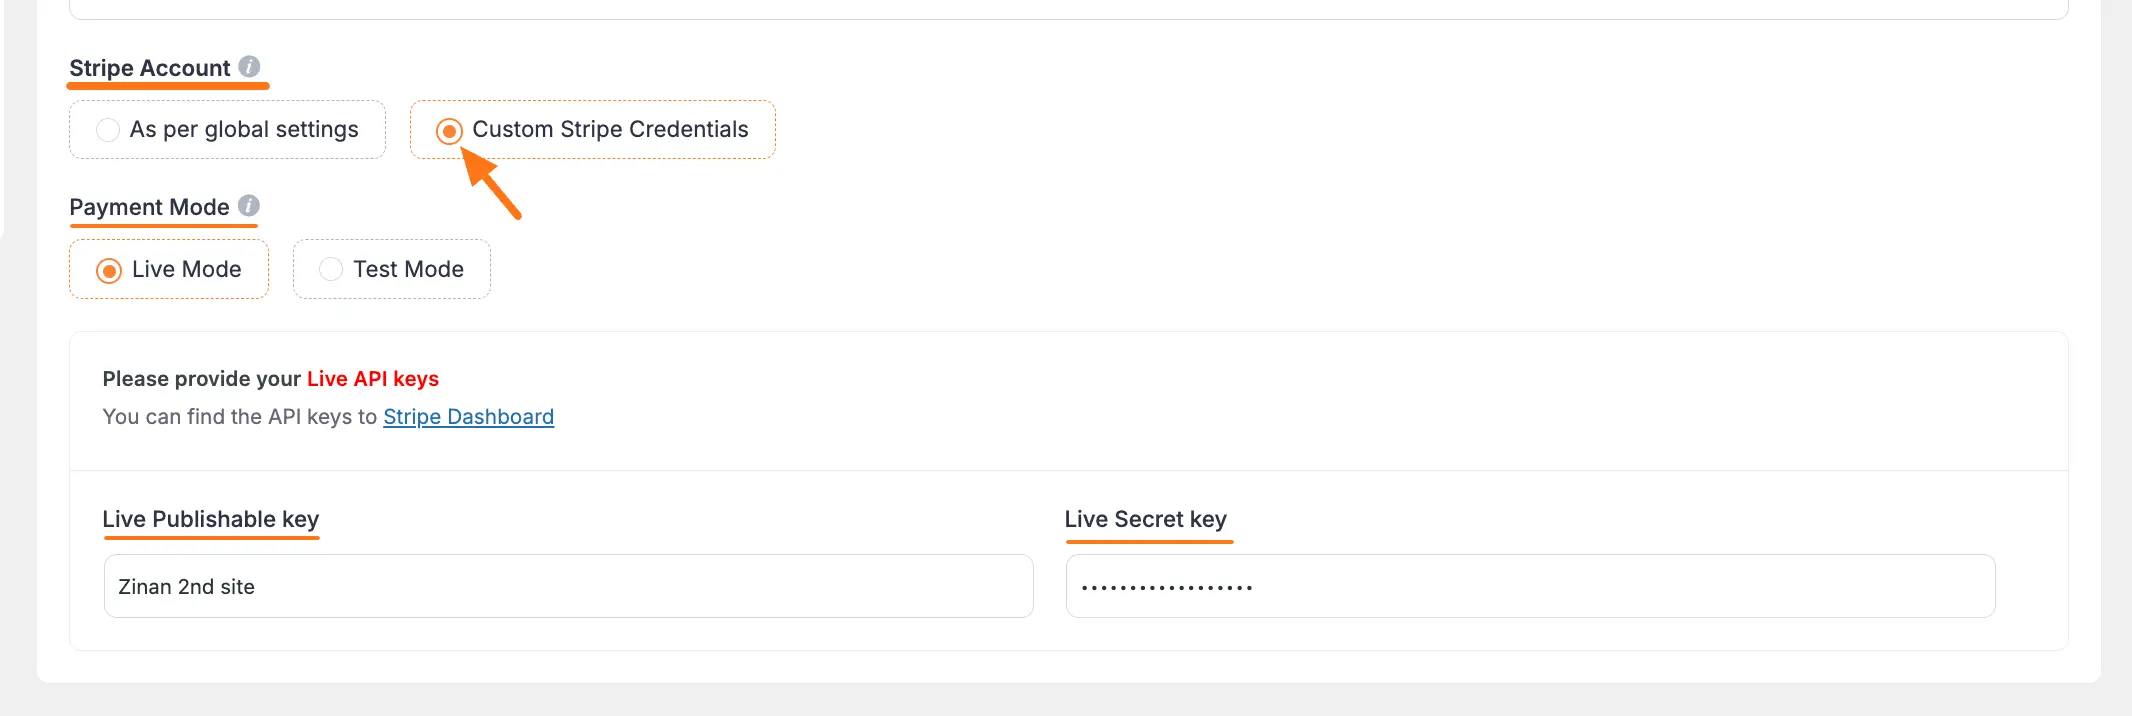
3. Stripe Account #

This will give you two options to set up your Stripe configuration for successful payment transactions. These are:

As per global settings: If you select this option, the configuration of Stripe that you have set up globally for all forms will also apply to this form. To learn the process of Stripe Configuration from Global Settings, read this Documentation. 

Custom Stripe Credentials: Select this option if you want to set up a different Stripe Account only for this form. To add the stripe account, first, choose a Payment Mode between Live (for real payments) and Test (for test payments) modes as needed. Then, provide the Publishable key and Secret key from your Stripe Account.

To learn how to get the Publishable key and Secret key from your Stripe Account, click here.

B. Form Specific PayPal Settings #

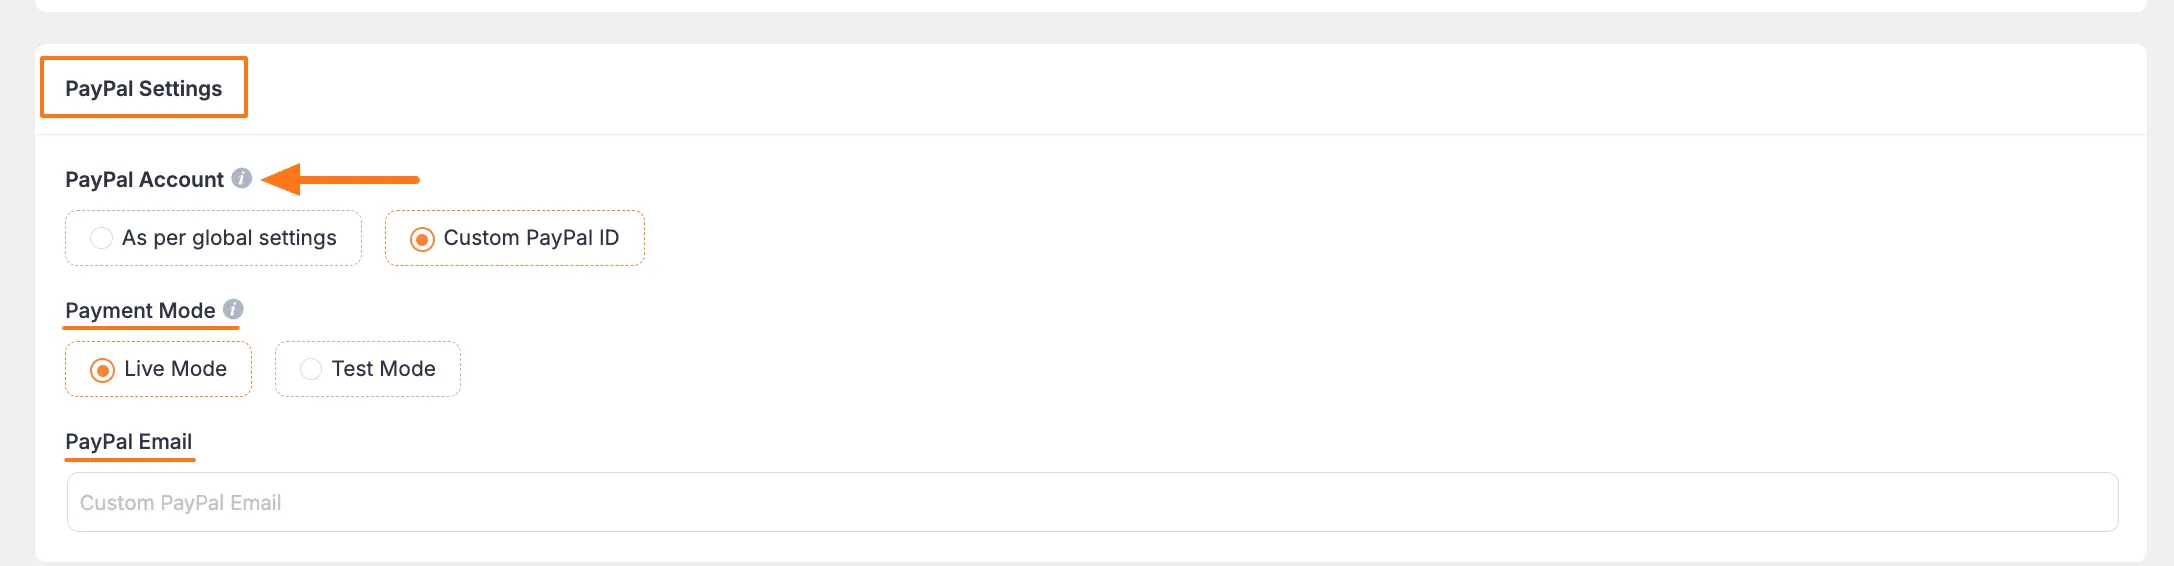
This will give you two options to set up your PayPal configuration for successful payment transactions. These are:

As per global settings: If you select this option, the configuration of PayPal that you have set up globally for all forms will also apply to this form. To learn the process of PayPal Configuration from Global Settings, read this Documentation. 

Custom PayPal ID: Select this option if you want to set up a different PayPal Account only for this form. To add the account, first, choose a Payment Mode between Live (for real payments) and Test (for test payments) modes as needed. Then, enter the email you signed up with on the PayPal Account into the PayPal Email field.

C. Transaction Type #

This settings option allows you to define the transaction type (Donations or Products/Services) to the payment method, ensuring a smooth payment process based on the purpose of collecting payments.

If you have any further questions, concerns, or suggestions, please do not hesitate to contact our @support team. Thank you.

What are your Feelings
Share This Article :
  • Facebook
  • X
  • LinkedIn
  • Pinterest
Still stuck? How can we help?

How can we help?

Updated on November 18, 2024
How to Create Custom CSS/JS in WordPress with Paymattic? 

Powered by BetterDocs

Table of Contents
  • Payment Settings in a Specific Form
    • A. Form Specific Stripe Settings 
      • 1. Stripe Meta Data
      • 2. Limit accepted methods
      • 3. Stripe Account
    • B. Form Specific PayPal Settings
    • C. Transaction Type
paymattic

Paymattic (formerly known as WPPayForm) is the perfect lightweight WordPress payments and donation plugin fit for your small business, online fundraiser, e-Learning or membership program.

Report a Security Issue

Payment Methods

  • Stripe
  • Paypal
  • Mollie
  • Razorpay
  • Billplz
  • Flutterwave
  • Viva Wallet
  • Paystack
  • Square
  • Payrexx
  • SSLCOMMERZ
  • Xendit
  • Moneris
  • Authorize.net

Get Help

  • Docs
  • API Docs
  • Blogs
  • Support
  • Brand Assets

Integrations

  • FluentCRM
  • Zapier
  • Mailchimp
  • Slack
  • Telegram
  • Twilio
  • Webhooks
  • LifterLMS
  • Tutor LMS
  • LearnDash
  • Google Sheets
  • ActiveCampaign
  • FluentCommunity

Subscribe to our email

Footer Newsletter
We will never spam you. We will only send you product updates and tips.

Copyright©2025 Paymattic

Affiliate Terms & Privacy

Facebook Twitter YouTube Linkedin WordPress

Let’s Begin Your Payments Journey
At Zero Cost!

Build smart form and start collecting money worldwide with the best WordPress payment and donation plugin!
Plugin Download Form
Scroll to top
  • Features
    • All Features
    • Paymattic for Small Business
    • Paymattic for Non Profit
    • Paymattic for e-Learning
    • Paymattic for Membership
  • Pricing
  • Integrations
  • Resources
    • Blogs
    • Demo
    • Documentation
    • Support
    • REST API Doc
    • Account Login