Skip to content
Get Paymattic Pro at Special Discount!
Save Up to 50%
paymattic logo
  • Pricing
  • FeaturesExpand
    • Features

      Explore all the features available in Paymattic.

      Payment Features

      Essential payment features to manage your transactions

      Donation Features

      Simplest donation features to run your fundraising campaigns

      See all features

      Get a glimpse of all the advanced features available in Paymattic

  • Use CasesExpand
    • Use Cases

      Paymattic offers versatile solutions for your versatile needs.

      Small Business

      Simplify payments, manage customers, and get revenue.

      Nonprofit

      Get donations, manage donors, and grow your funds.

      Membership

      Get paid memebers, manage them, and set specific roles.

      LMS

      Enroll students and sell courses with integrations.

  • Integrations
  • ResourcesExpand
    • Resources

      Everything you need to get the most out of Paymattic plugin.

      Free Plugin

      Explore all the powerful features available in Paymattic Free.

      Free VS Pro

      Compare the Paymattic Free plugin with Paymattic Pro.

      Blogs

      Get insights, tips, and guides to help your campaigns grow.

      Gateways

      Explore all the global payment gateways supported by Paymattic.

      • Documentation
      • Rest API Doc
      • Change Log
      • Contact Us
      • Get Support
      • Login
      • Report Security Issue
  • Demo
Grab Discount
Get Paymattic Pro at Special Discount!
Save Up to 50%
paymattic logo

How can we help you?

Popular Search subscriptionstriperecurringtheuser

Getting Started with Paymattic

  • Paymattic Introduction 
  • How to Install and Activate Paymattic in WordPress

Form Editor

  • Add Multiple Column Containers in Forms
  • Create a Form from Scratch with Paymattic
  • How to Create a Step Form with Paymattic
  • How to Create Your First Payment Form in a Minute and Accept Payments with Paymattic?
  • How to Create WordPress Donation Form with Simple Form Templates?
  • How to Edit, Duplicate, or Delete Paymattic Forms
  • How to Use Conditional Logic in Form Fields with Paymattic?
  • How to Create PDF Feed for Form Submissions?

General Input Fields

  • How to Use the General Fields
  • How to Use the Payment Method Fields
  • How to Use the Donation & Product Fields 

Donation and Product Fields

  • Dynamic Payment Item Field 
  • Add Payment Summary Field in Forms 
  • How to Add Currency Switcher in WordPress Form?
  • How to Add Payment Item Fields in WordPress with Paymattic?
  • How to Add Subscription Payment Item Fields in Paymattic?
  • How to Add Tabular Product Item Fields in WordPress with Paymattic?
  • Add Donation Progress Item in Paymattic
  • How to Add Item Quantity Field in WordPress with Paymattic? 
  • How to Add Custom Payment Amount Field in WordPress with Paymattic?
  • How to Add Tax Calculated Amount Field in WordPress with Paymattic?
  • How to Add Coupon Field in WordPress with Paymattic
  • Donation Leaderboard in Paymattic 

Payment Methods

  • Configure Authorize.net in WordPress through Paymattic
  • How to Add Flutterwave Payment Gateway in Paymattic?
  • How to Integrate Xendit Payment Gateway in WordPress with Paymattic?
  • How to Integrate Square with Paymattic in WordPress?
  • How to Configure Billplz in WordPress with Paymattic?
  • How to Configure Stripe Payment Gateway in WordPress with Paymattic?
  • How to Configure PayPal in WordPress with Paymattic?
  • How to Set PayPal IPN in WordPress with Paymattic?
  • How to Integrate Mollie in WordPress with Paymattic?
  • How to Integrate Razorpay with Paymattic in WordPress
  • How to Integrate Paystack in WordPress with Paymattic?
  • How to Integrate Payrexx in WordPress with Paymattic
  • How to Integrate SSLCOMMERZ with Paymattic in WordPress?
  • How to Collect Offline Payment in WordPress with Paymattic
  • How to integrate Moneris Payment Gateway in Paymattic
  • How to Integrate Viva Wallet With Paymattic?

Global Settings

  • How to Add User Dashboard Module in Paymattic?
  • How to Configure Cloudflare Turnstile Security with Paymattic?
  • How to Configure reCAPTCHA in WordPress with Paymattic
  • How to Change Currency Settings in WordPress with Paymattic
  • How to Manage User Roles in WordPress with Paymattic?

Integrations

  • How to Integrate FluentCommunity in WordPress with Paymattic 
  • How to Integrate Google Sheets in WordPress with Paymattic?
  • How to Integrate Fluent Support with Paymattic in WordPress?
  • How to Integrate Webhook in WordPress with Paymattic?
  • How to Integrate Zapier with Paymattic in WordPress?
  • How to Integrate Slack in WordPress with Paymattic?
  • How to Integrate Telegram with Paymattic in WordPress?
  • How to Integrate Twilio with Paymattic in WordPress?
  • How to Integrate ActiveCampaign in WordPress with Paymattic?
  • How to Integrate Mailchimp in WordPress with Paymattic?
  • How to Integrate FluentCRM in WordPress with Paymattic
  • How to Create a User Registration Form with Paymattic in WordPress?

Learning Management System (LMS) Integrations

  • How to Integrate LifterLMS in WordPress with Paymattic?
  • How to Integrate LearnDash in WordPress with Paymattic?
  • How to Integrate Tutor LMS in WordPress with Paymattic?

Form Settings

  • Customize Form-Specific Payment Settings
  • How to Create Custom CSS/JS in WordPress with Paymattic? 
  • How to Set Form Scheduling and Restriction Settings in WordPress?
  • How to Customize Form Design Settings in WordPress with Paymattic?
  • How to Configure Confirmation Settings in WordPress?

Email Notification Settings

  • How to Setup Email Notifications in Paymattic WordPress Plugin?
  • How to Enable Email Notification For Subscription Cancel

Manage Form Entries

  • Manually Cancel Any Subscription
  • How to Manage Subscriptions in WordPress with Paymattic
  • How to Disable IP Address Logging in WordPress with Paymattic?
  • How to View Single Submission Data and Manage Payments in Paymattic
  • How to View and Manage All Form Entries in WordPress with Paymattic
  • How to Enable Stripe Payment Hold in Paymattic 
  • How to Refund Payments in Paymattic

Reports & Analytics

  • How to View the Reports and Payment Analytics in WordPress?

FAQ

  • Add First & Last Name Fields Separately
  • Date Formats Customization
  • How to Fix Not Sending Email Confirmations Issue in WordPress?

Customer Profile

  • How to View Customer Profile in WordPress with Paymattic?

Import - Export

  • How to Import-Export Forms with Paymattic
  • How to Export Form Entry/Entries with Paymattic  

Change Log

  • Change Log
View Categories
  • Home
  • Docs
  • Integrations
  • How to Integrate FluentCRM in WordPress with Paymattic

How to Integrate FluentCRM in WordPress with Paymattic

Paymattic allows you to connect with FluentCRM a WordPress-based self-hosted email marketing automation plugin that helps you to add new prospects to your FluentCRM contact list when a form is submitted. This article will guide you through integrating FluentCRM with Paymattic on your WordPress Site.

Enable FluentCRM Integration #

To learn how to enable FluentCRM integration, follow the steps with screenshots below – 

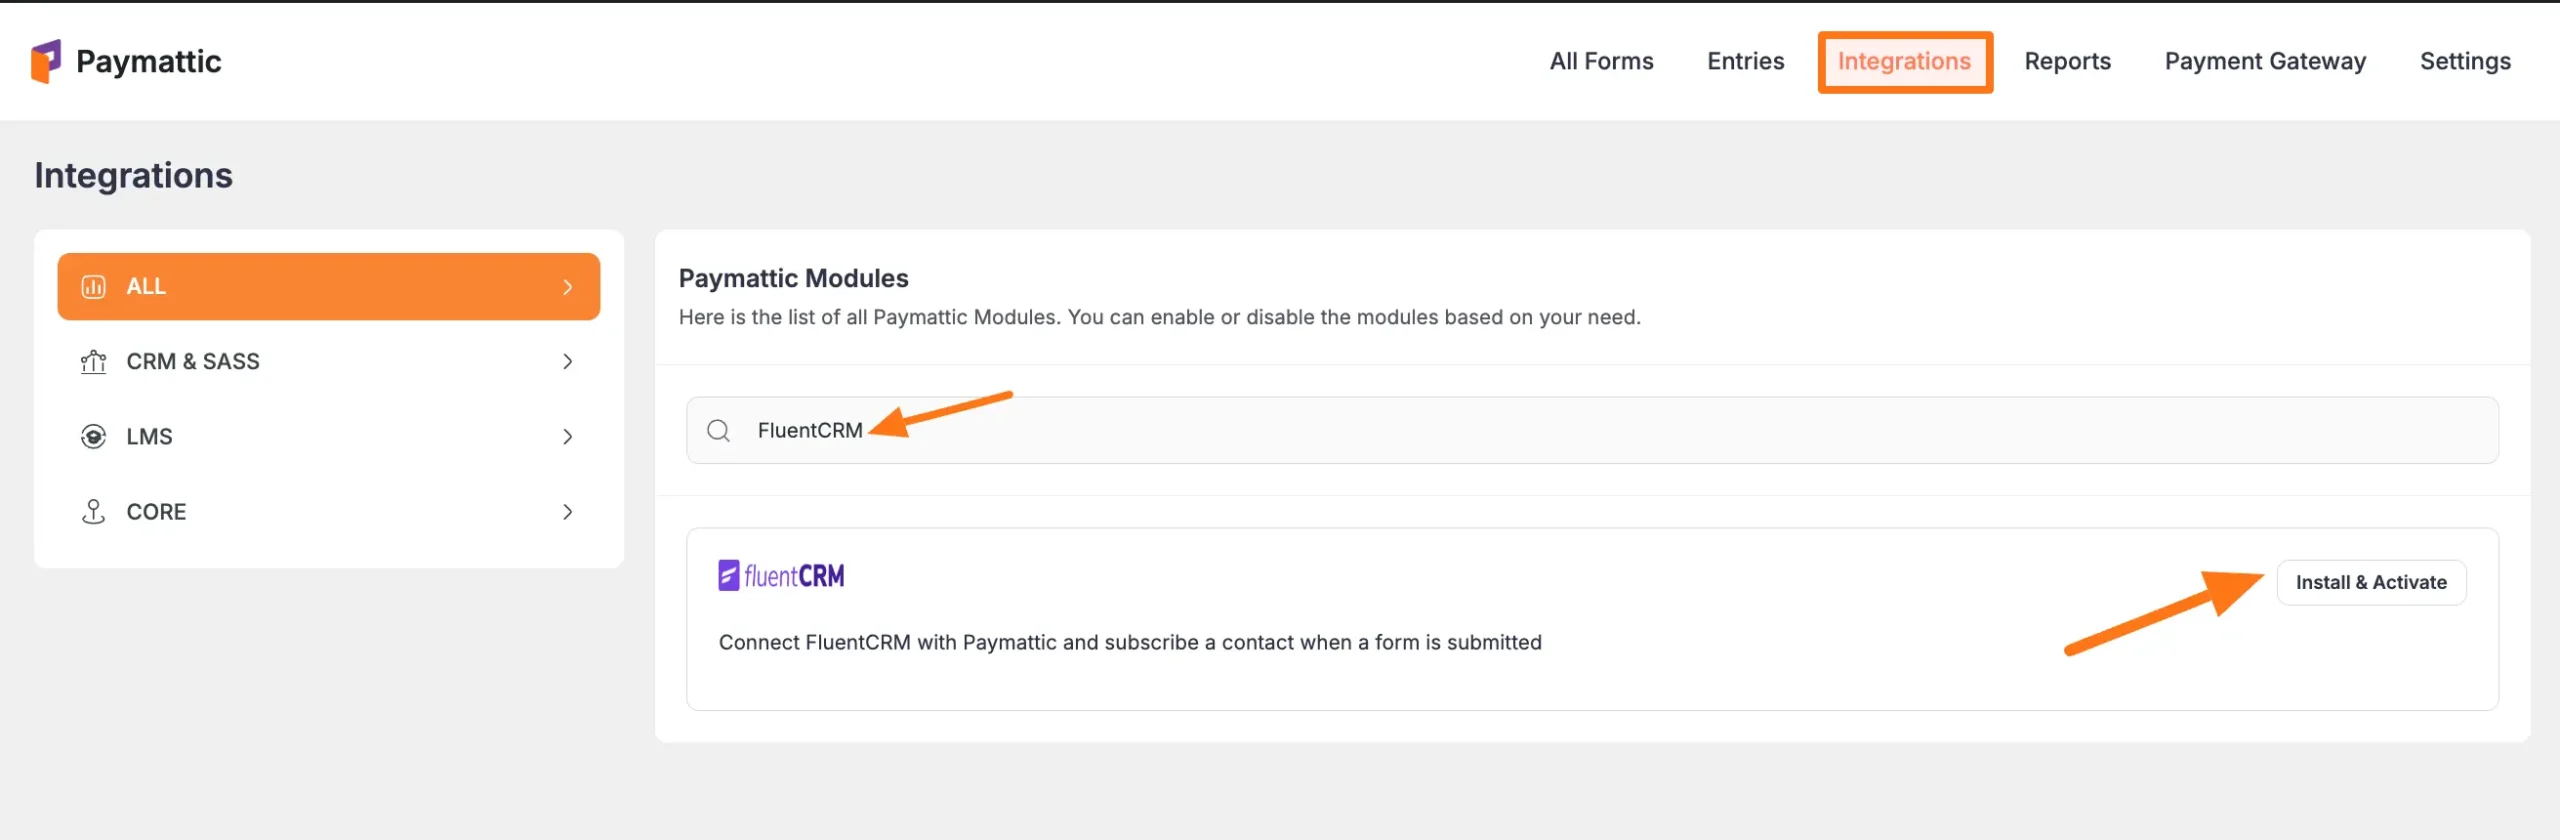
First, go to Integrations from the Paymattic Navbar, search for FluentCRM through the search bar, and you will get the FluentCRM integration module.

Before starting the process, ensure you Installed and Activated the FluentCRM Plugin in your WordPress Site. 

To learn how to install & activate FluentCRM Free/PRO Version read this Documentation.

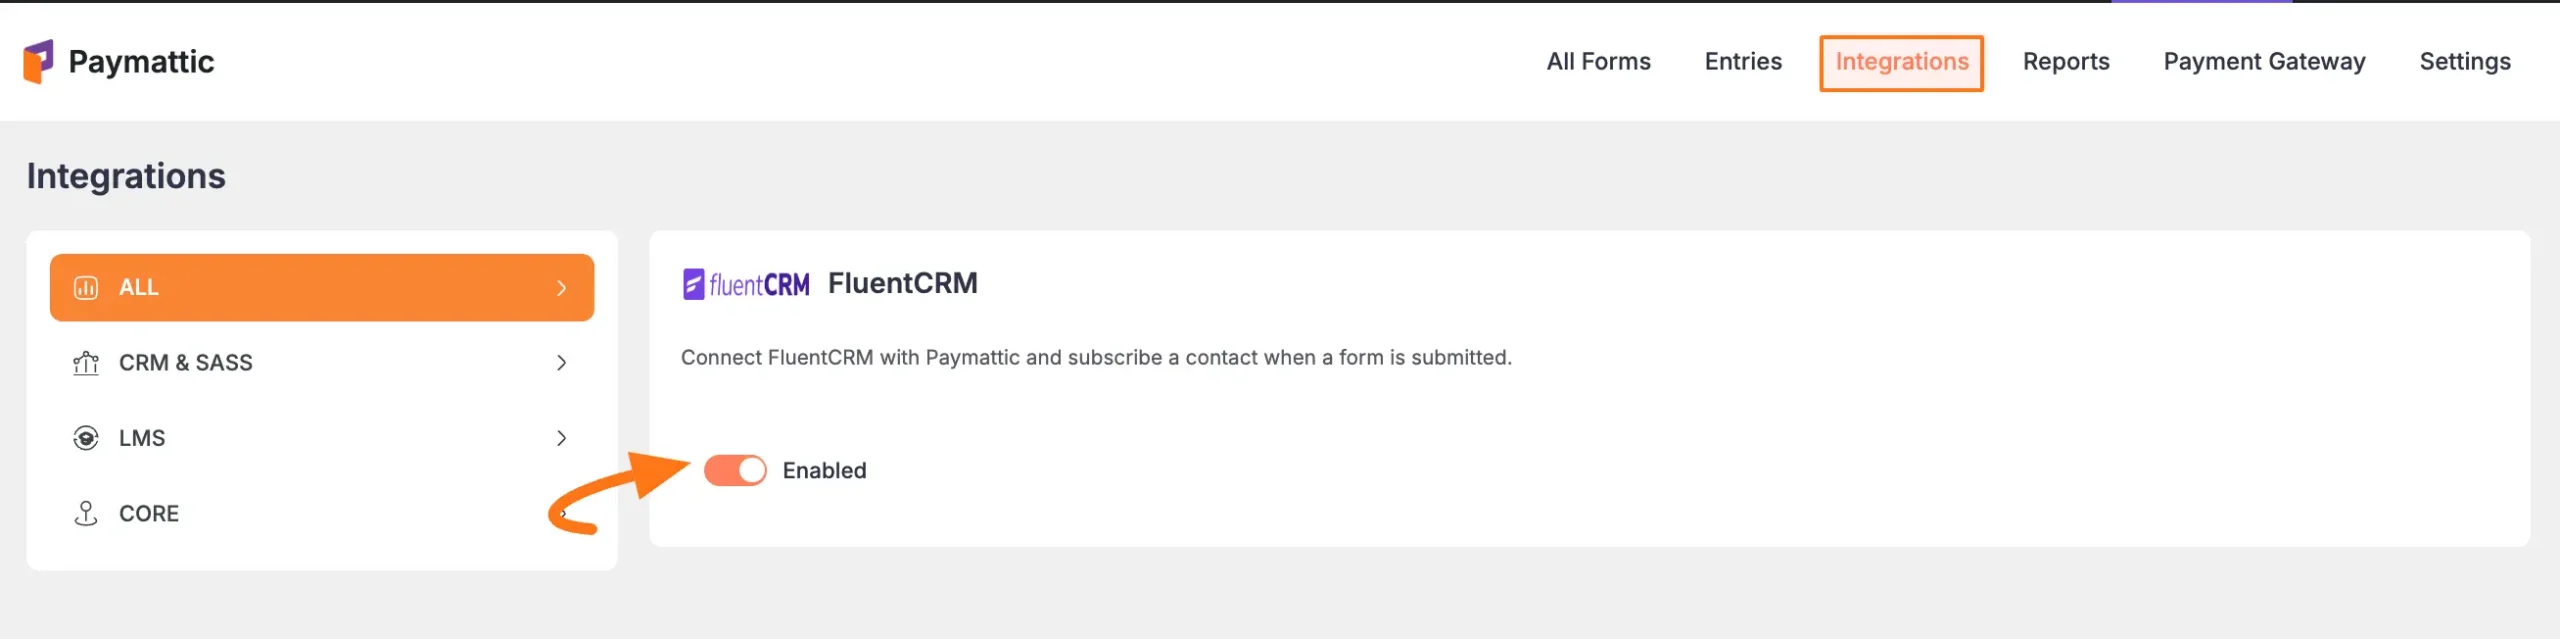
Once you successfully install & activate the FluentCRM plugin in your WordPress Site, you will get the FluentCRMt’s Settings Icon on the right side, click on it.

Click the Toggle button and your FluentCRM integration module will be enabled.

Integrate FluentCRM into Paymattic Forms #

To learn how to integrate FluentCRM into any specific Form in Paymattic, follow the steps with the screenshots below –

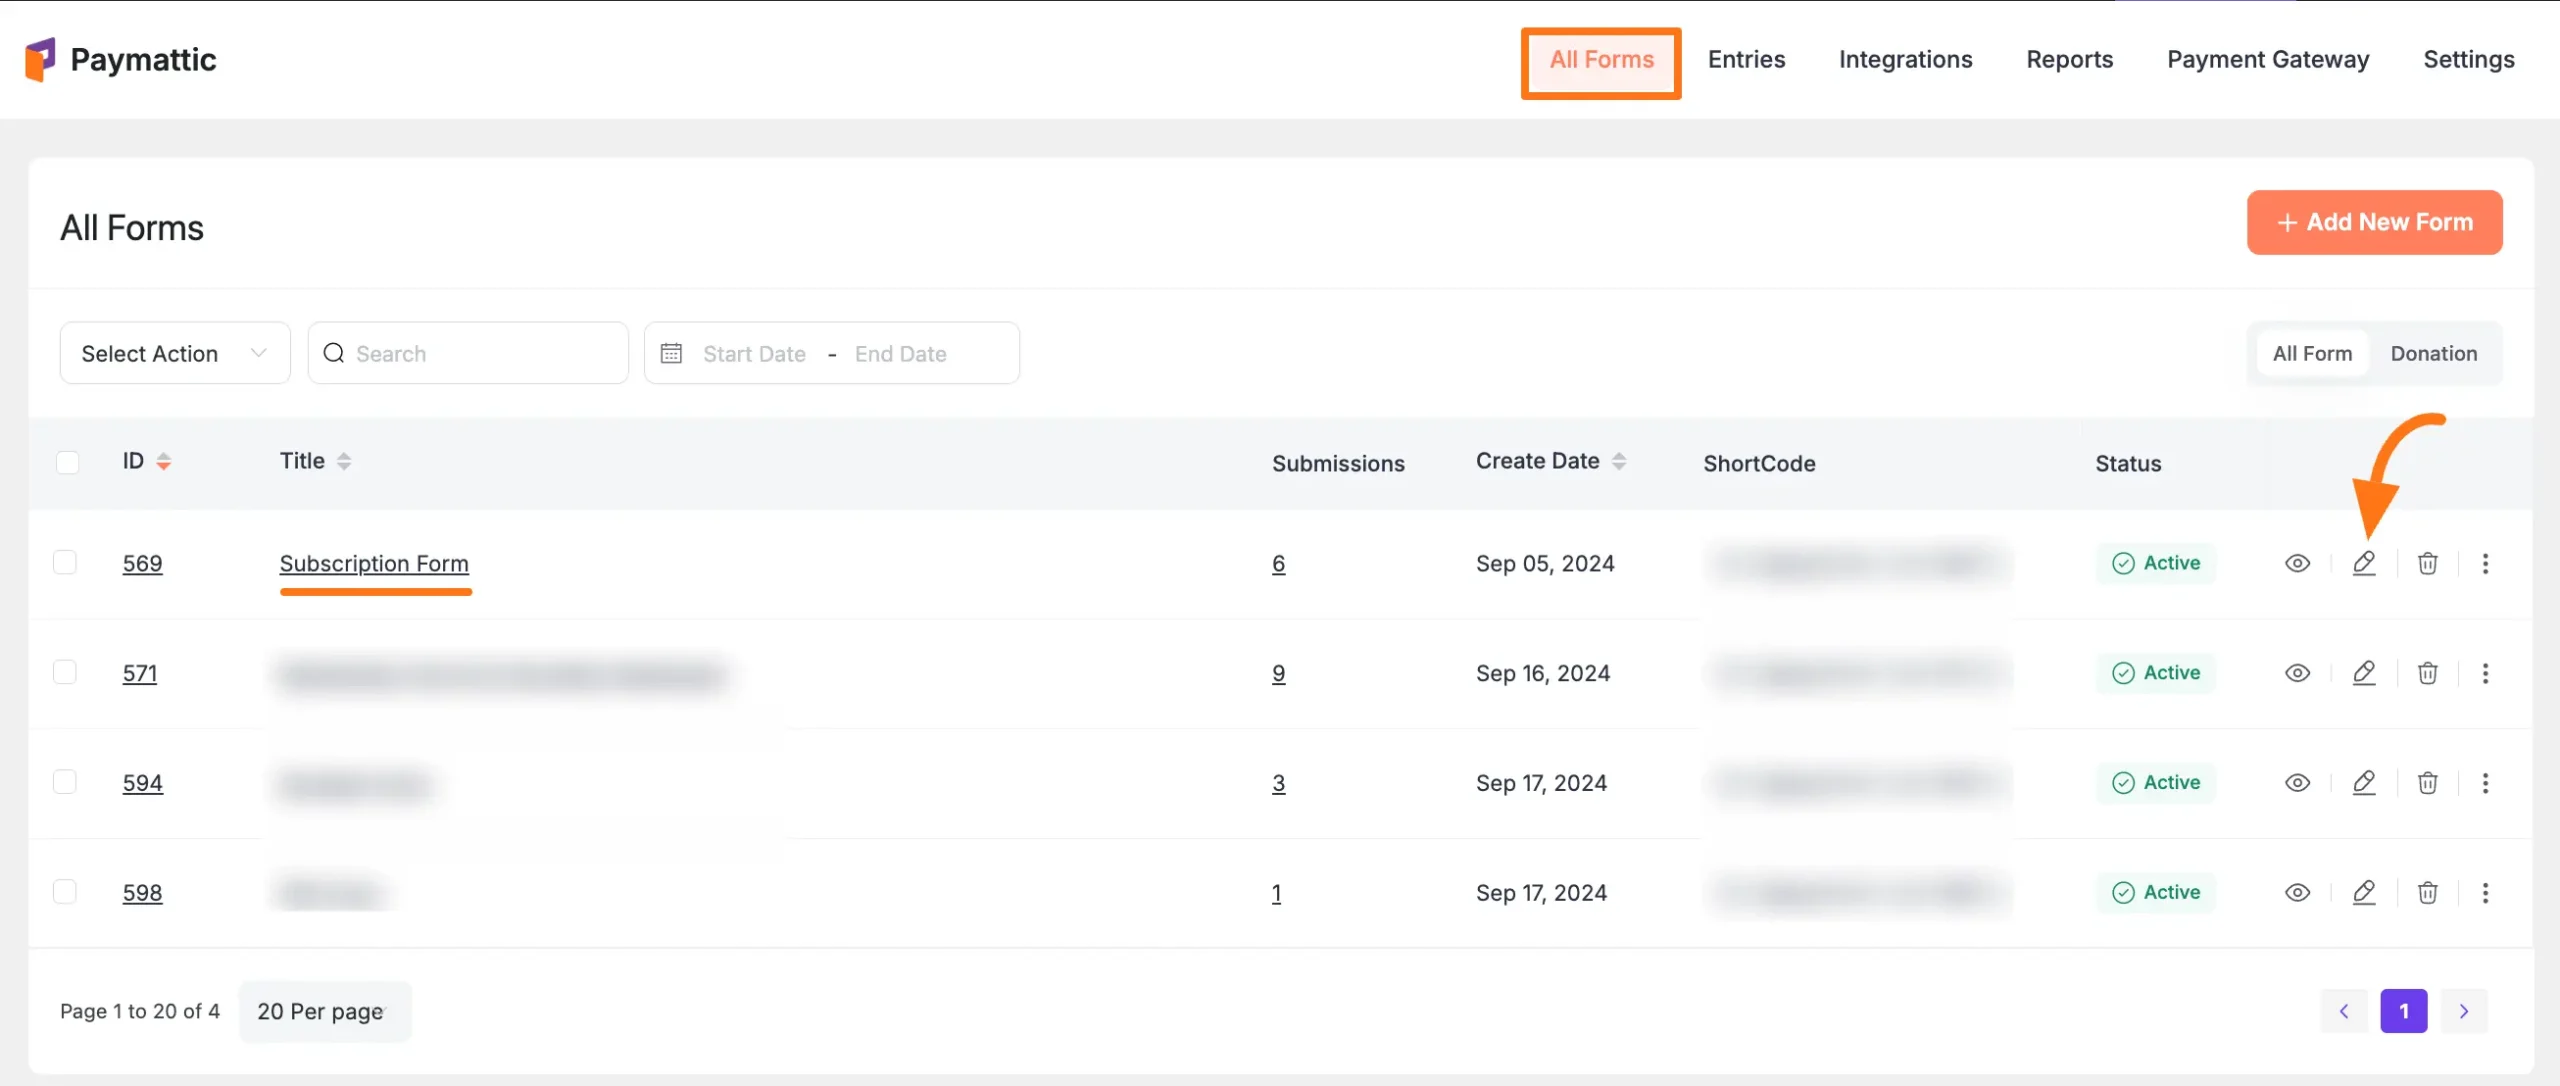
First, go to All Forms from the Paymattic Navbar, select the Desired Form where you want to integrate FluentCRM and click the Pencil/Editor Icon.

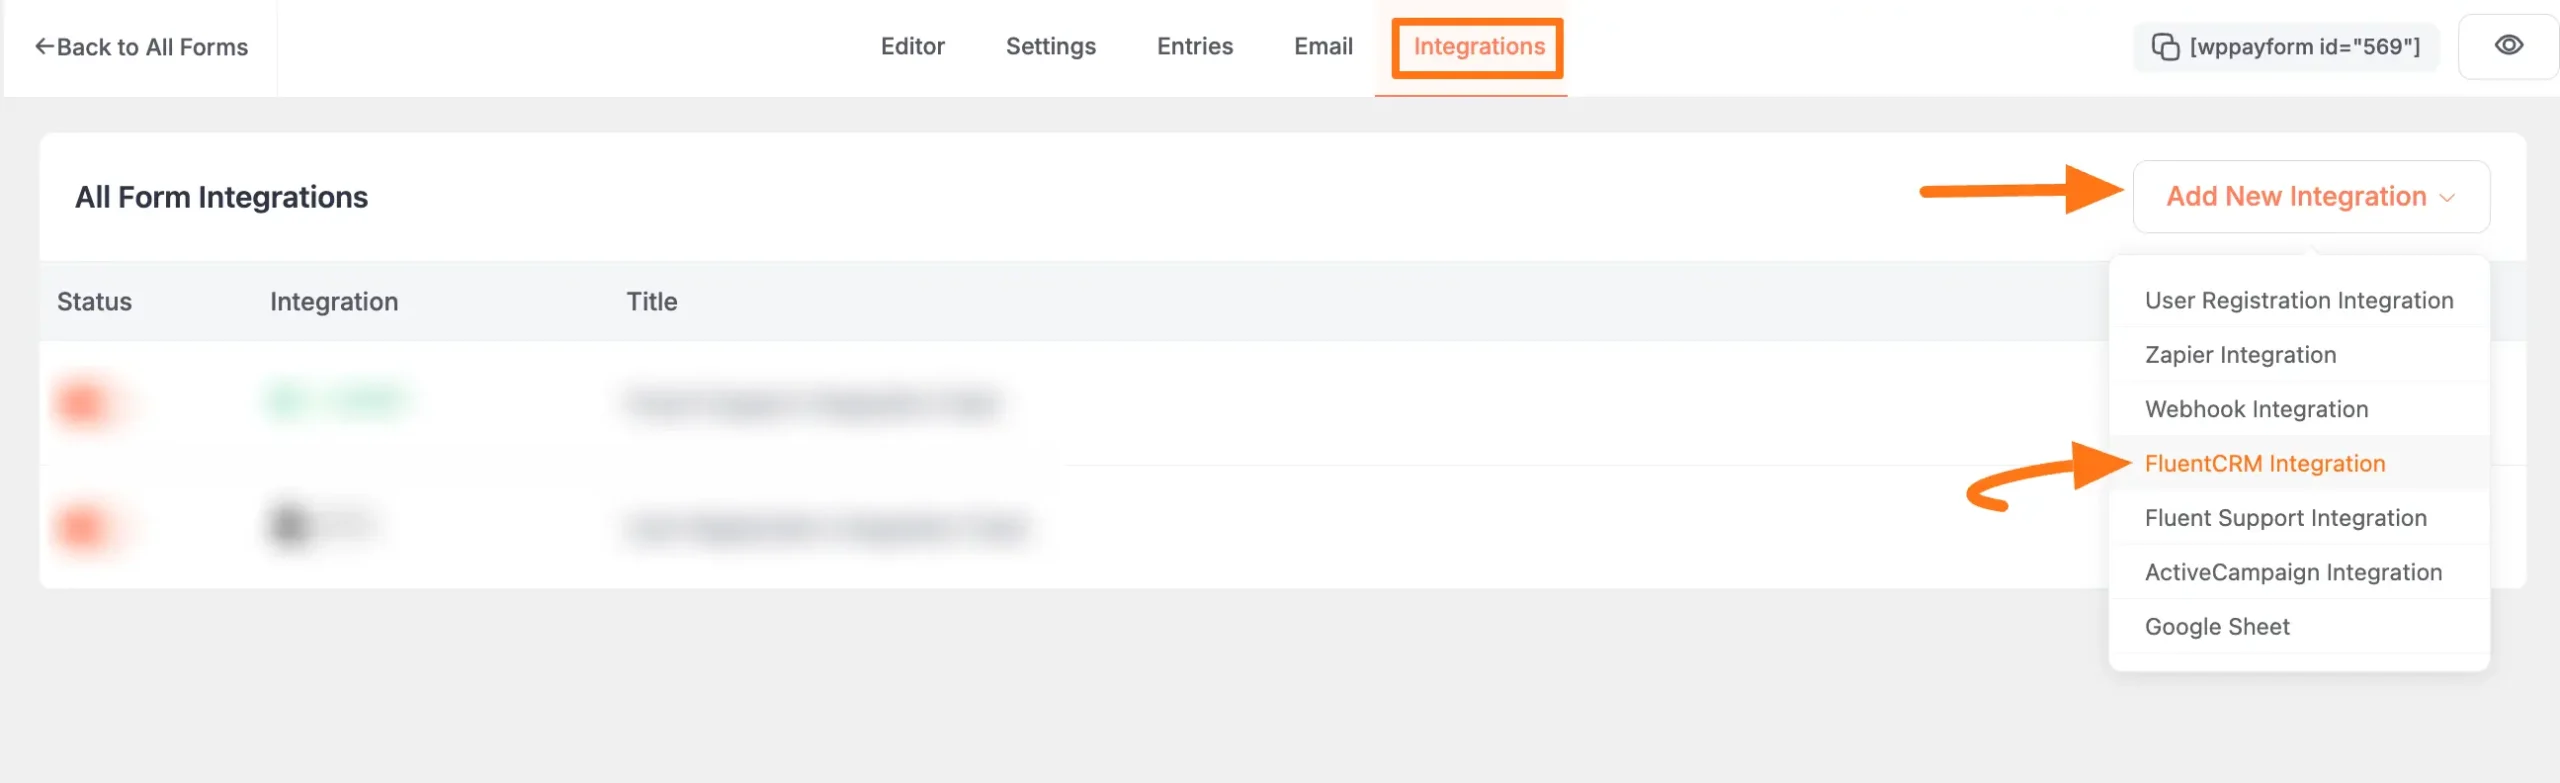
Once the Editor page opens, go to the Integrations tab, click the Add New Integration button & select FluentCRM Integration feed from the dropdown list. 

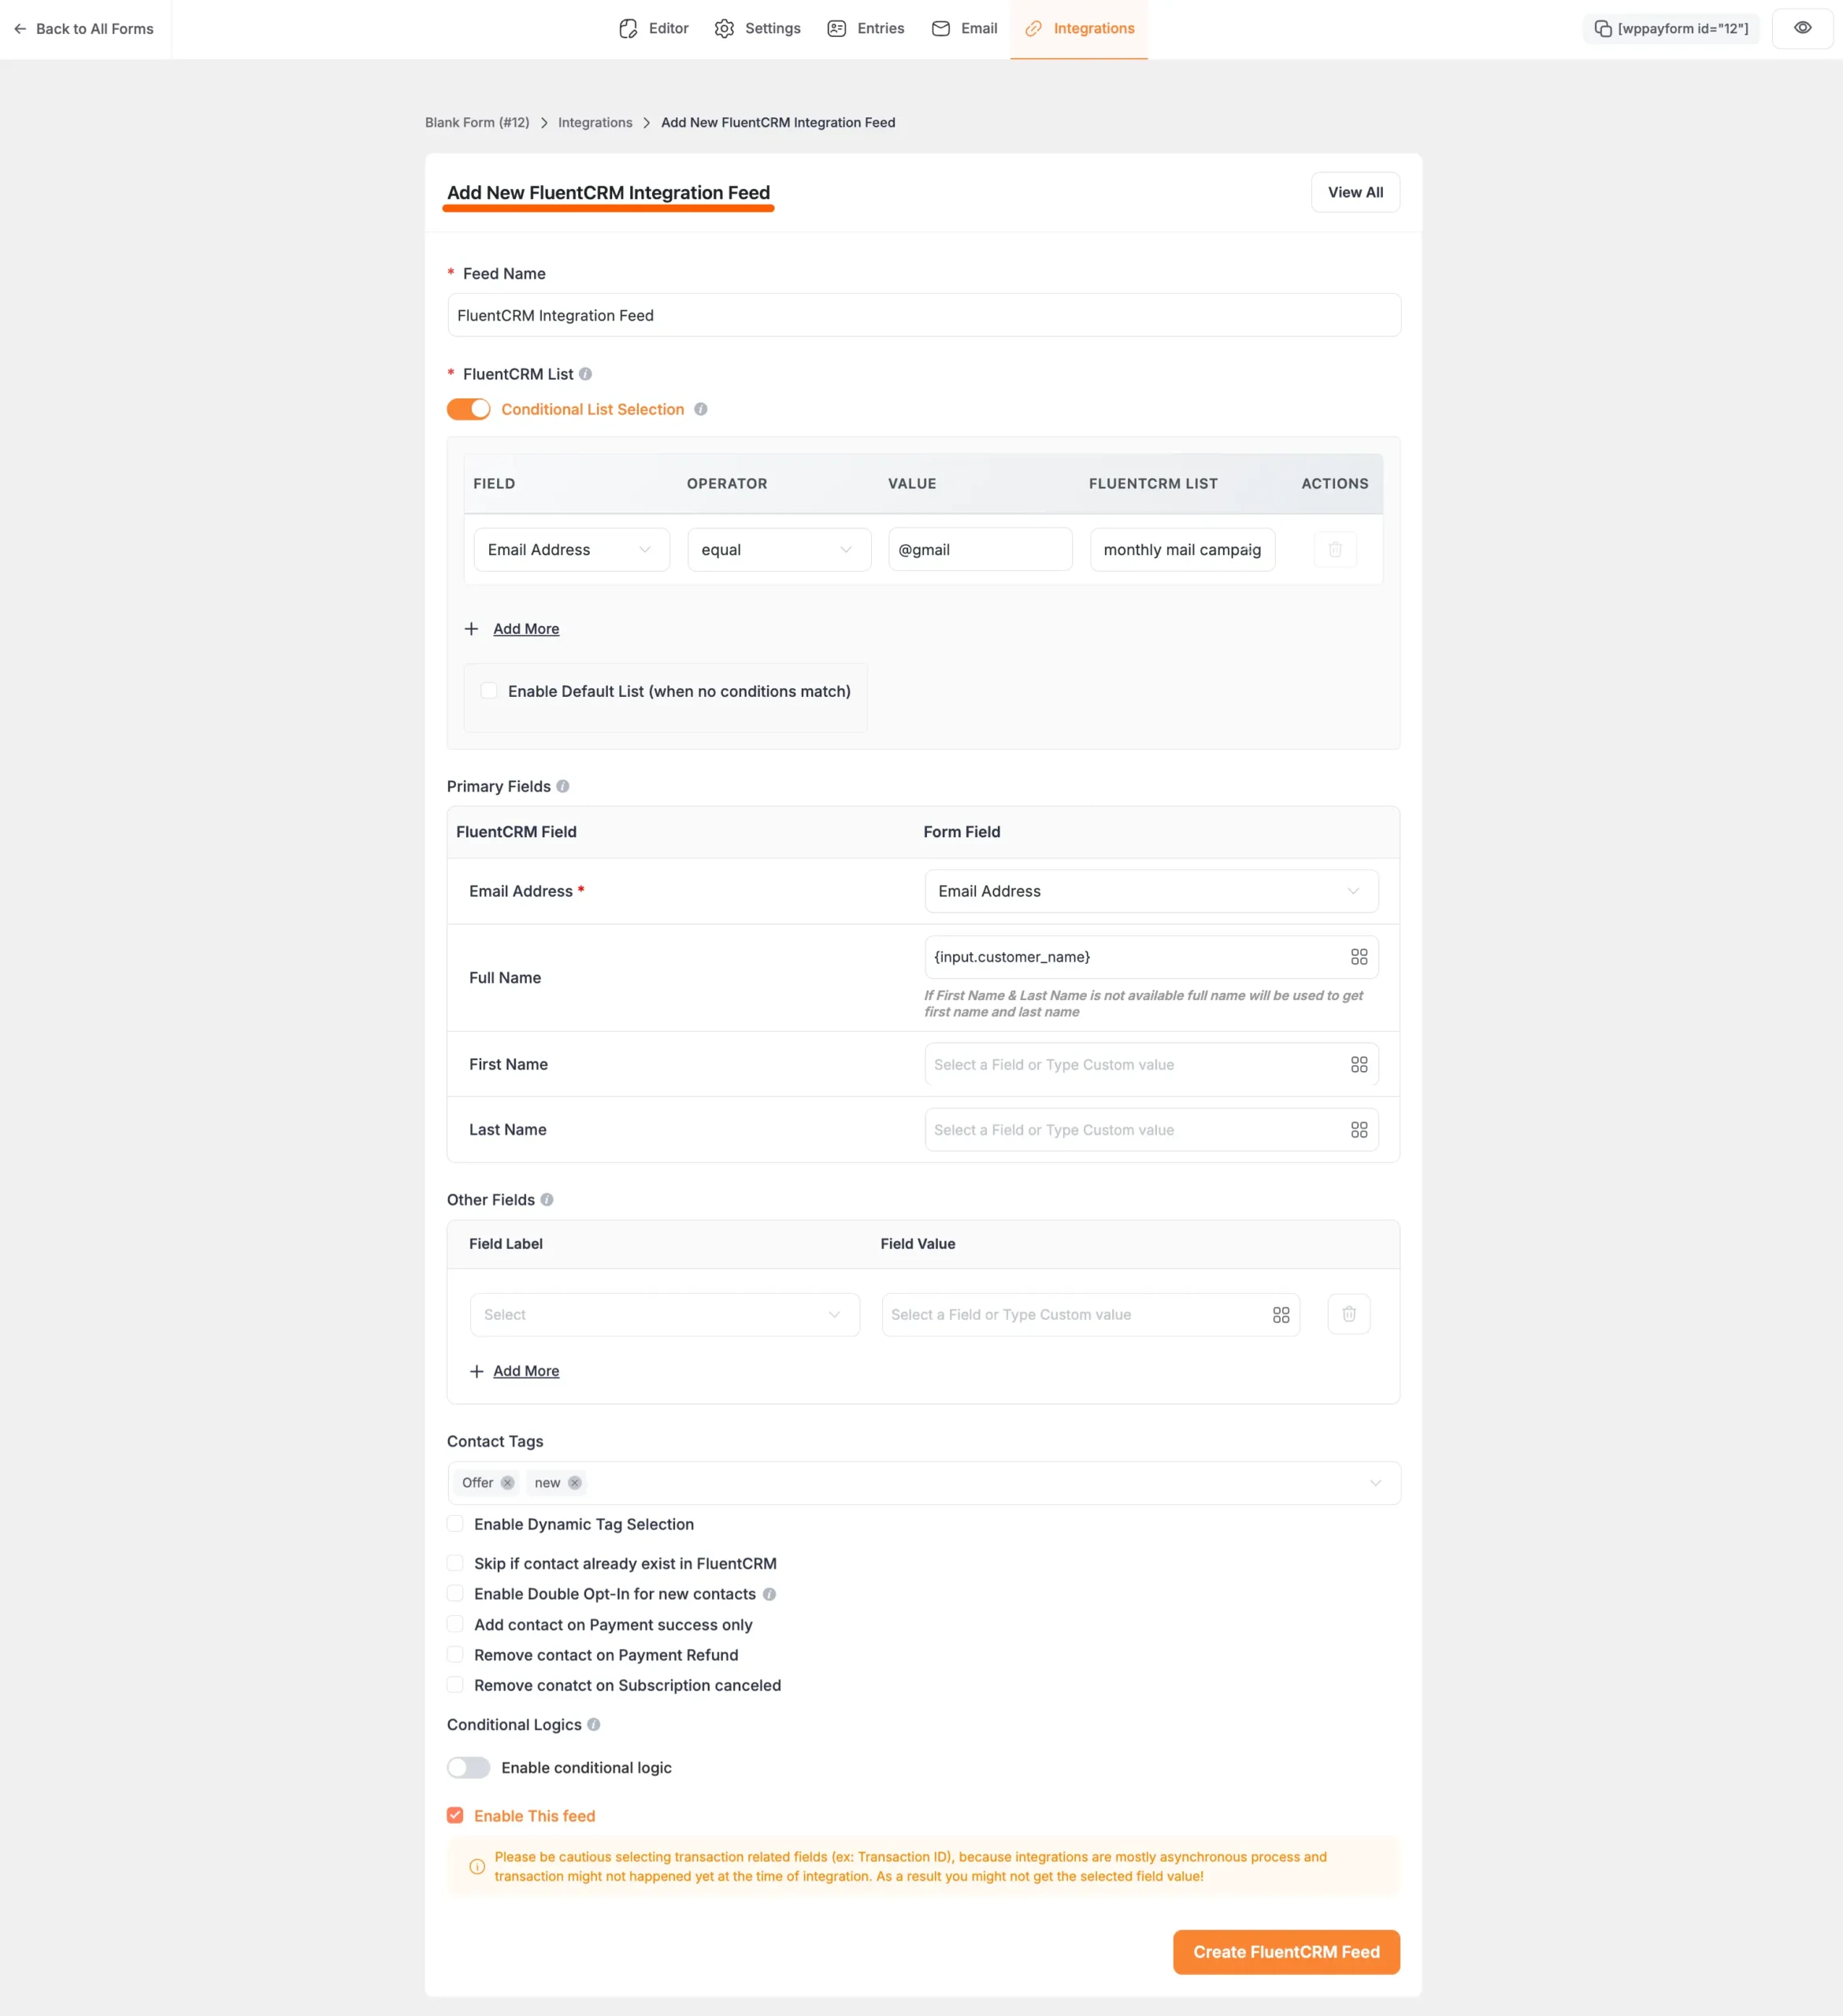
Now, a pop-up page will appear with various settings options for configuring FluentCRM. 

All the settings options mentioned in the screenshot below are briefly explained:

  • Feed Name: Here, you can set a name according to your preference for your feed. This field is required to be filled in.
  • FluentCRM List: This is a required field where you select the FluentCRM list to add new contacts to. By default, you can select a single list from the dropdown menu. All users who submit the form will be added to this list. Alternatively, you can enable the Conditional List Selection toggle to add contacts to different lists based on their specific form inputs. To configure the conditions:
    • Click the Add More button to create a new rule.
    • Set the conditions for the rule based on the following:
      • FIELD: In this dropdown, select the form field that the condition will be based on..
      • OPERATOR: Choose a comparison operator (e.g., equal, not_equal, greater_than).
      • VALUE: Enter the value to check against the user’s input.
      • FLUENTCRM LIST: Select the list to which the contact will be added if the condition is met.
    • You can also check the Enable Default List (when no conditions match) box to select a fallback list for contacts who do not meet any of your defined conditions.
  • Primary Fields: Use all the fields under this option to properly link your FluentCRM Fields with the Form Fields. Also, you can easily select the Value for the Form Fields according to the FluentCRM Fields by using the Shortcode button. 
  • Other Fields: Use this option if you need to add your FluentCRM fields beside the primary fields. Here also, you can select the Value according to the FluentCRM Fields by using the Shortcode button.

    Add as many Other Fields as you need by clicking the +Add More button.
    Also, Delete any Field by clicking the Trash Icon if needed.
  • Contact Tags: With this option, you can add tags to your FluentCRM contacts.
  • Enable Dynamic Tag Selection: Check this box to dynamically assign FluentCRM tags based on the user’s choices in the form.
  • Skip if contact already exist in FluentCRM: If enabled, the integration will not process a new entry if the submitted email address is already in your FluentCRM database.
  • Enable Double Opt-In for new contacts: When checked, new subscribers will be sent a confirmation email that they must click to be officially added to your list.
  • Add contact on Payment success only: This ensures that the contact is only added to FluentCRM after their payment has been successfully completed, not just on form submission.
  • Remove contact on Payment Refund: If you enable this, the contact will be automatically removed from FluentCRM if their corresponding payment is refunded.
  • Remove contact on Subscription canceled: When enabled, the contact will be automatically removed from FluentCRM if their subscription, initiated through this form, is canceled.
  • Conditional Logics: This option allows FluentCRM integration to function conditionally based on your submission values according to your set conditional logic/s. Also, here,  you can add as much conditional logic as you need by clicking the + Add More button and delete any logic by clicking the Trash Icon if needed. To learn more, read this Documentation. 
  • Enable This Feed: Check this option, to ensure this integration feed remains enabled, and all the actions of this feed function properly.

Once the setup is done, finally, click the Create FluentCRM Feed button.
And, your FluentCRM will be integrated into this specific form.

fluentcrm feed paymattic

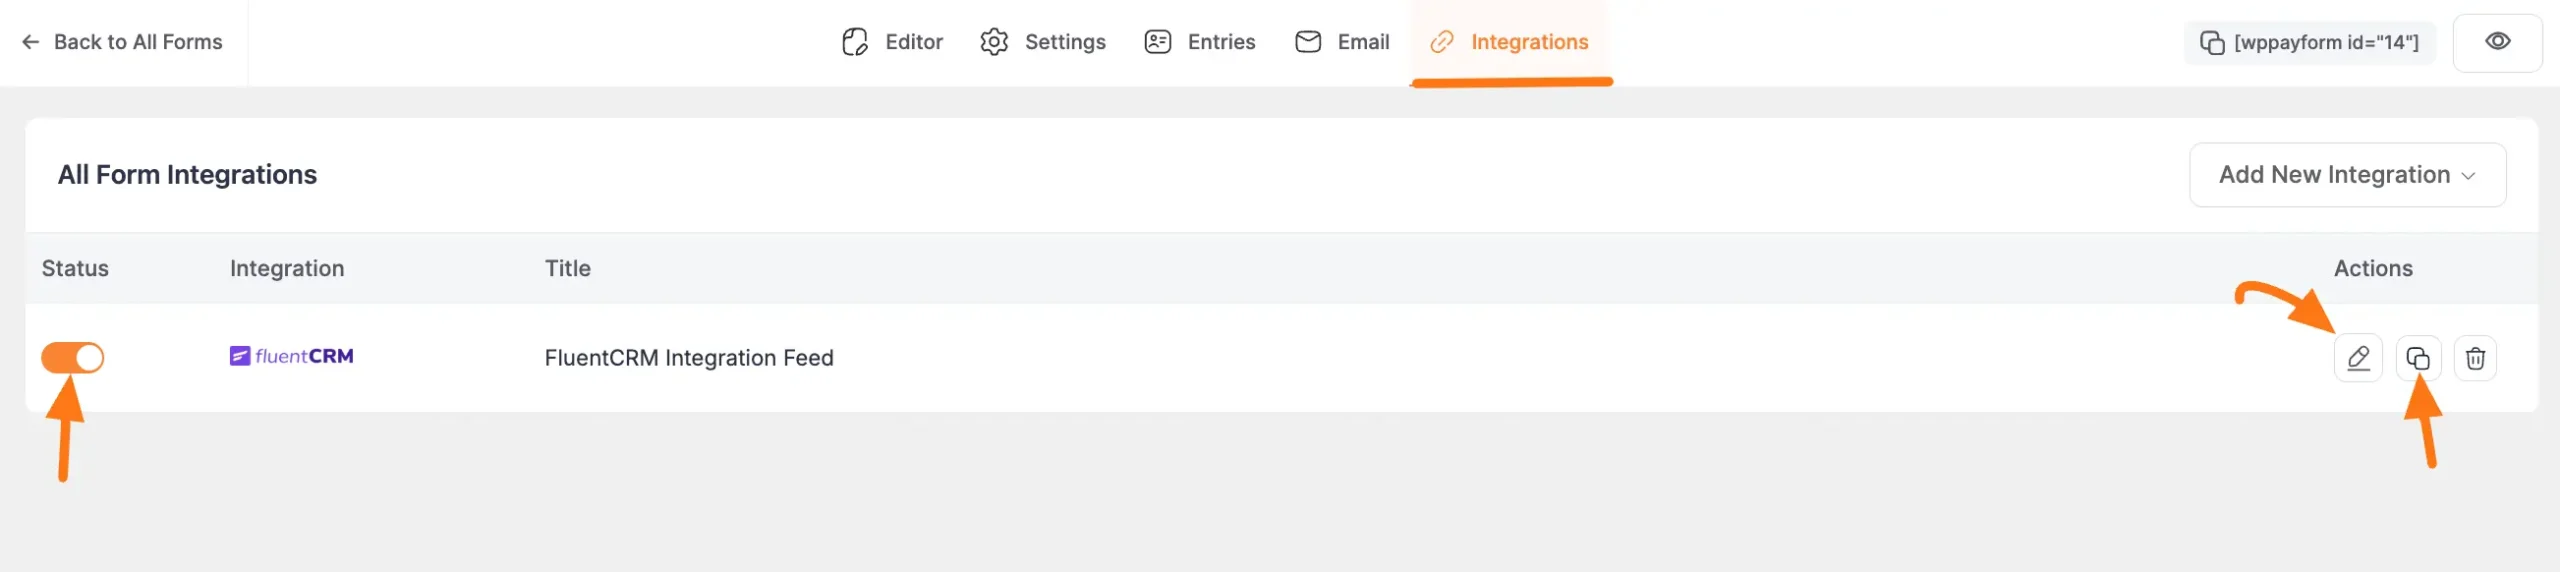
After successful Integration, now you will see that your FluentCRM Integration Feed has been added here.

You can edit your feed anytime by clicking the Pencil icon or delete it using the Trash icon. If you want to duplicate an existing integration feed, click the Duplicate icon. This allows you to recreate similar feeds with just one click.
Additionally, you can enable or disable the feed anytime using the Toggle button as needed.

1

Preview of Integrated FluentCRM #

Here, you can see the preview of the added contacts of FluentCRM through the Form entries that I set up during the integration.

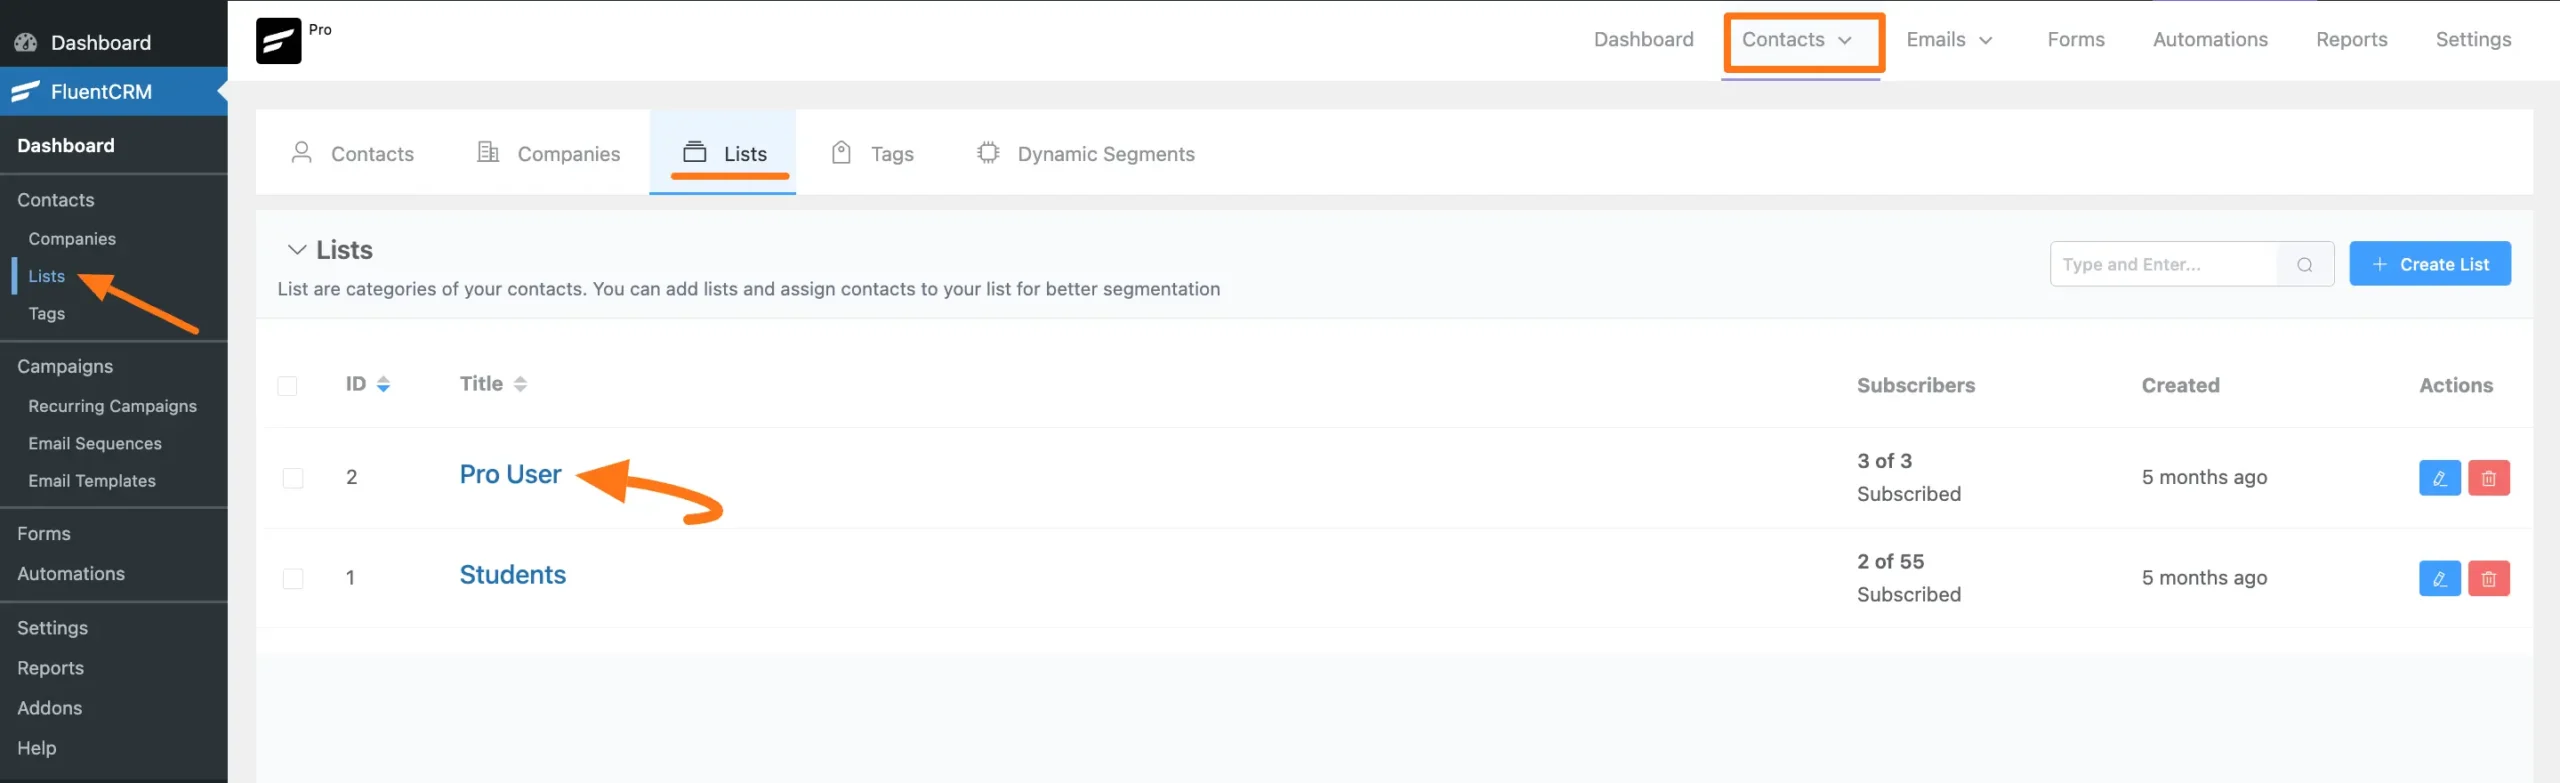
First, go to the Contacts section from the left sidebar, open the List tab, and click on the Desired List you integrated into Paymattic.

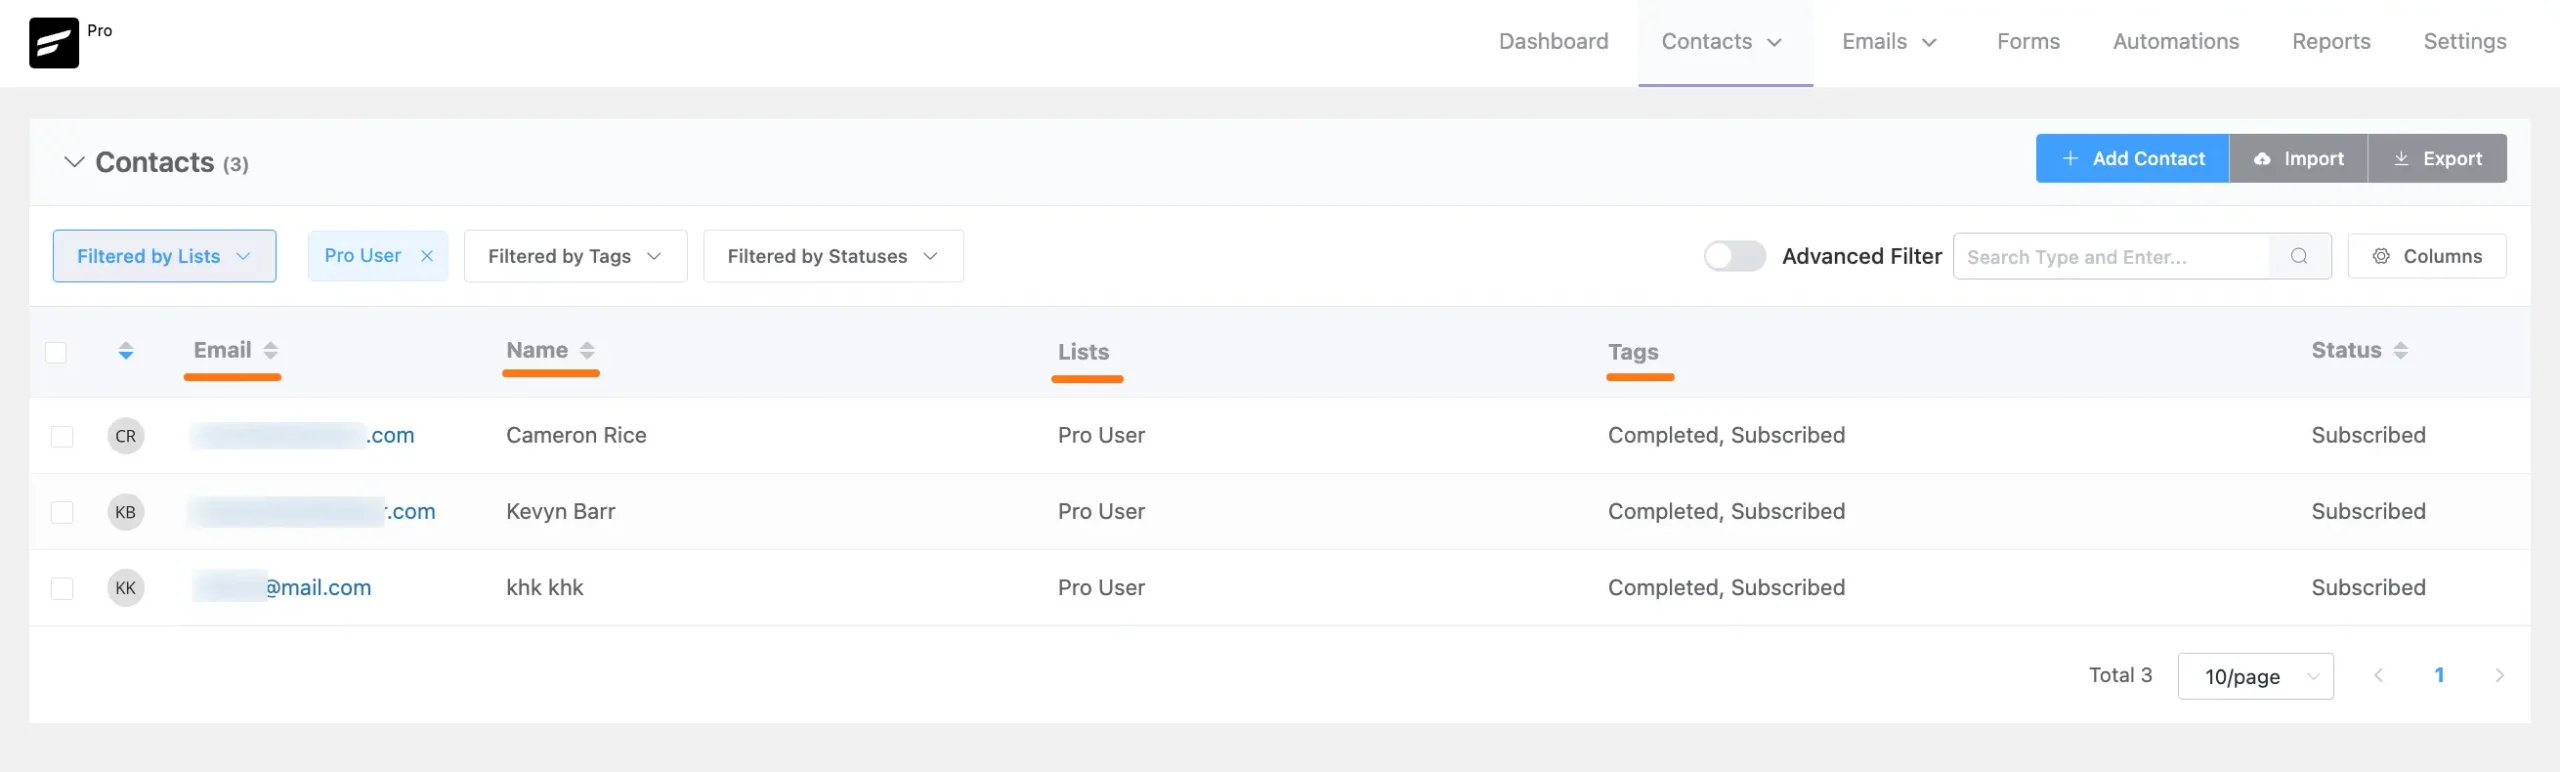
And, you can see that Contacts are added automatically to the chosen FluentCRM Contact List through the Paymattic Form submission. 

This way you can easily integrate FluentCRM with Paymattic!
If you have any further questions, concerns, or suggestions, please do not hesitate to contact our @support team. Thank you.

What are your Feelings

Share This Article :

  • Facebook
  • X
  • LinkedIn
  • Pinterest
Still stuck? How can we help?

How can we help?

Updated on October 21, 2025
How to Create a User Registration Form with Paymattic in WordPress?How to Integrate Mailchimp in WordPress with Paymattic?

Powered by BetterDocs

Table of Contents
  • Enable FluentCRM Integration
  • Integrate FluentCRM into Paymattic Forms
  • Preview of Integrated FluentCRM
Paymattic - WordPress Payment and donation plugin.

Simplest WordPress Payment and Donation Management

Get Paymattic Pro to unlock all the advanced features

Get Paymattic
paymattic monotone light logos

Paymattic is a lightweight yet super powerful WordPress plugin designed for handling global payments, donations, subscriptions, and customers. Zero code needed.

Subscribe to Newsletter

Footer Newsletter
We won't spam you. Unsubscribe at any time.
Explore
  • Pricing
  • Features
  • Integrations
  • Paymattic Free
GET HELP
  • Blog
  • Support
  • Documentation
  • API Documentation
  • Account Login
  • Report Security Issue
Resources
  • Demo
  • Free vs Pro
  • Payment Gateways
  • Brand Guideline
  • Affiliate
Company
  • Sister Brands
  • About Us
  • Terms & Conditions
  • Privacy Policy
  • Contact Us

Follow us on:

Copyright ©2026 Paymattic. A Brand of WPManageNinja™

Start Your Paymattic Journey
at Zero Cost 🚀

Just download, install, and start collecting money from all around the globe with Paymattic.

Plugin Download Form
ChatGPT Icon Google AI Mode Perplexity AI Icon Grok AI Icon Claude AI Icon
  • Pricing
  • Features
    • Features

      Explore all the features available in Paymattic.

      Payment Features

      Essential payment features to manage your transactions

      Donation Features

      Simplest donation features to run your fundraising campaigns

      See all features

      Get a glimpse of all the advanced features available in Paymattic

  • Use Cases
    • Use Cases

      Paymattic offers versatile solutions for your versatile needs.

      Small Business

      Simplify payments, manage customers, and get revenue.

      Nonprofit

      Get donations, manage donors, and grow your funds.

      Membership

      Get paid memebers, manage them, and set specific roles.

      LMS

      Enroll students and sell courses with integrations.

  • Integrations
  • Resources
    • Resources

      Everything you need to get the most out of Paymattic plugin.

      Free Plugin

      Explore all the powerful features available in Paymattic Free.

      Free VS Pro

      Compare the Paymattic Free plugin with Paymattic Pro.

      Blogs

      Get insights, tips, and guides to help your campaigns grow.

      Gateways

      Explore all the global payment gateways supported by Paymattic.

      • Documentation
      • Rest API Doc
      • Change Log
      • Contact Us
      • Get Support
      • Login
      • Report Security Issue
  • Demo